LMS - Gradebook
Getting Started in the Gradebook
What will I see in the main landing page of Gradebook (GB)?
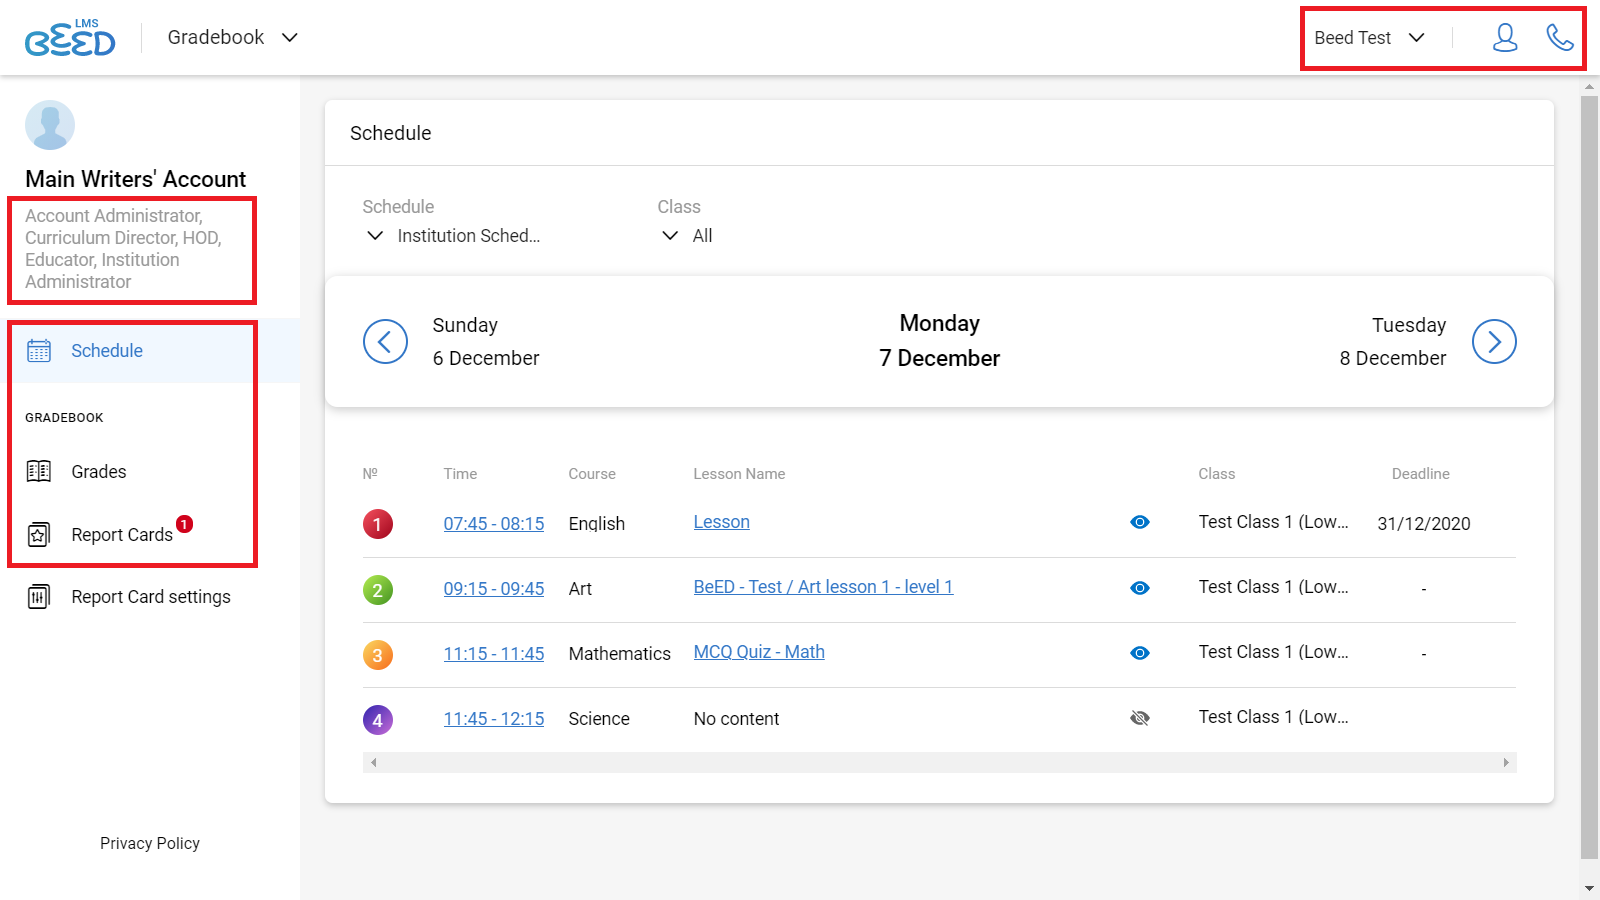
GB is divided into three main sections, which you can see on the sidebar:
|
Schedule |
Allows you to view Schedule and provide feedback to Learners. |
|
Grades |
Allows you to view and grade Learners. |
|
Report Cards |
Allows you to view and generate Report Cards. |
In the top right of the page, you will see:
- Name of your Institution
- A portrait icon - viewing your profile and the logout function
- A telephone icon - getting contact information of BeED
In the top left of the page, you will see your assigned roles. These roles determine what functions you have access in the Gradebook.
What can different Educator’s roles do with Gradebook?
|
ROLES |
RESPONSIBILITIES |
|
Director |
|
|
Curriculum Director |
|
|
Head of Department |
|
|
Educator |
|
|
Homeroom educator |
|
What can Learners do with Gradebook?
Through Gradebook, Learners can:
- Access and view the daily Schedule for their classes
- Access his/her own grades in Report Cards
- View and respond to feedback for their work.
Schedule Function In Gradebook
How do I view a Schedule?
Note: To utilise this function, a Timetable needs to be set up first in the Admin Panel, where Educators slot in their Courses, Lessons and Learners.
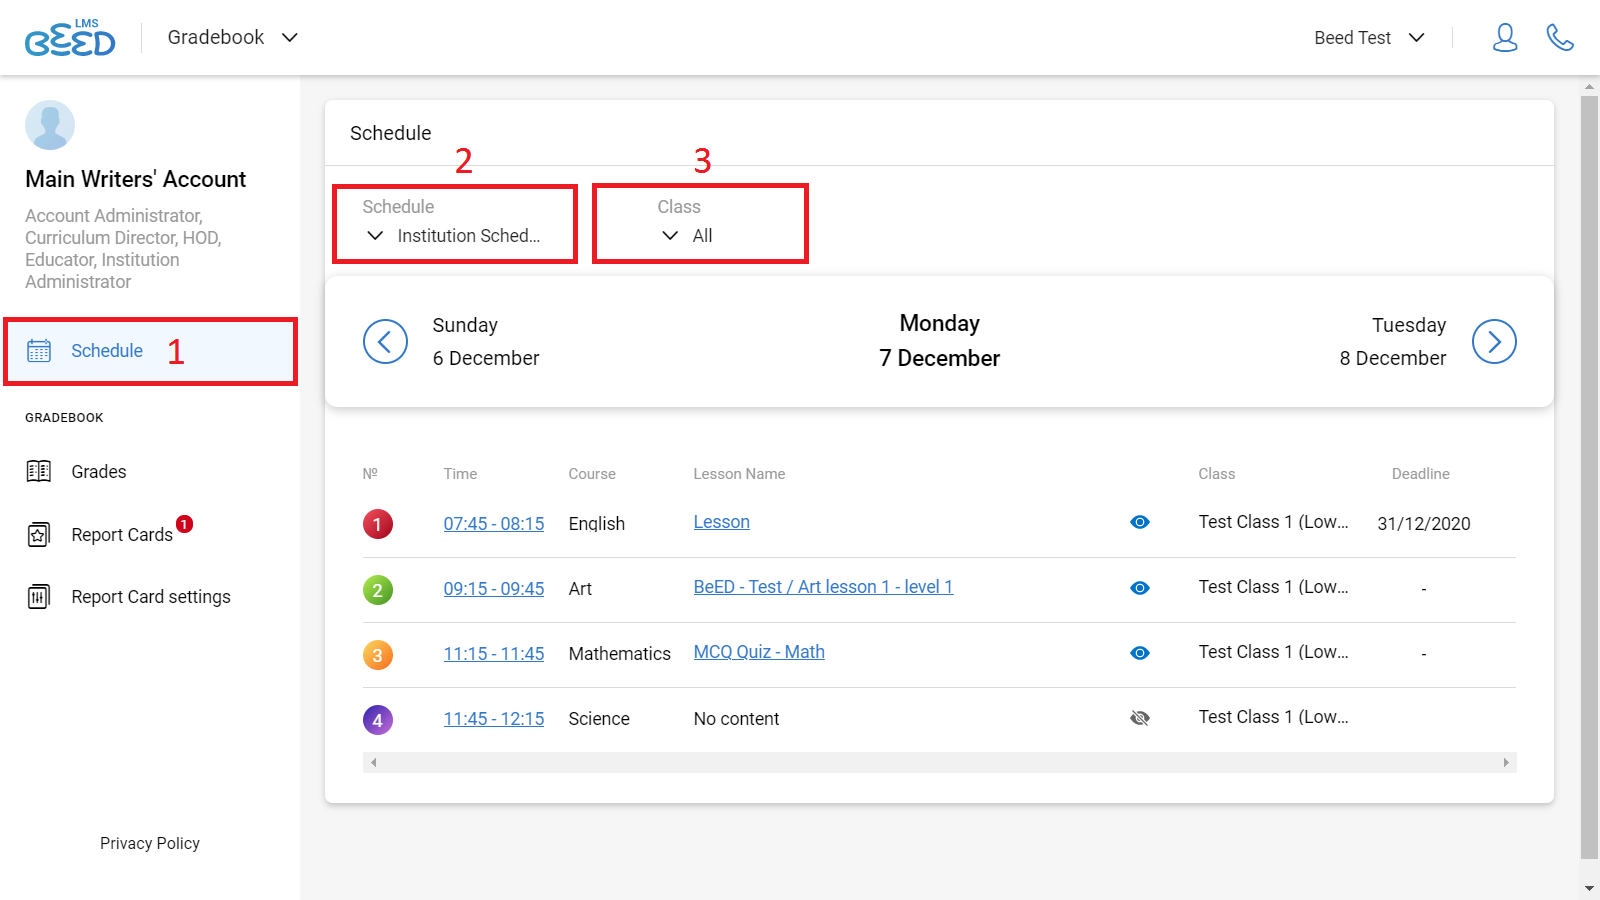
To view a Schedule:
1. Click Schedule on the leftmost column.
2. Select the Schedule type from the drop-down list under Schedule in the top left.
Note: The Curriculum Director can view the Institution Schedule, while the Head of Department can view the Course Schedule.
3. Select the relevant Class from the drop-down list.
By clicking on a timeslot in the Schedule, you will be brought to Grades, where you can view Learners’ assessment for that particular Course.
What is the difference between My Schedule, Course Schedule and Institution Schedule?
Every Educator using the Gradebook will have the following 3 schedules:
- My Schedule
- Course Schedule
- Institution Schedule
My Schedule
This lists all the time slots for the courses that you have been assigned to.
Course Schedule
This displays all time slots for a specific Course across all school levels in your Institution (available for Heads of Departments only).
Institution Schedule
This displays all time slots for all Courses in your Institution.
What will my Learners see in their Schedule?
Your Learners will be able to see the following in their Schedule:
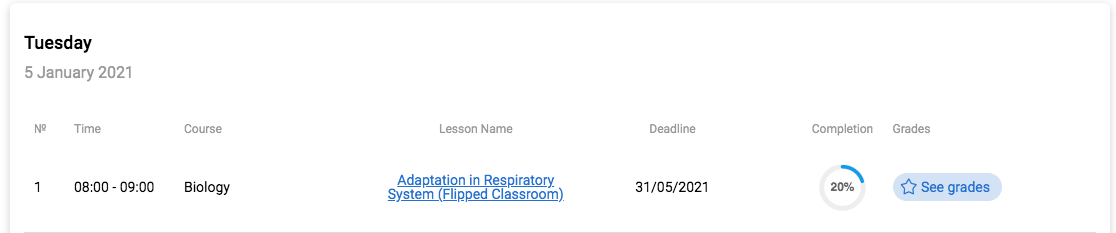
- Daily courses and time slots
- Lesson Titles (clicking on a Lesson Title will take them directly into the lesson)
- Any set deadlines
- Completion tracker to track individual lesson progress
- Final grades for Lesson (if given)
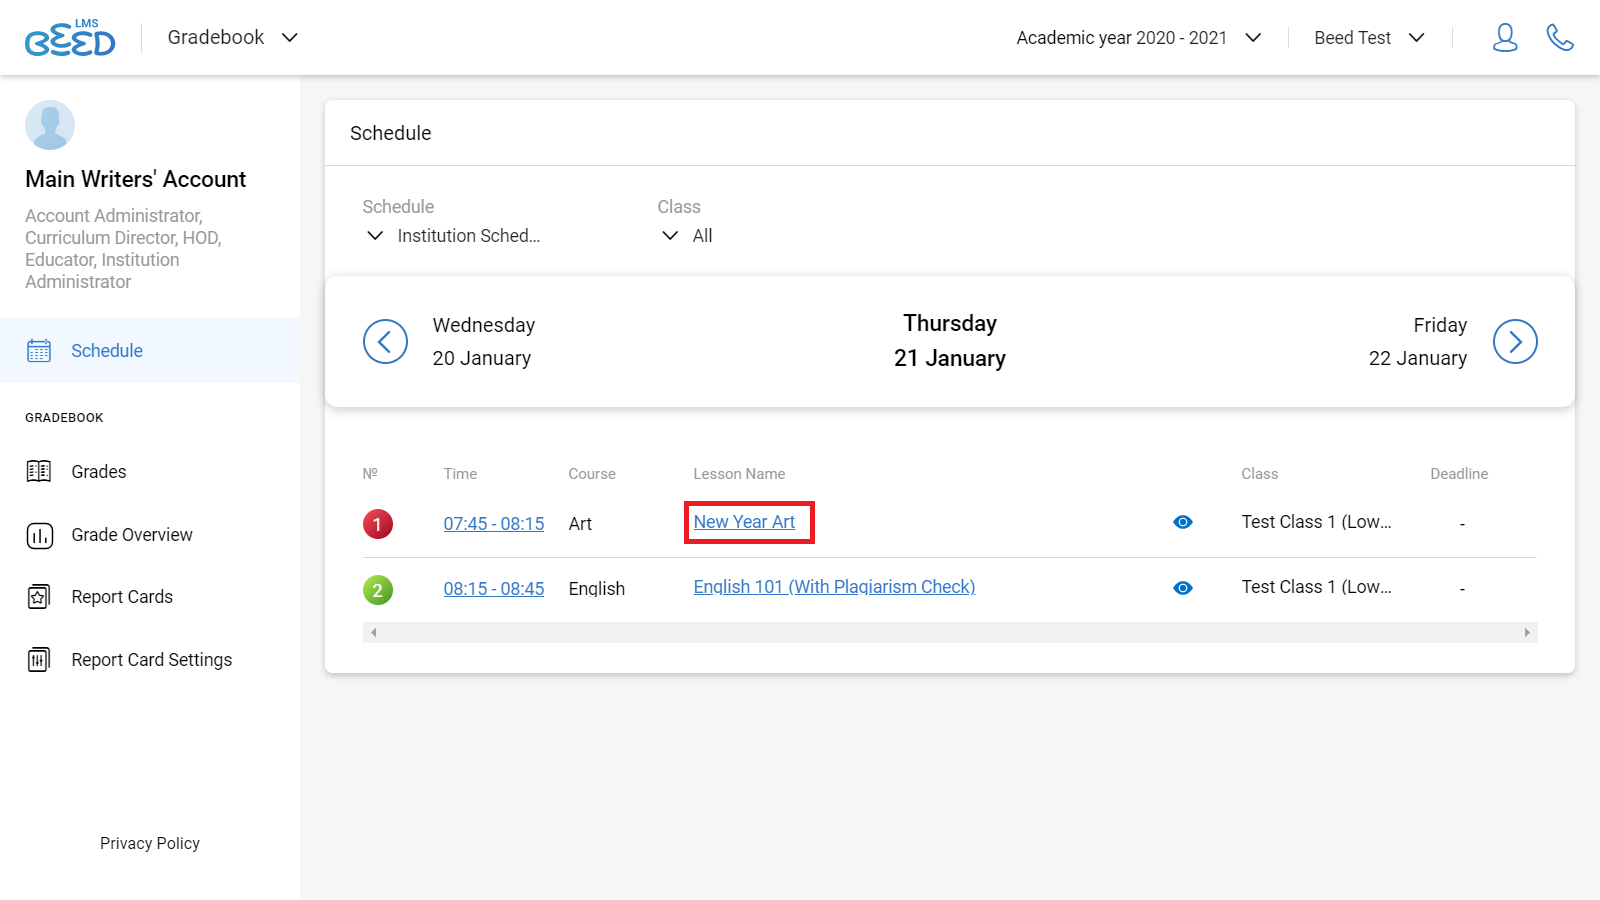
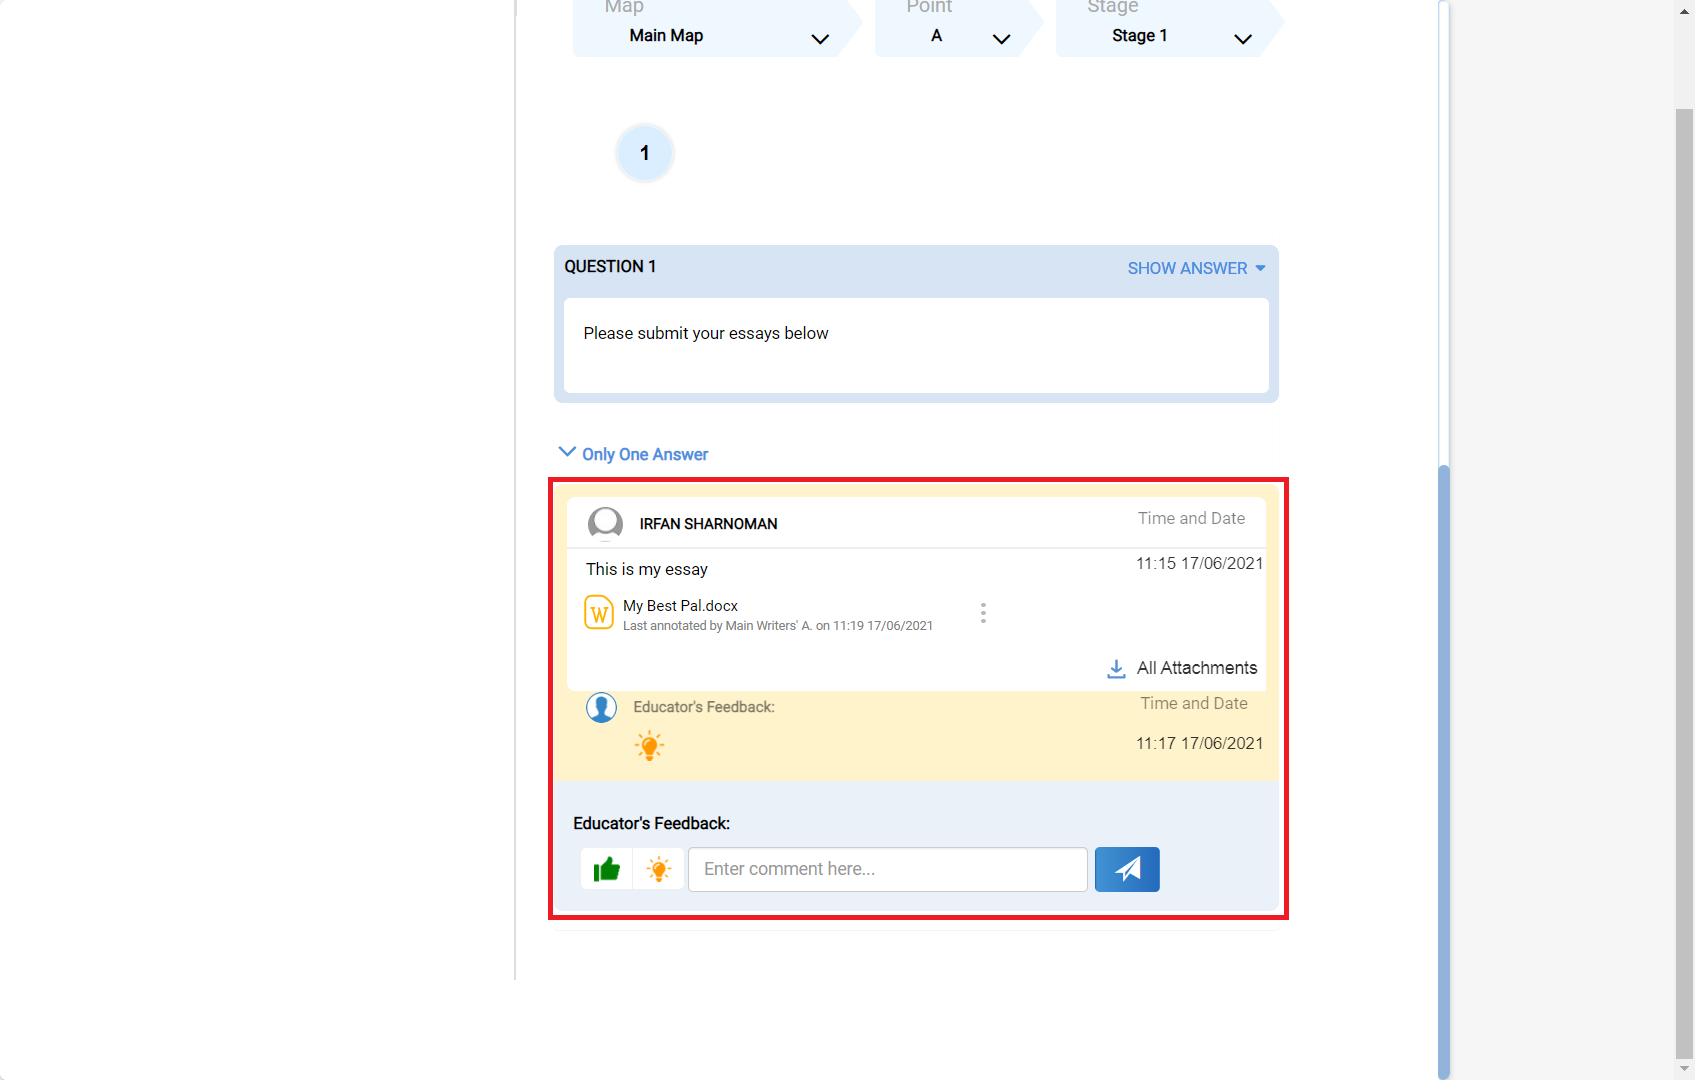
What can I see on the Learner Feedback page?
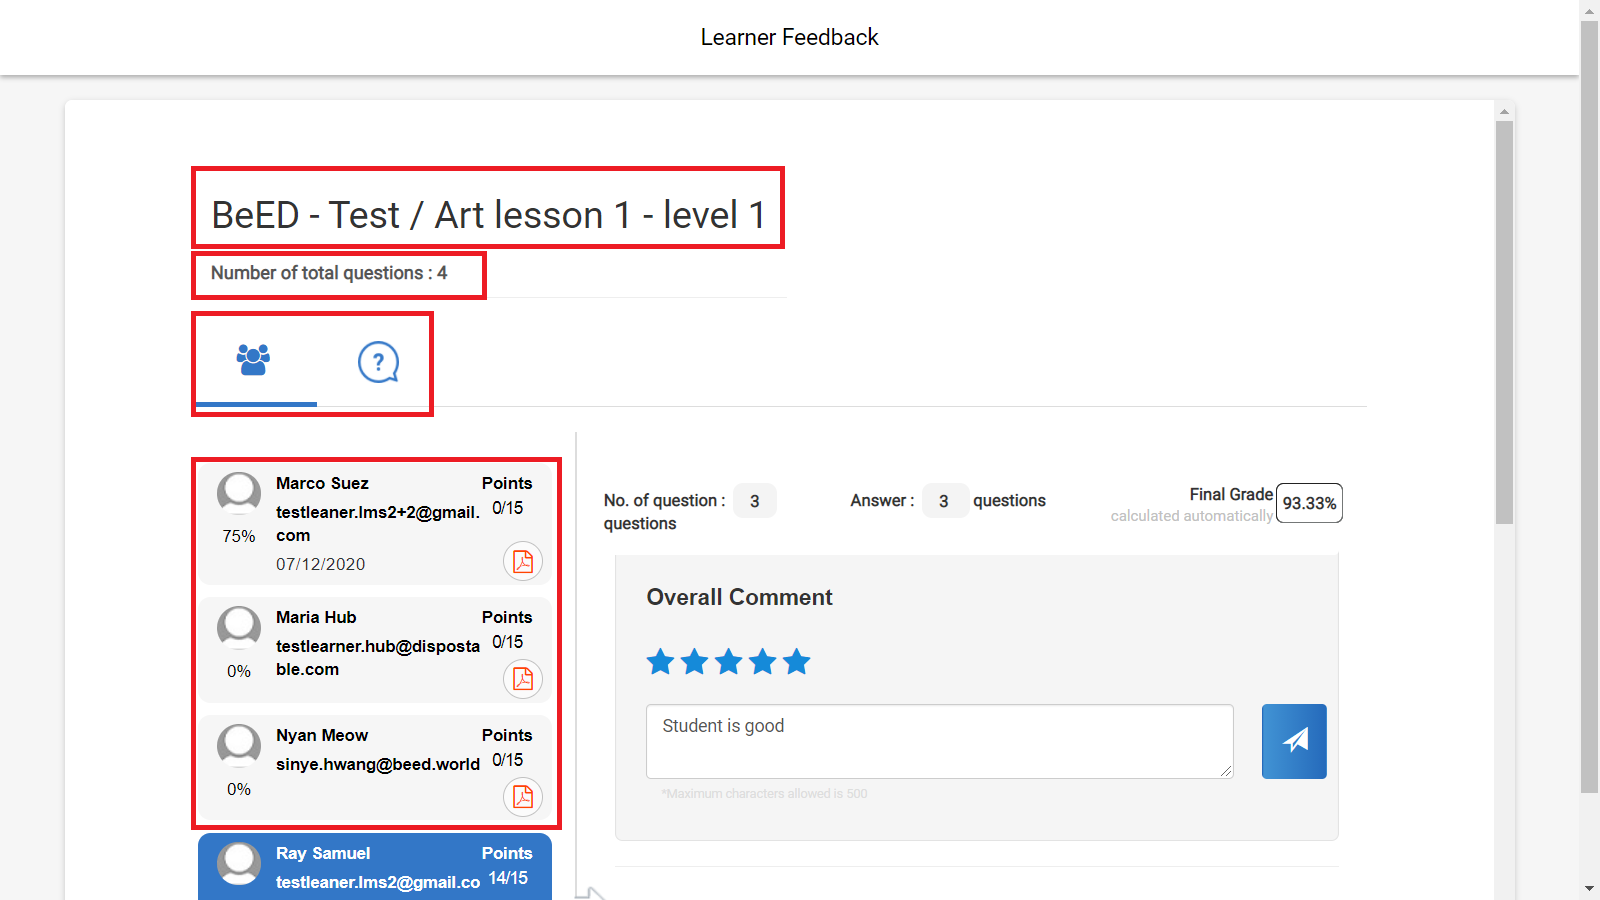
At the top of the page, you will see the Lesson name and the Number of total questions for the Lesson. On the left, you will see the list of Learners and their completion percentage.
Alternatively, you can change your display to filter by questions by clicking on the question mark icon.
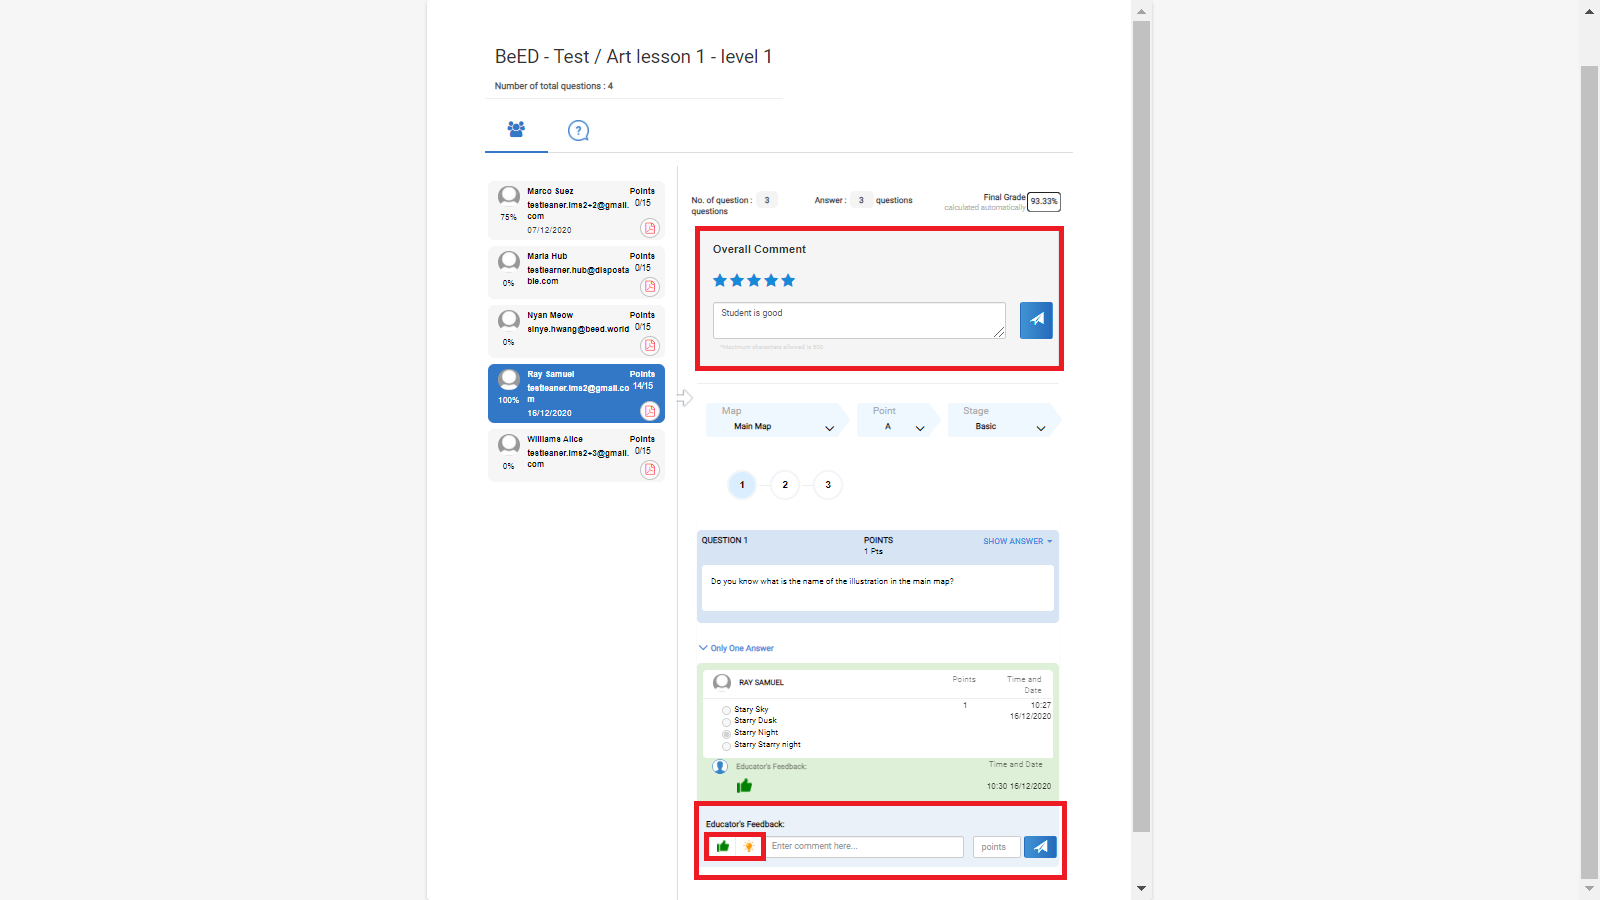
What type of feedback can I provide in the Learner Feedback page?
You will be able to provide the following:
- Overall Comment - Leave a rating and comment on the Learner’s overall performance for the particular Lesson.
- Question Feedback - Leave a comment for individual questions.
You can use the thumbs up icon to indicate a correct response and the light bulb icon for an incorrect one.
How do I view or provide feedback in the Learner Feedback page?
To view a Learner’s feedback:
1. Click Schedule on the leftmost column.
2. Navigate to the date and time slot that you want to view the feedback.
3. Click on the Lesson Name of the lesson you would like to view.
To provide feedback to a Learner:
1. Click Schedule on the leftmost column.
2. Navigate to the date and time slot that you want to provide the feedback.
3. Click Provide Feedback under Lesson content.
4. Enter your comment and click on the paper plane icon to submit.
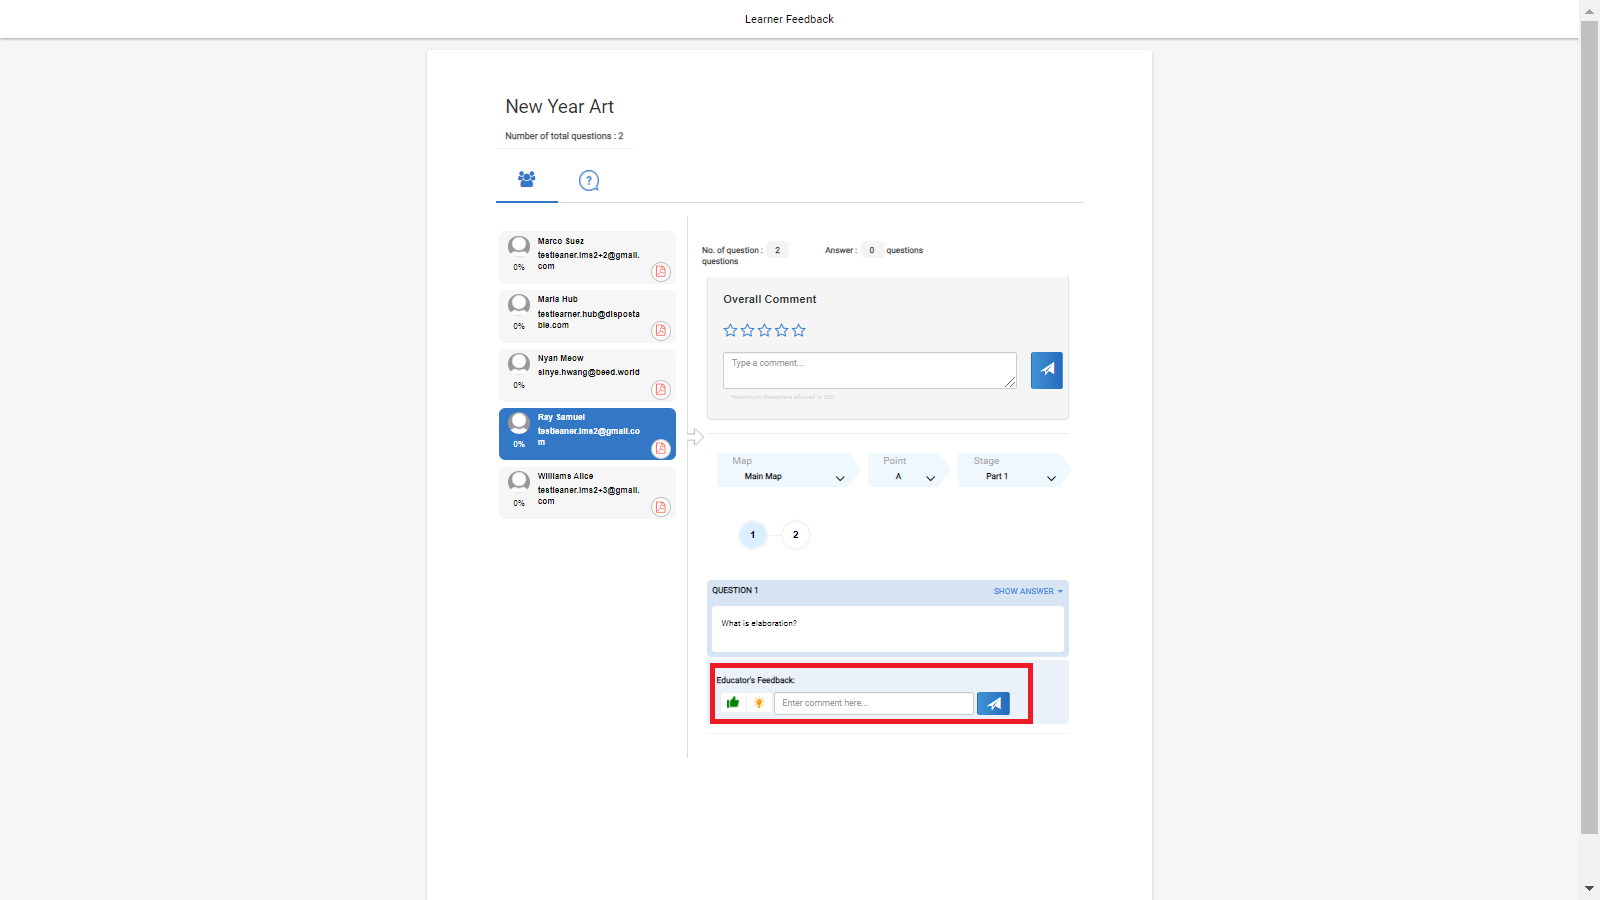
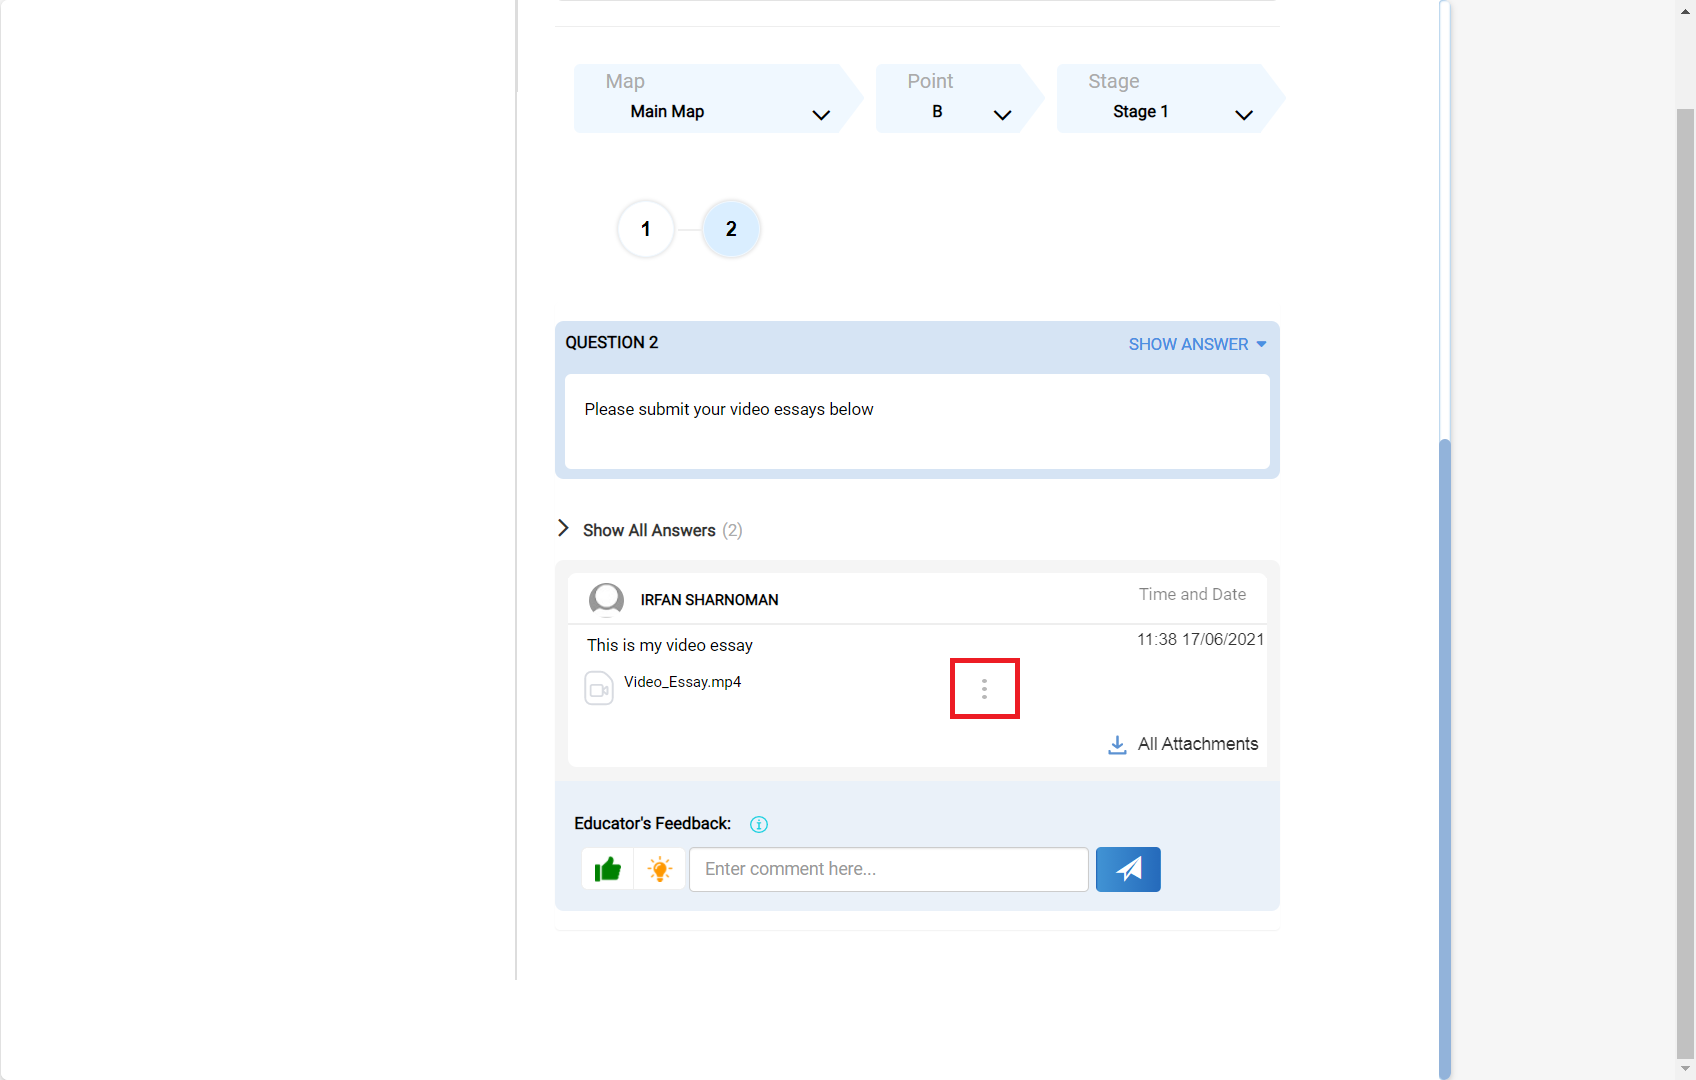
How do I annotate on my Learner's responses?
When you log on to the Learner Feedback page, you will see a three dotted icon on any Learner responses containing an attached file. Clicking on the icon will open up the options below:
(a) Clicking on Annotation allows you to draw, comment and highlight on the file for your Learners to see.
(b) Clicking on View Plagiarism Report allows you to view any plagiarism reports attached to the file (If applicable).
(c) Clicking on Download allows you to download the original file, the file with annotations, or a plagiarism report attached to the file (If applicable).
Annotation for Word, PDF and Image Files
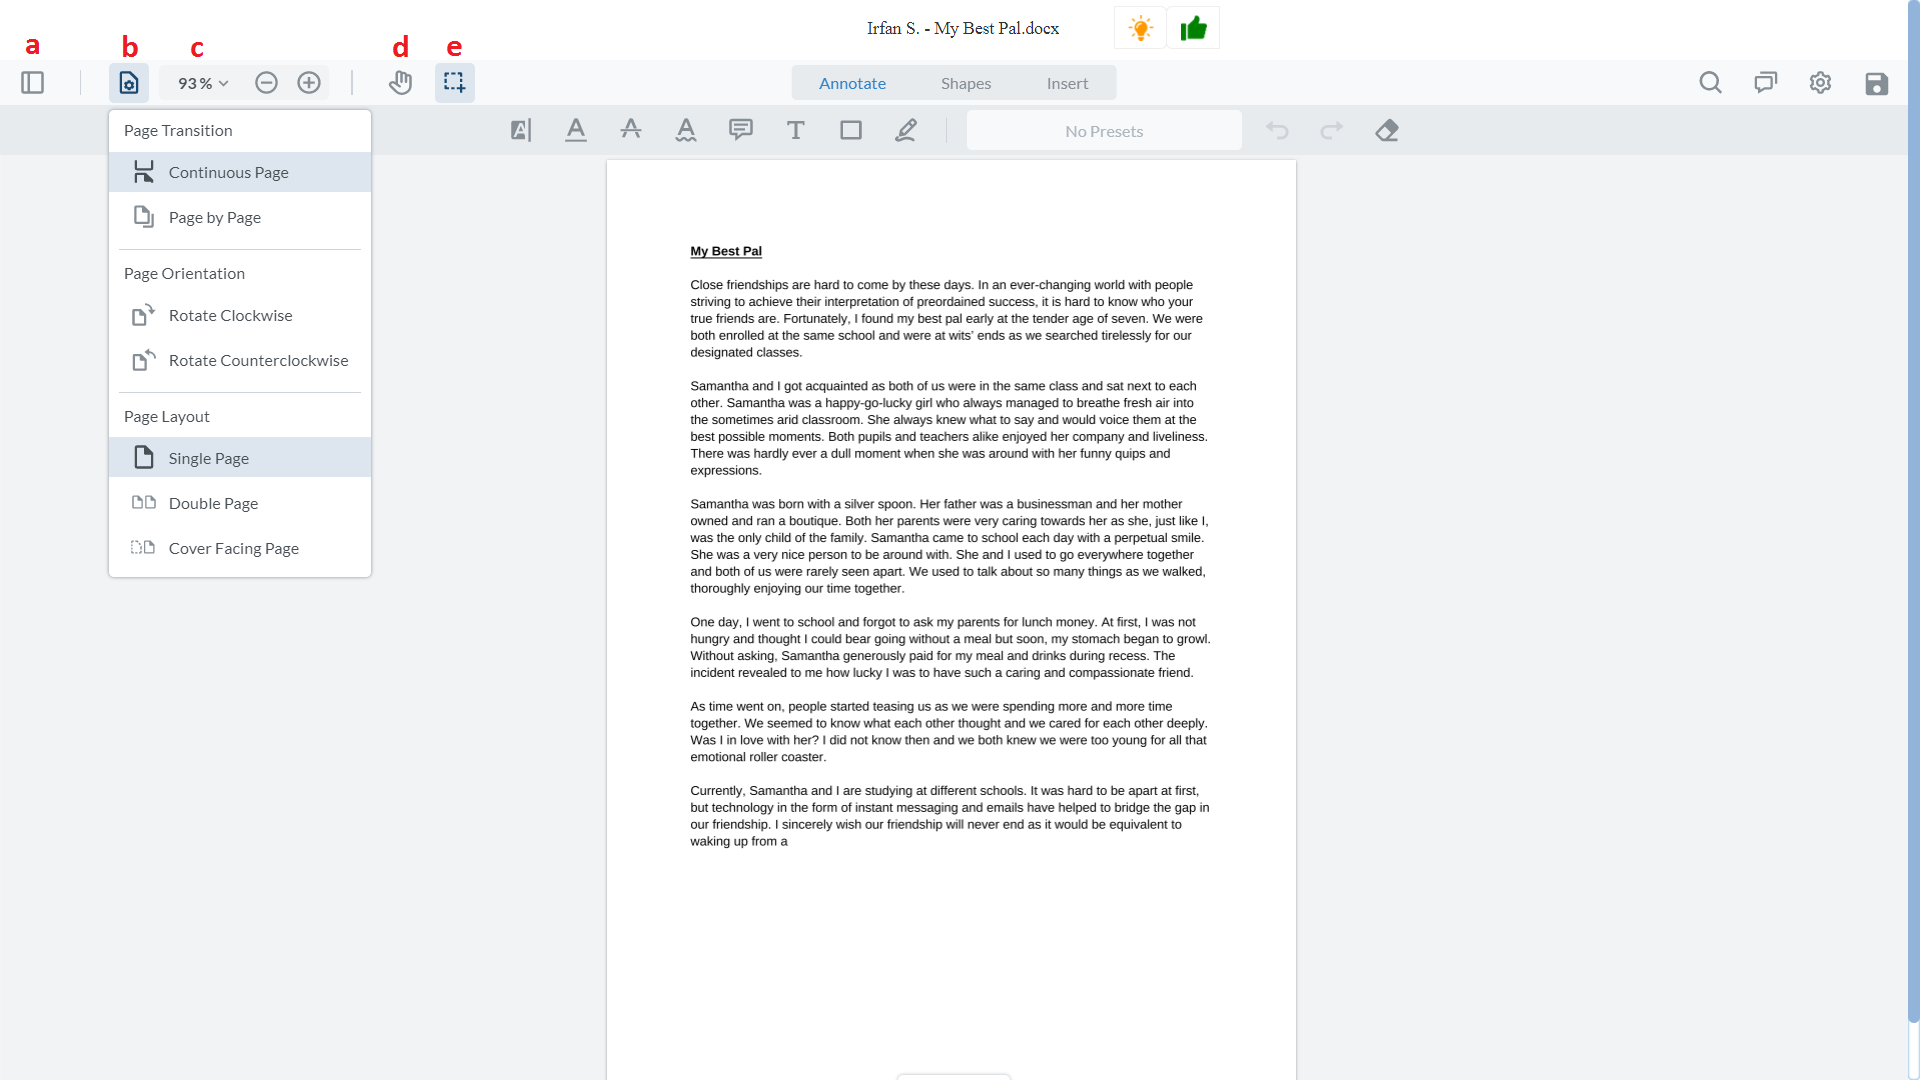
This is the annotations page, where you have your control panel on the top left panel of the page.
(a) will open a side panel allowing you to quickly navigate between document pages.
(b) will allow you to manipulate how the document pages appear, to rotate pages and to manipulate page layouts.
(c) will allow you to manipulate the magnification on the file.
(d) will bring up the hand cursor, allowing you to manipulate the pages.
(e) will allow you to multi-select a selection of words/passages to annotate over.
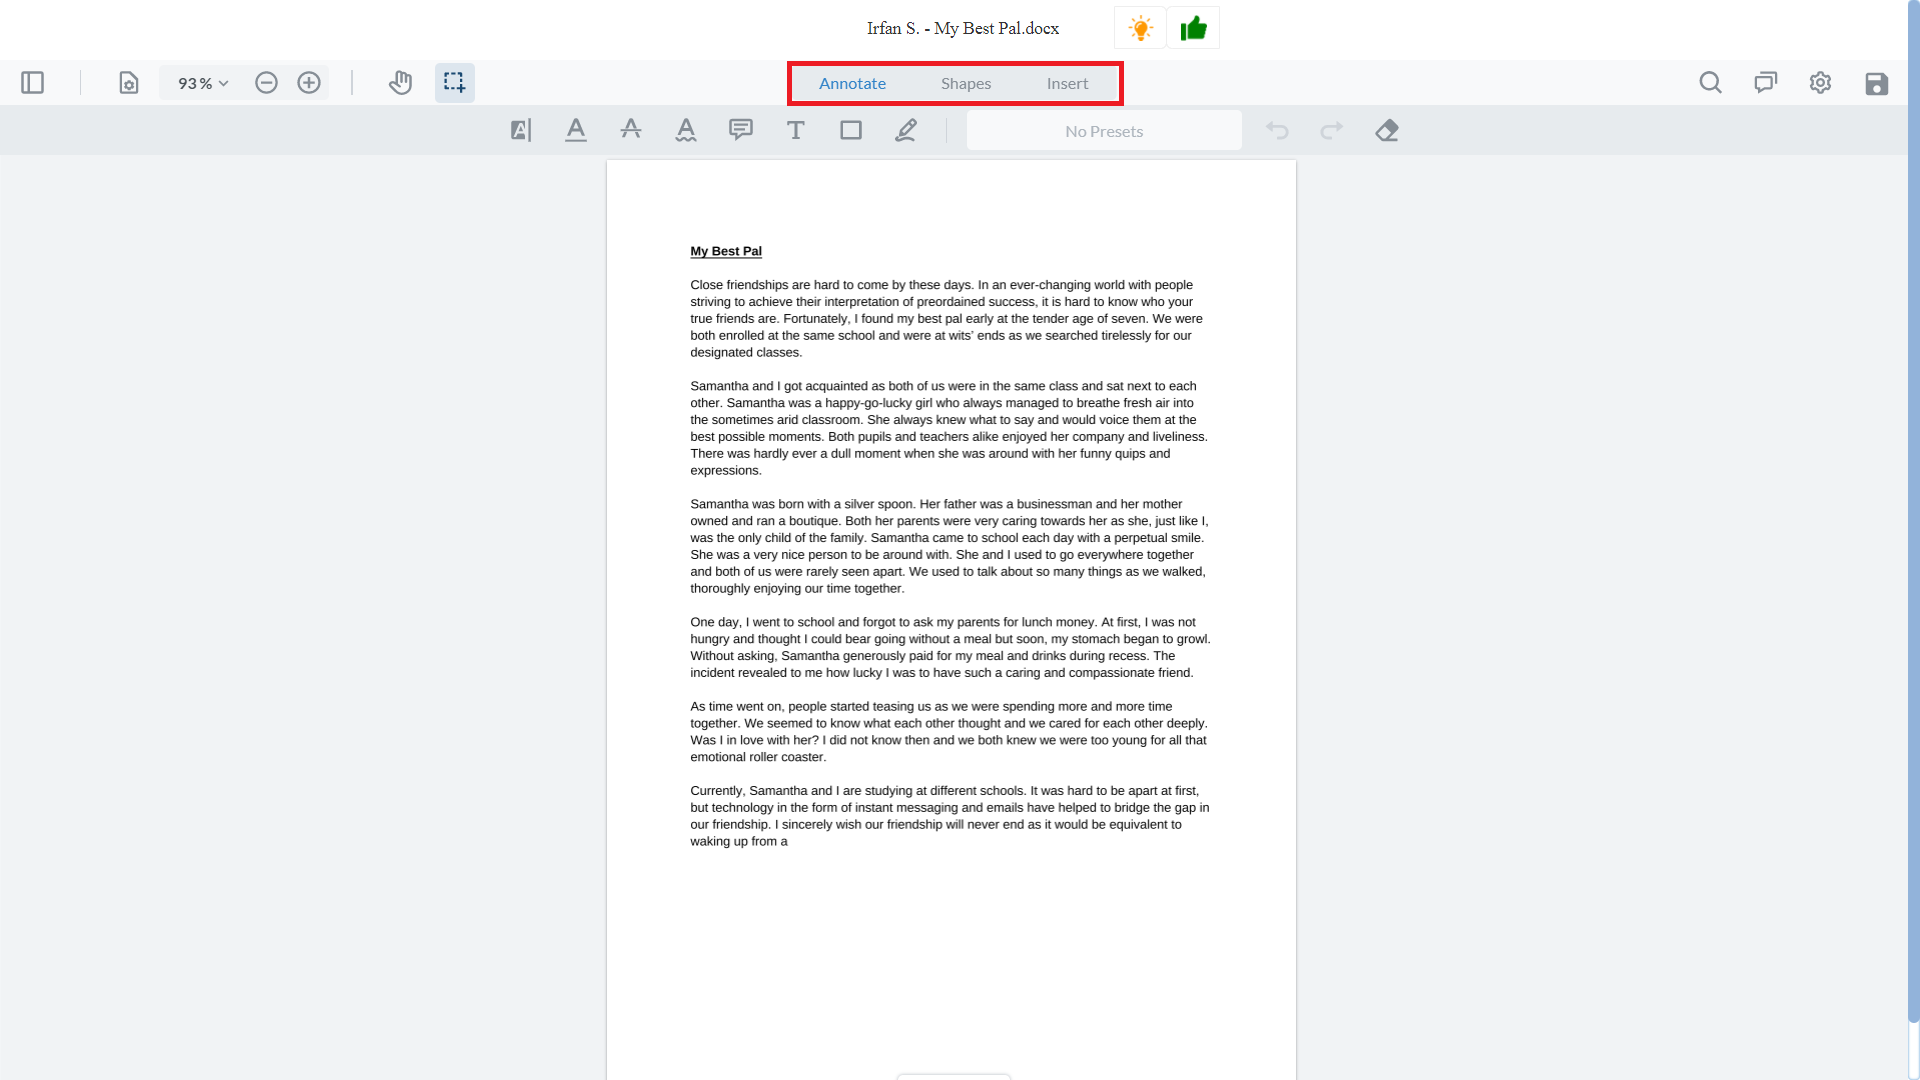
The middle portion of the page contains your annotation choices. You can choose either Annotate, Shapes, or Insert.
Annotate allows you to highlight/underline specific words as well as insert notes and draw over files. This is more effective on files with recognizable words (such as a PDF or Word file).
Shapes allows you to draw specific shapes or arrows over the files. This is most effective for files with image heavy content.
Insert allows you to add in signatures/premade and custom stamps onto the files.
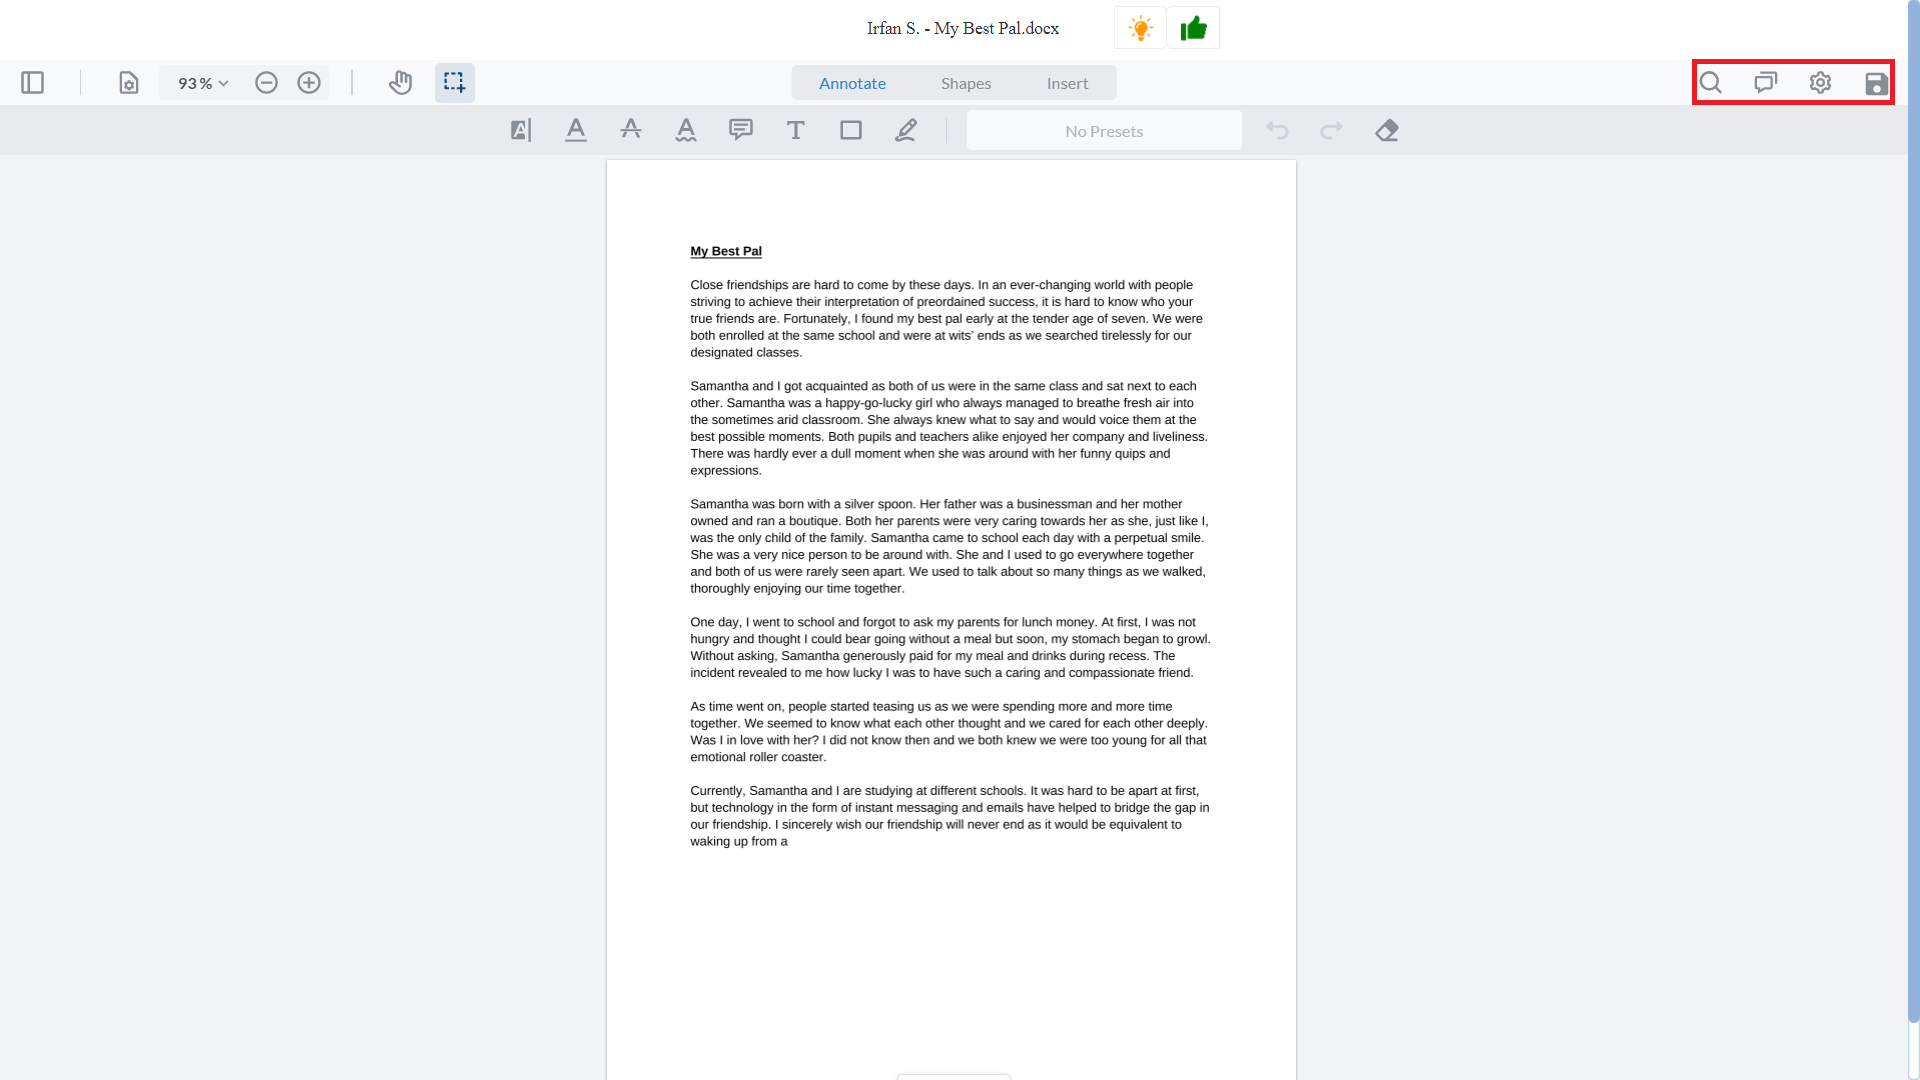
The top right of the panel contains the navigation tool.
Clicking on the search icon lets you search for specific keywords within the file (exclusive of annotated comments).
Clicking on the comment icon will bring up the comments panel, where you can view added comments and reply to annotations (from your Learners).
Clicking on the gear icon allows you to enlarge the file to full screen, download a PDF copy of the file (with annotations) and print the file.
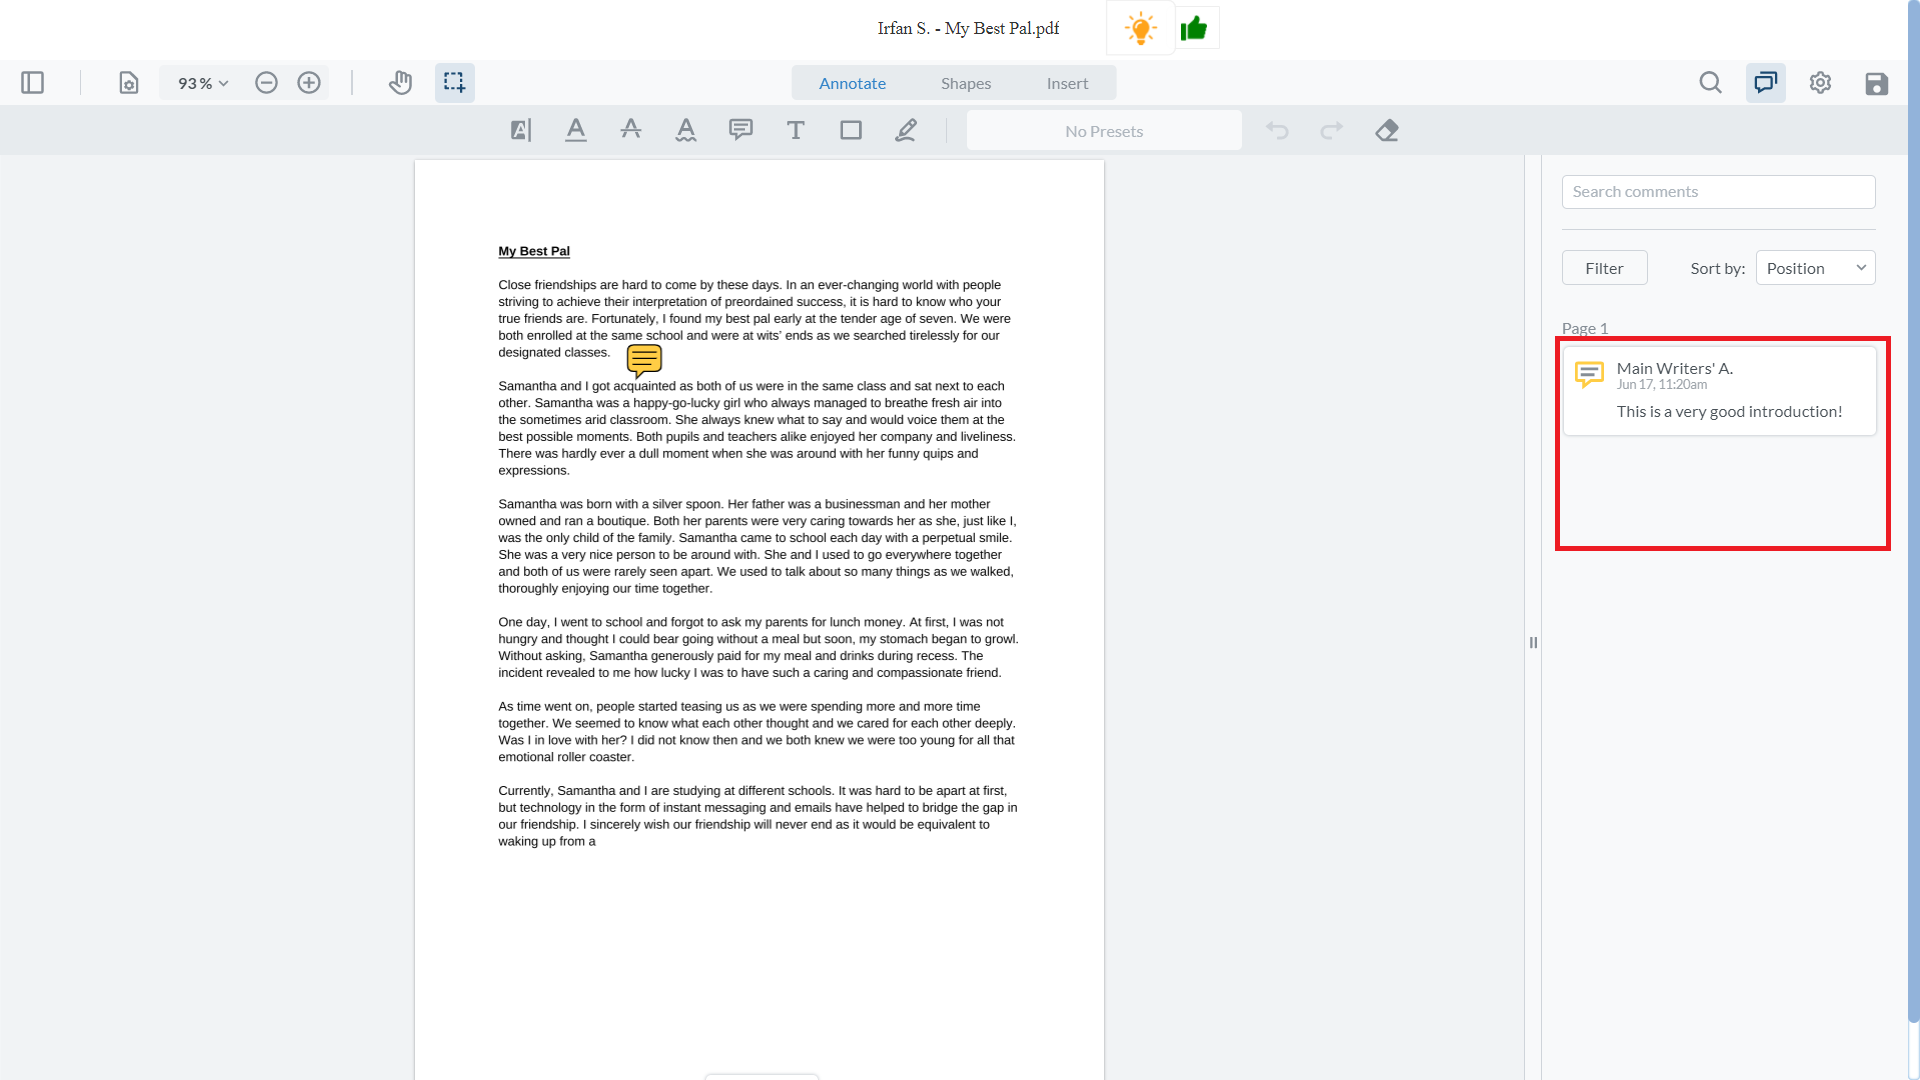
You can view your Learner’s annotation history by clicking on the comment icon.
Items with one or more replies will have a number indicator on its icon.
Clicking on the item will allow you to read the item in full and to post a reply to the annotation/response.
To save the annotated file for your Learners to view, you will need to click on the lightbulb or thumbs up icon. This will then save the annotations into a PDF format for your Learners.
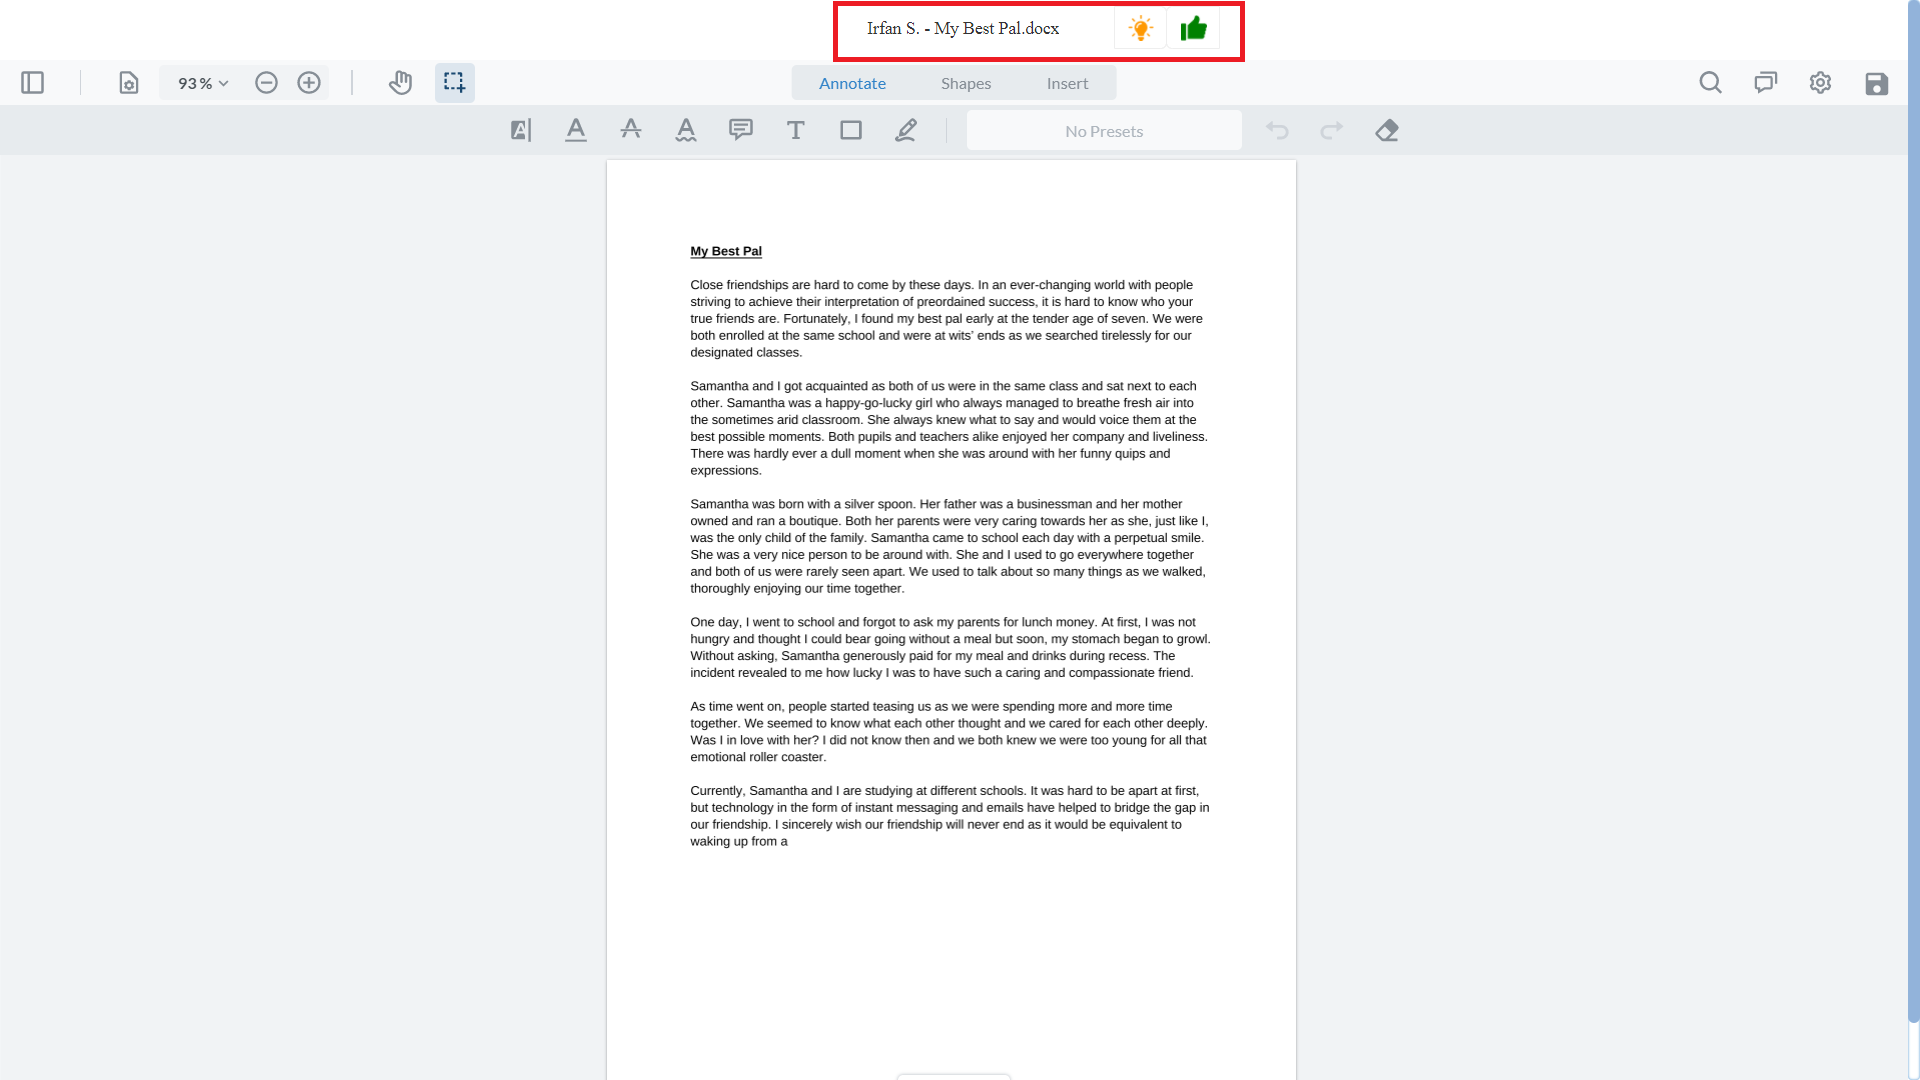
In the Learner Feedback page, the icon for the file will change colours to indicate their status. Yellow means that the file is annotated and the Learner can respond to it (Lightbulb icon) while green means that the file is annotated and the Learner cannot respond to it (Thumbs up icon).
Once you are satisfied with the annotated file(s), insert a comment in Educator’s Feedback and click on the thumbs up or lightbulb icon. Then, click on the paper plane icon to send.
Annotation for Video Files
You can also annotate over video files such as mp4 or wav. To annotate over videos, click on the three dotted icon and select Annotate.
This is the video annotation page. The top left of the panel allows you to zoom/ fit the video file to your preference. The multi-select icon allows you to multi-select several annotations you’ve made on the screen.
The video controls at the bottom left of the screen allows you to adjust the volume of the video, make the video loop, adjust the speed of the video, adjust the aspect ratio of the video or add closed caption files to the video.
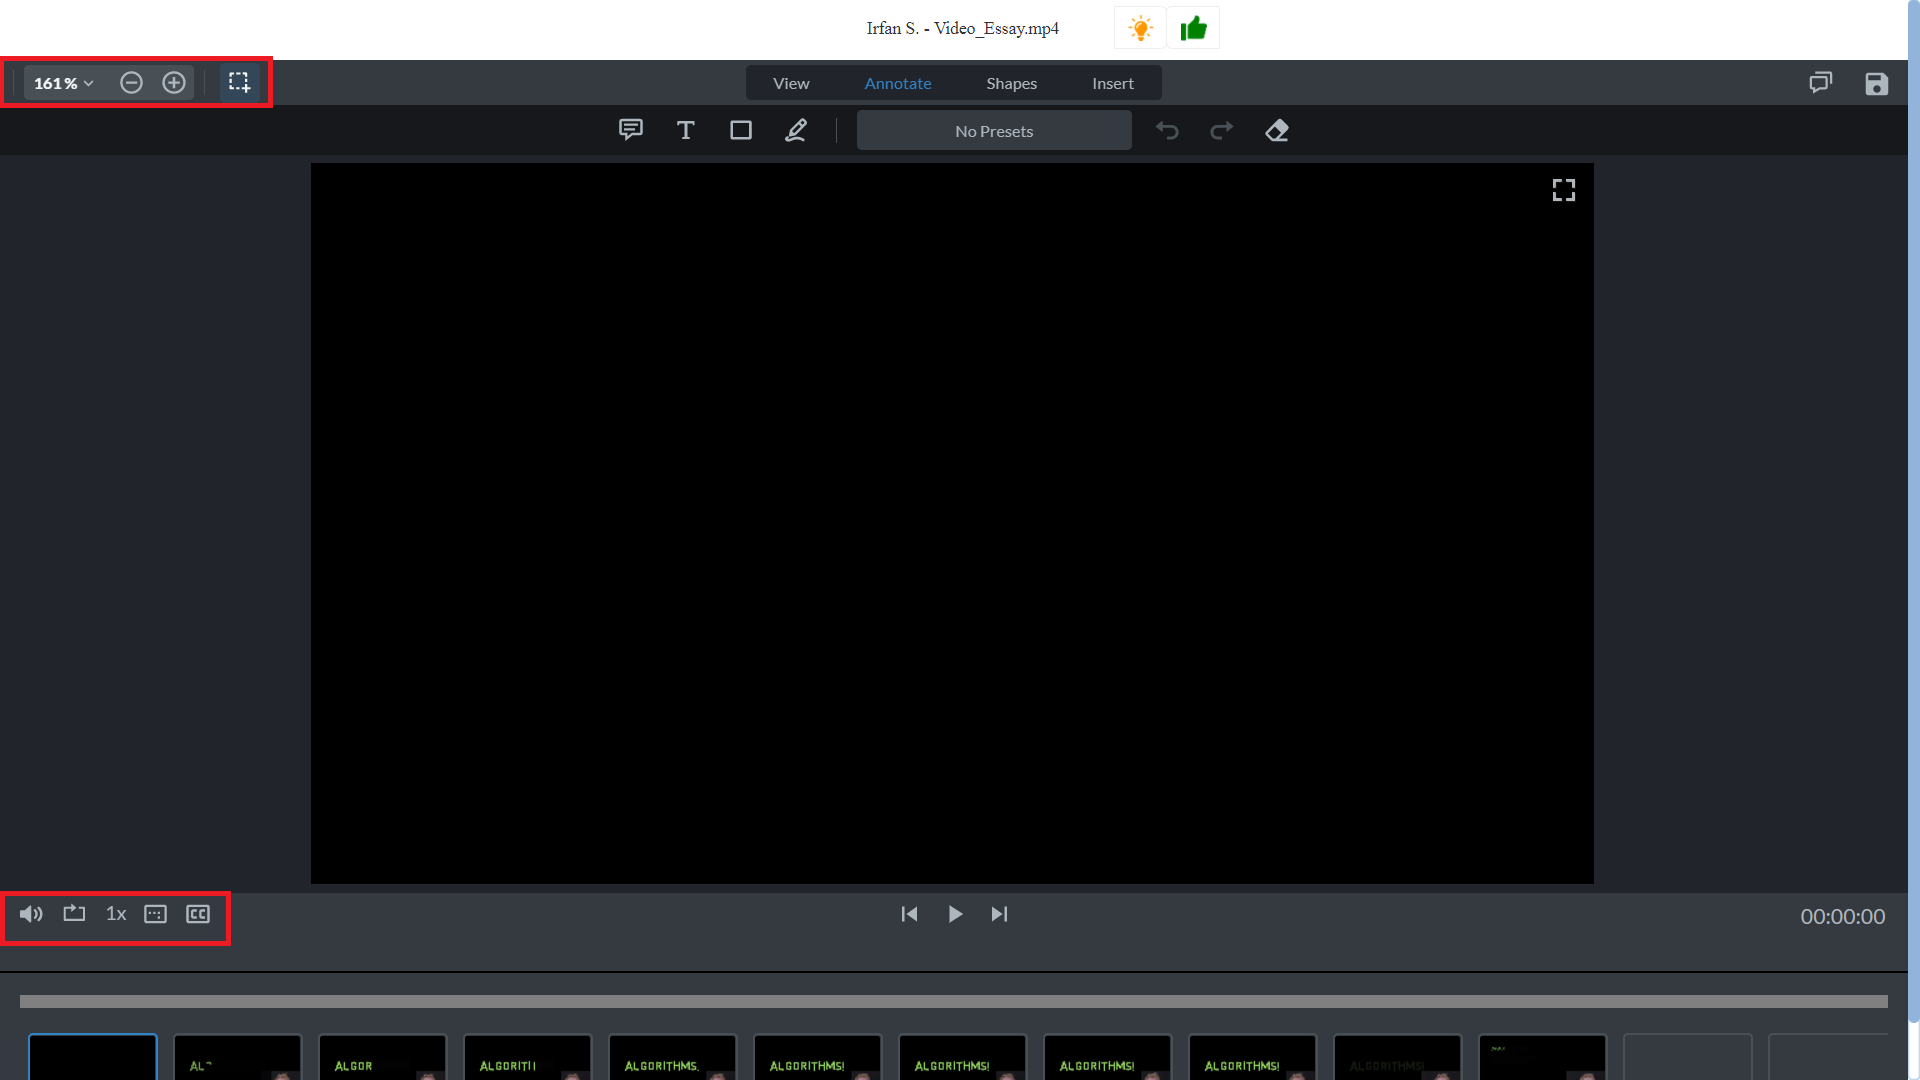
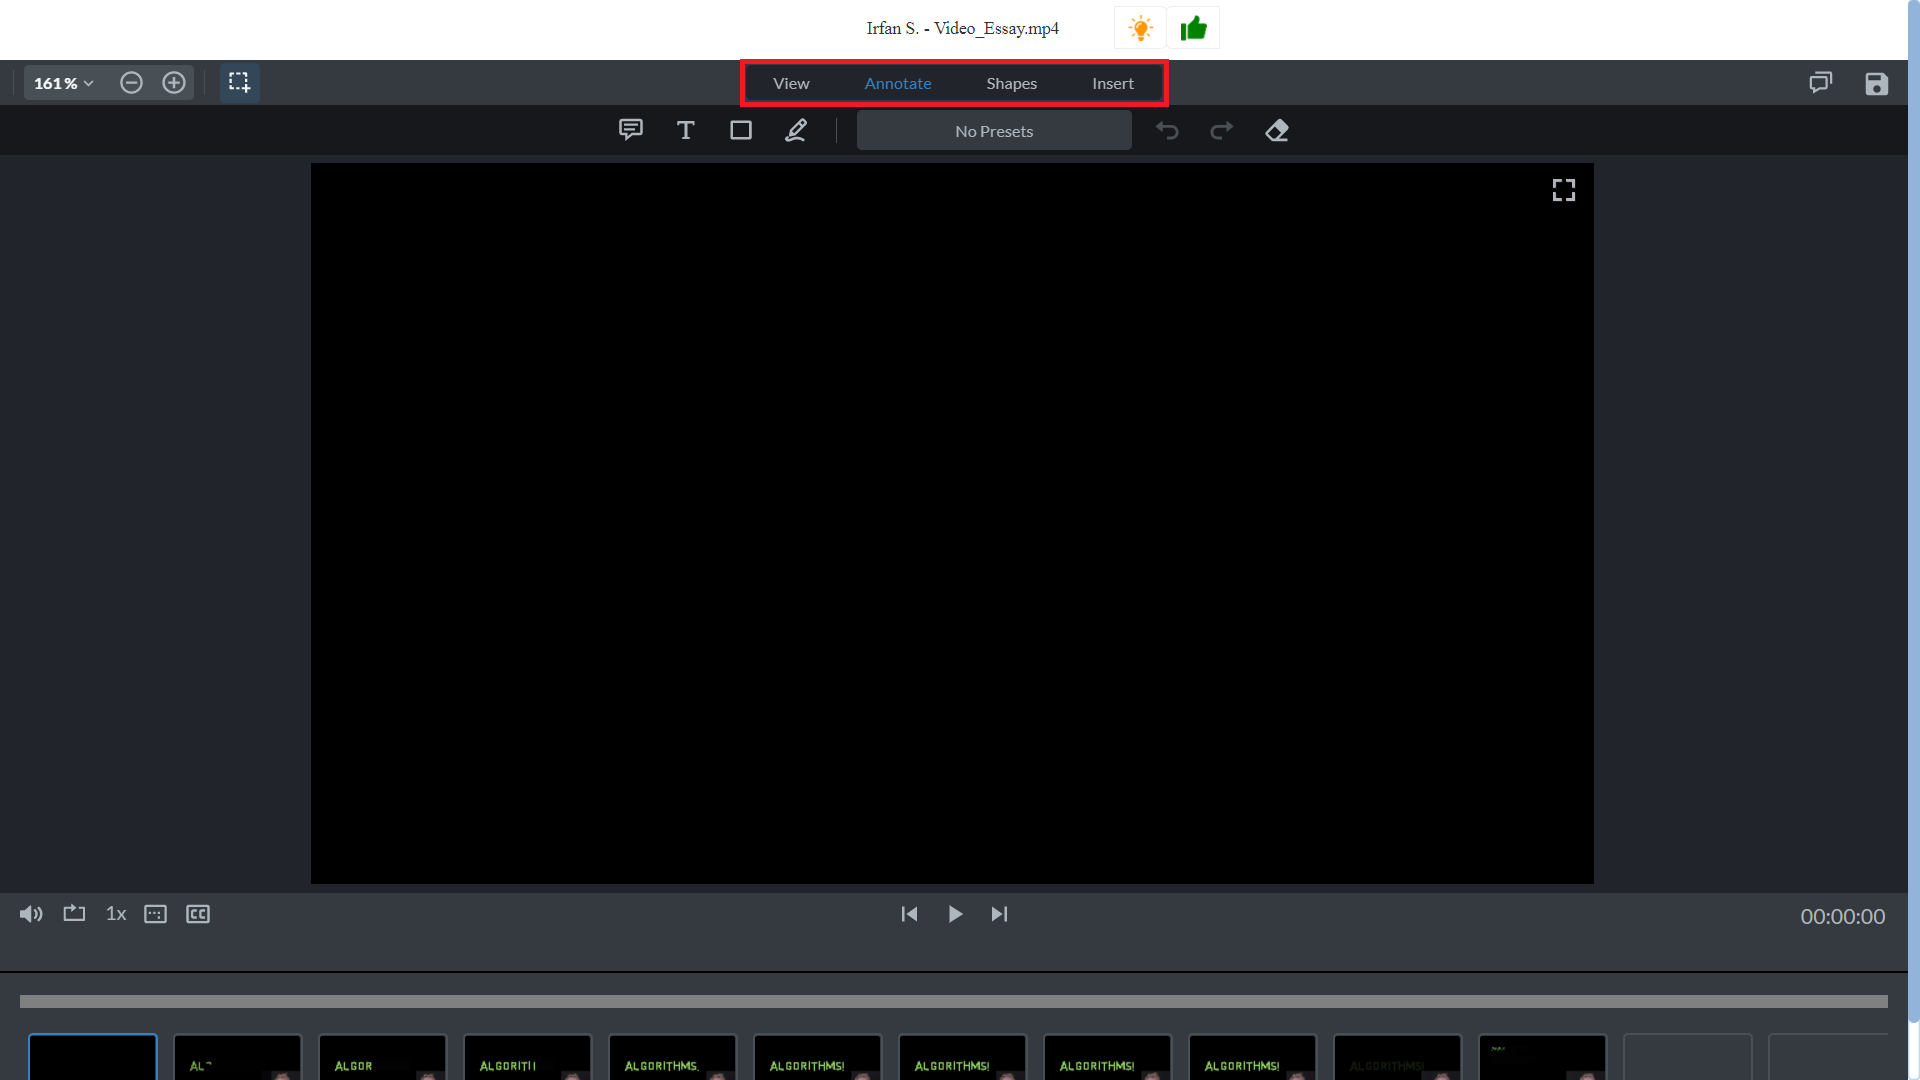
The middle portion of the page contains your annotation choices. You can choose either View, Annotate, Shapes, or Insert.
Annotate allows you to insert comments, texts, a square or draw directly on the video file.
Shapes allows you to draw specific shapes or arrows over the video file.
Insert allows you to add in signatures/premade and custom stamps onto the video file.
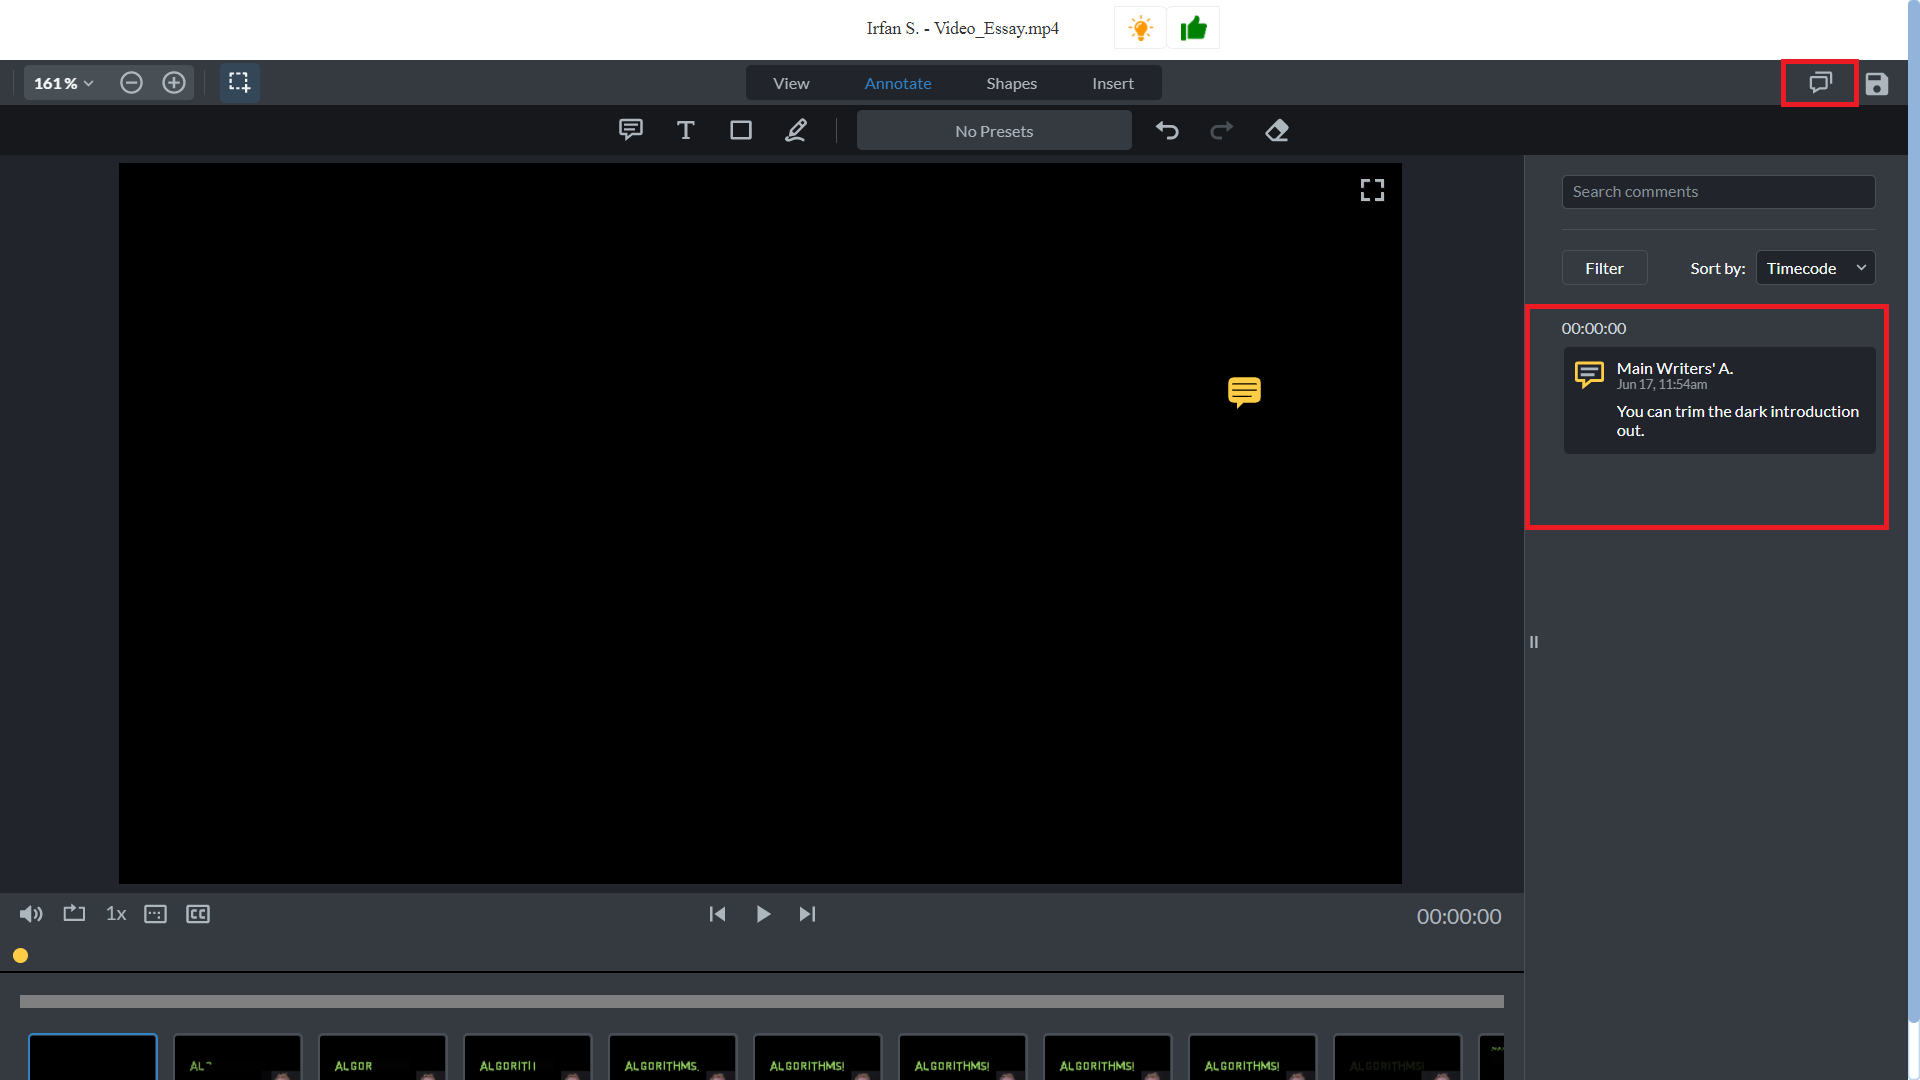
Clicking on the comment icon opens up the comment panel.
You can view time stamped annotations/comments inserted here. Click on an item you’d like to view and you have the option to reply to comments/annotations here.
You can also choose to edit or delete items through the comment panel.
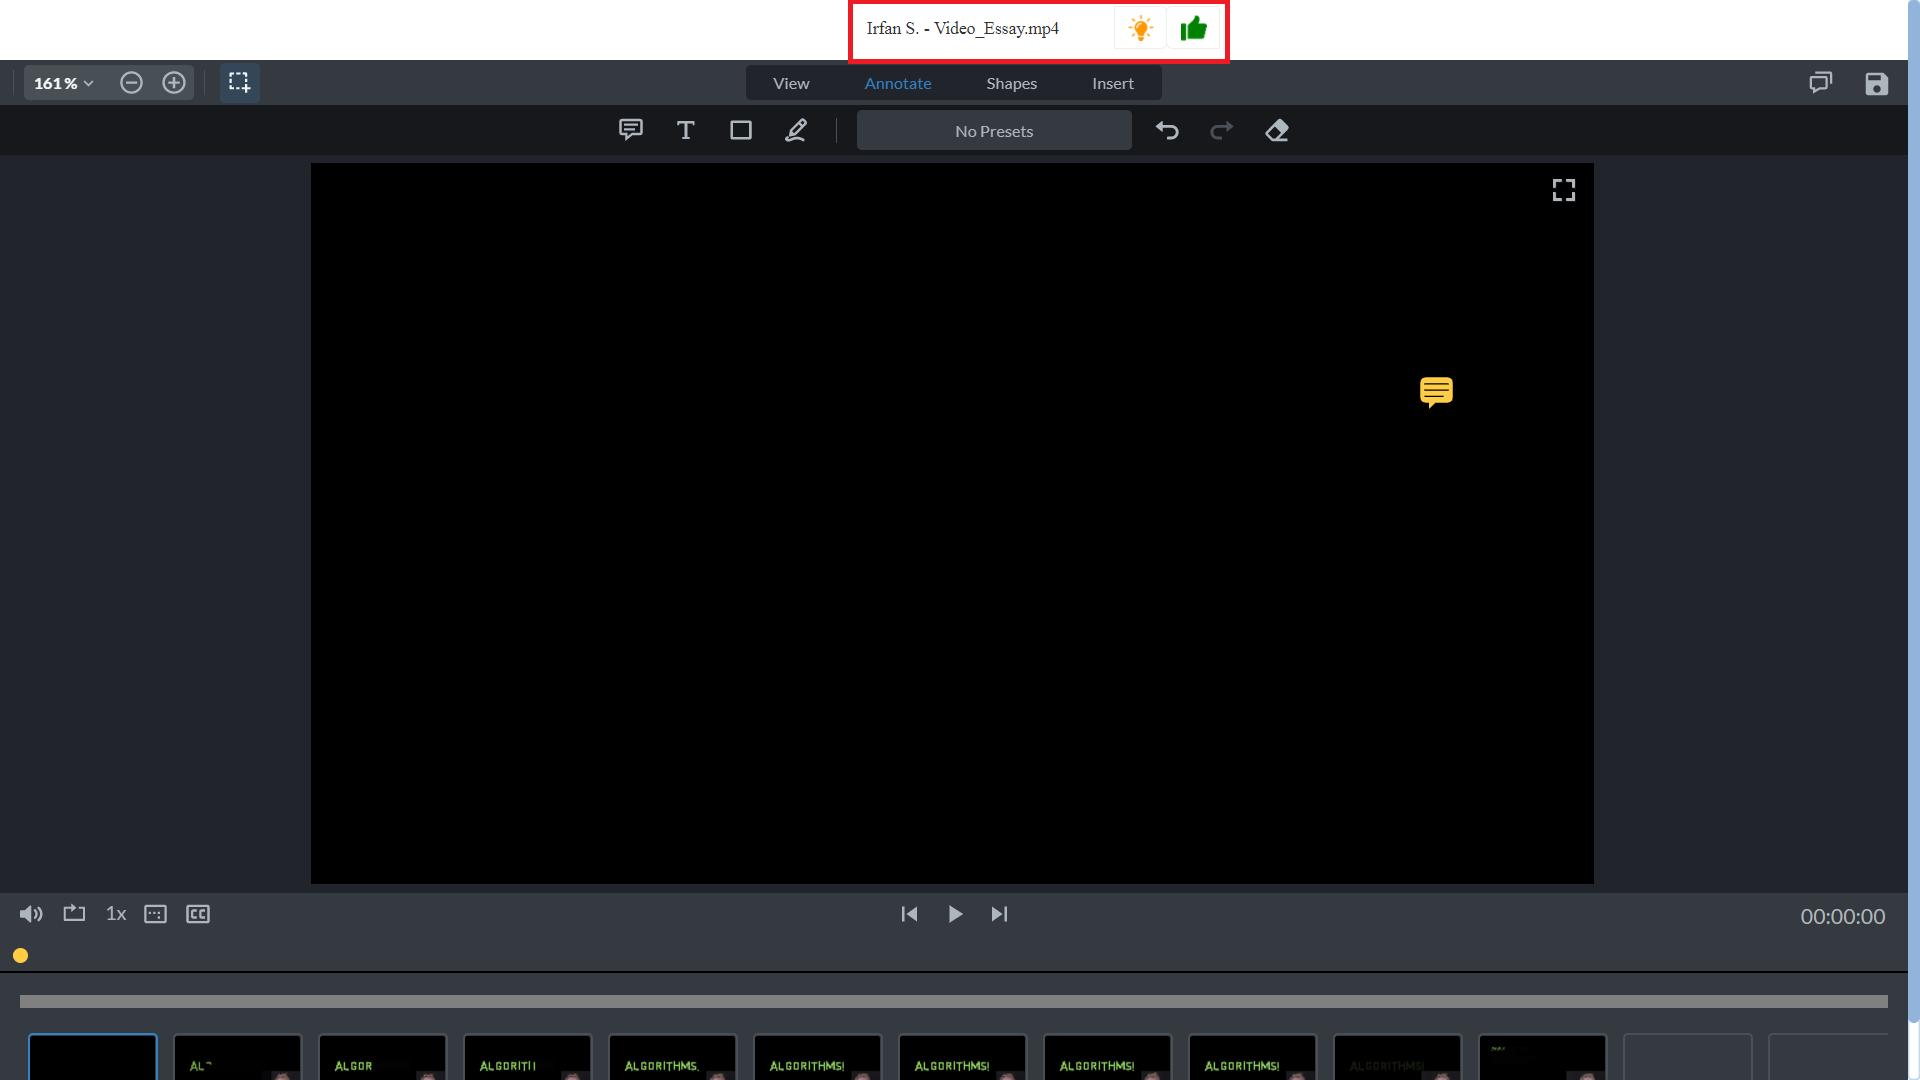
To save the annotated file for your Learners to view, you will need to click on the lightbulb or thumbs up icon. Then, click on the save icon.
Grades Function In Gradebook
Who can view Learners’ Grades?
Directors, Curriculum Directors, Heads of Department, Educators and Homeroom educators can all view Learners’ Grades, but to a varying degree.
Learn more about the responsibilities of these roles in the Grades function.
How do I view a Learner’s Grades?
To view a Learner’s Grades:
1. Click Grades on the leftmost column.
2. Select the relevant Segment, Level, Class and Course from the drop-down menus. Then, click Apply.
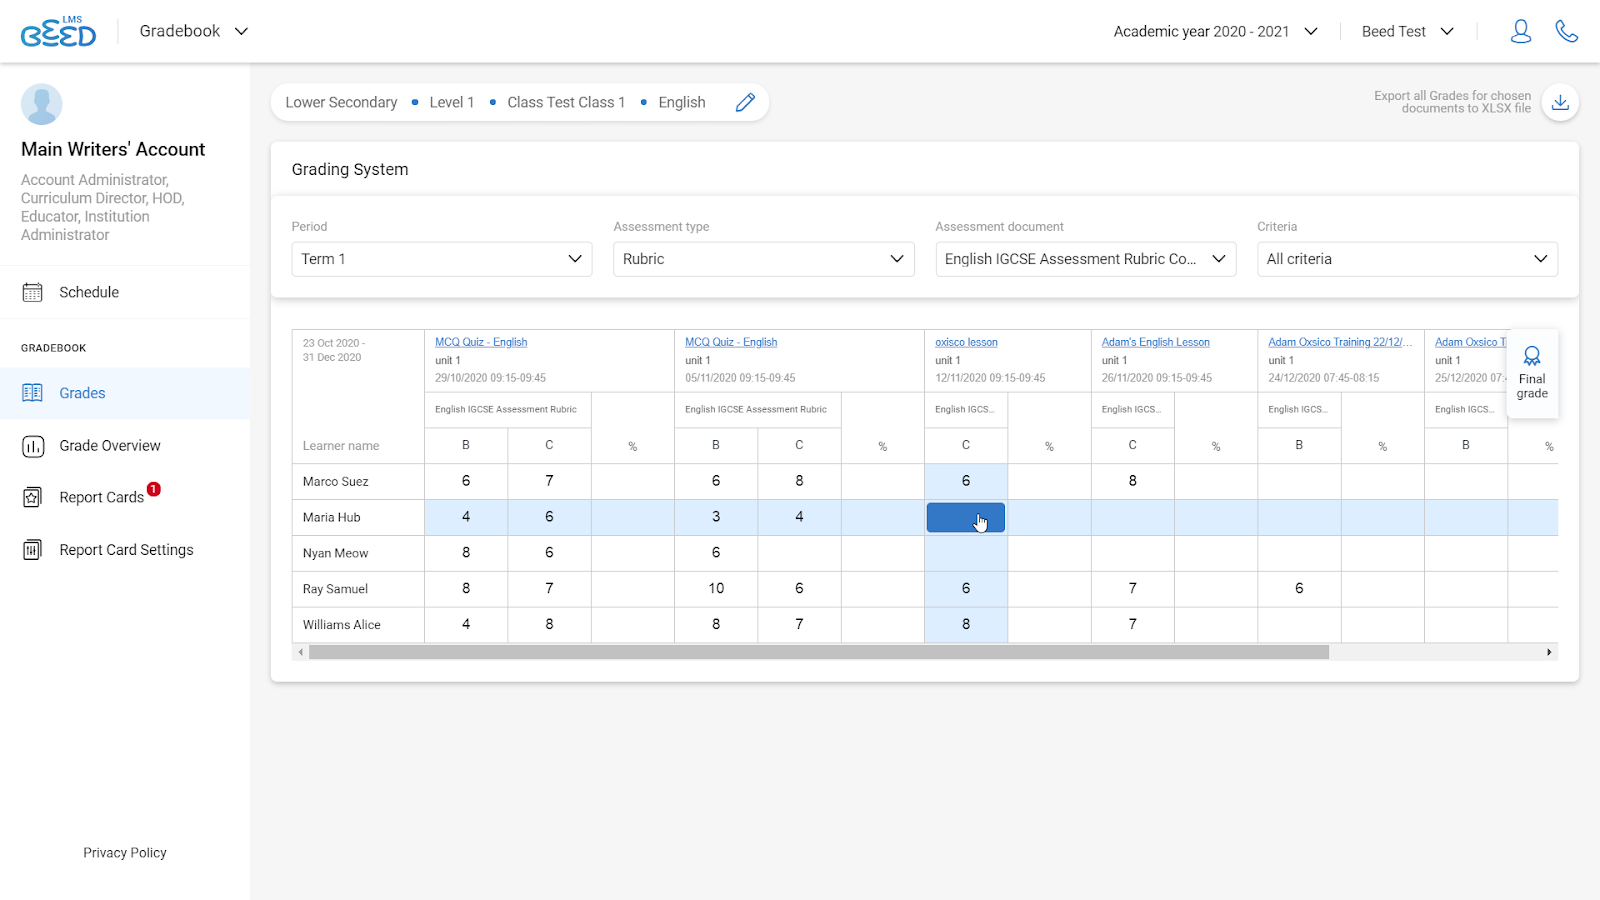
Here, you can view all available grades of Learners for a particular Class and Course.
3. Select the relevant Period, Assessment type and Assessment document to further filter the grades for viewing.
Note: The options under Assessment type and Assessment document are based on the criteria that have been selected in the Curriculum Builder when creating a Lesson.
How do I add Grades for a Learner?
To add Grades for a Learner:
1. Click Grades on the leftmost column.
2. Select the relevant Segment, Level, Class and Course from the drop-down menus. Then, click Apply.
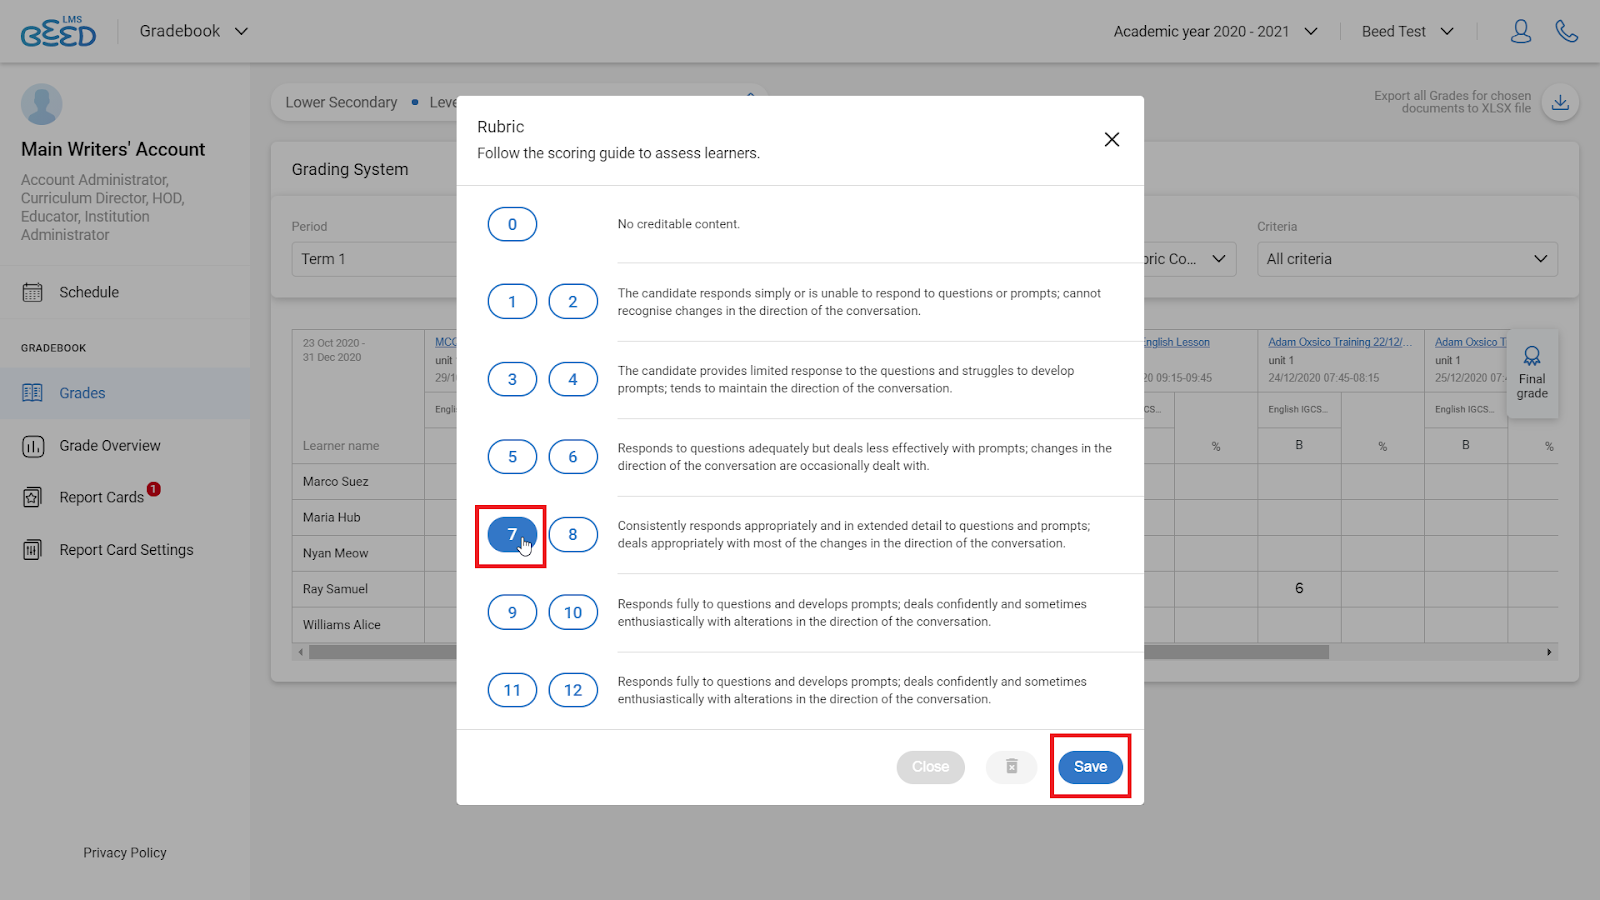
3. Click on the empty cell next to the Learner’s name.
4. In the Rubric menu, select the score for the Learner. Then, click Save.
Note: The criteria listed are those that have been selected in the Curriculum Builder when creating a Lesson.
How do I edit Grades for a Learner?
To edit Grades for a Learner:
1. Click Grades on the leftmost column.
2. Select the relevant Segment, Level, Class and Course from the drop-down menus. Then, click Apply.
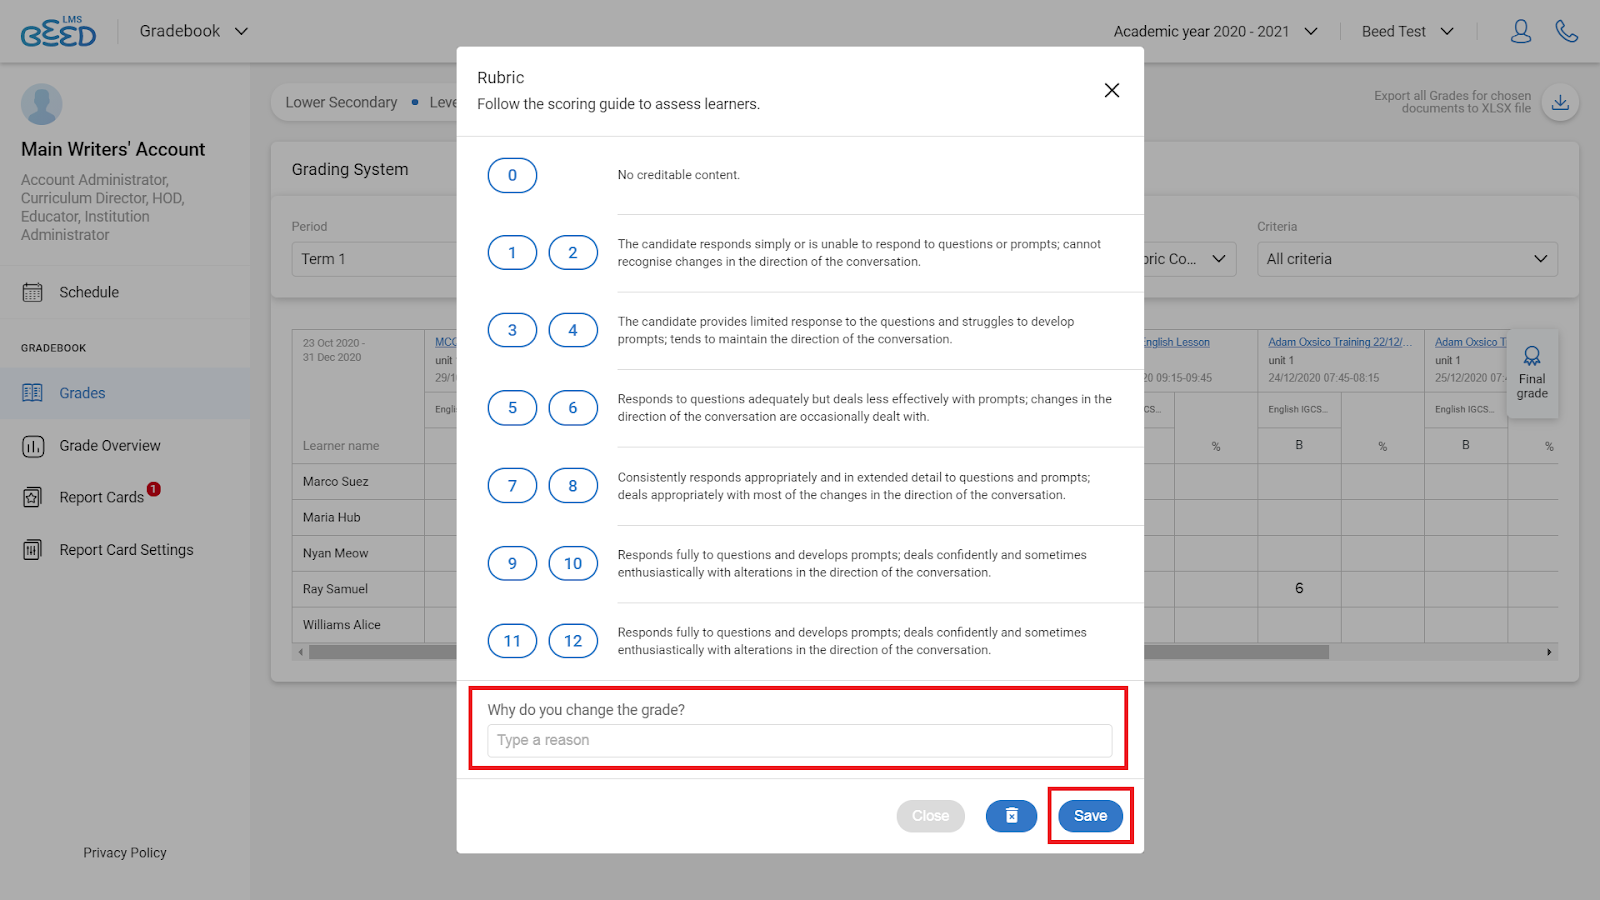
3. Click on the empty cell next to the Learner’s name.
4. In the Rubric menu, select a new score for the Learner. Enter the reason for the change under Why do you change the grade?. Then, click Save.
Note: Any grades that has been edited will be denoted with an asterisk (*) in the cells. When hovered over, the reason for change will be shown.
How do I delete Grades for a Learner?
To delete Grades for a Learner:
1. Click Grades on the leftmost column.
2. Select the relevant Segment, Level, Class and Course from the drop-down menus. Then, click Apply.
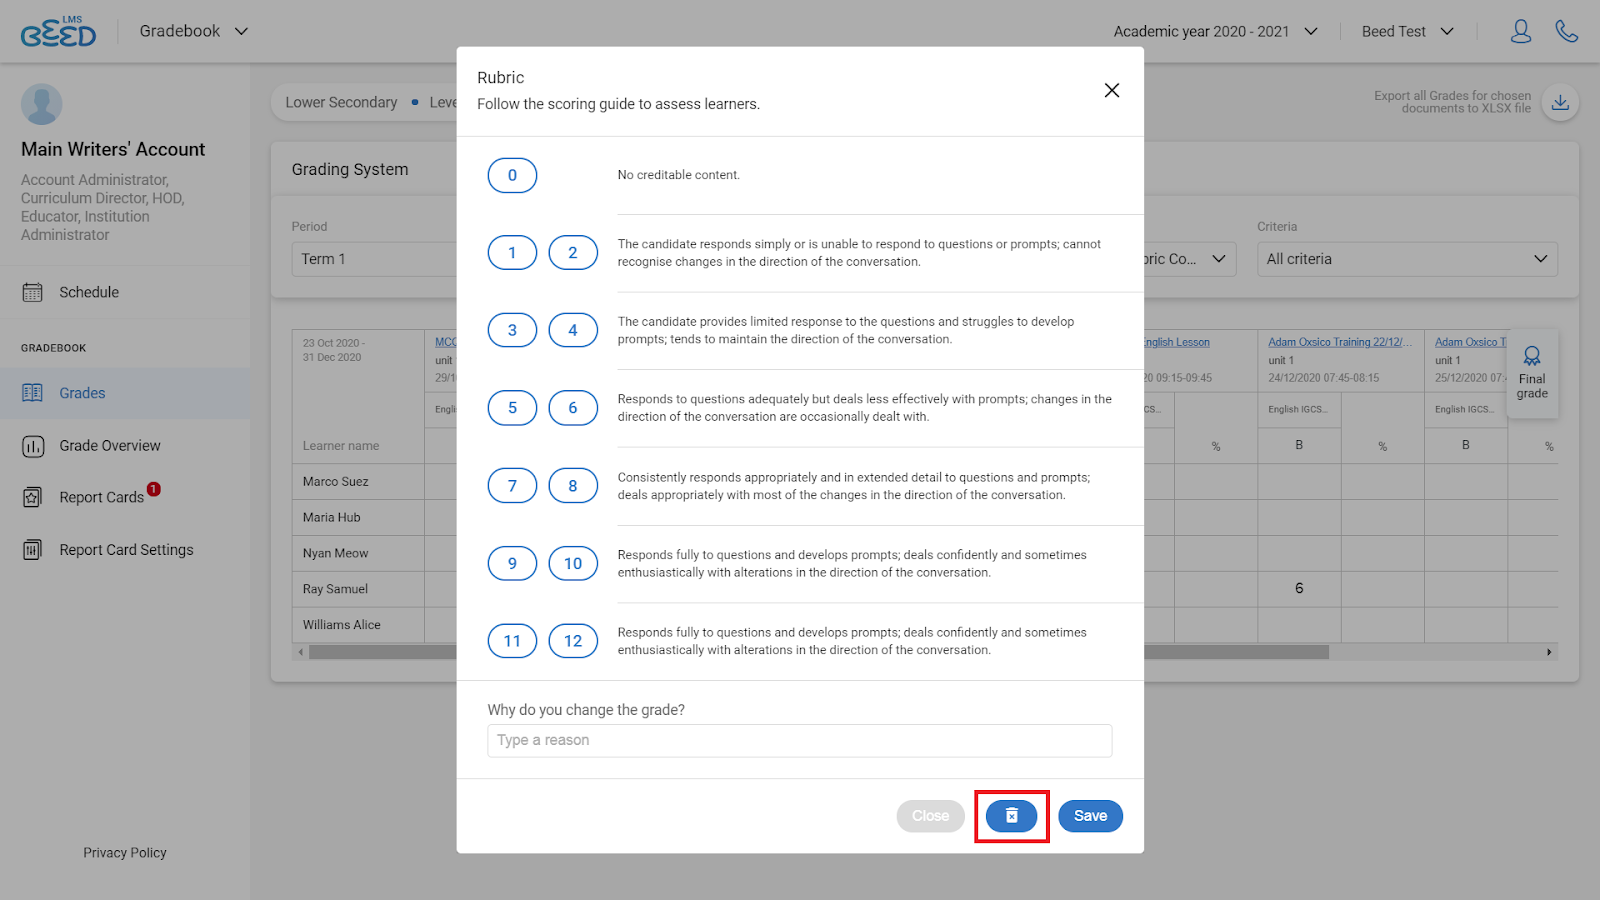
3. Click on a cell that is filled with a rubric score next to the Learner’s name.
4. In the Rubric menu, click on the trash bin icon in the bottom right.
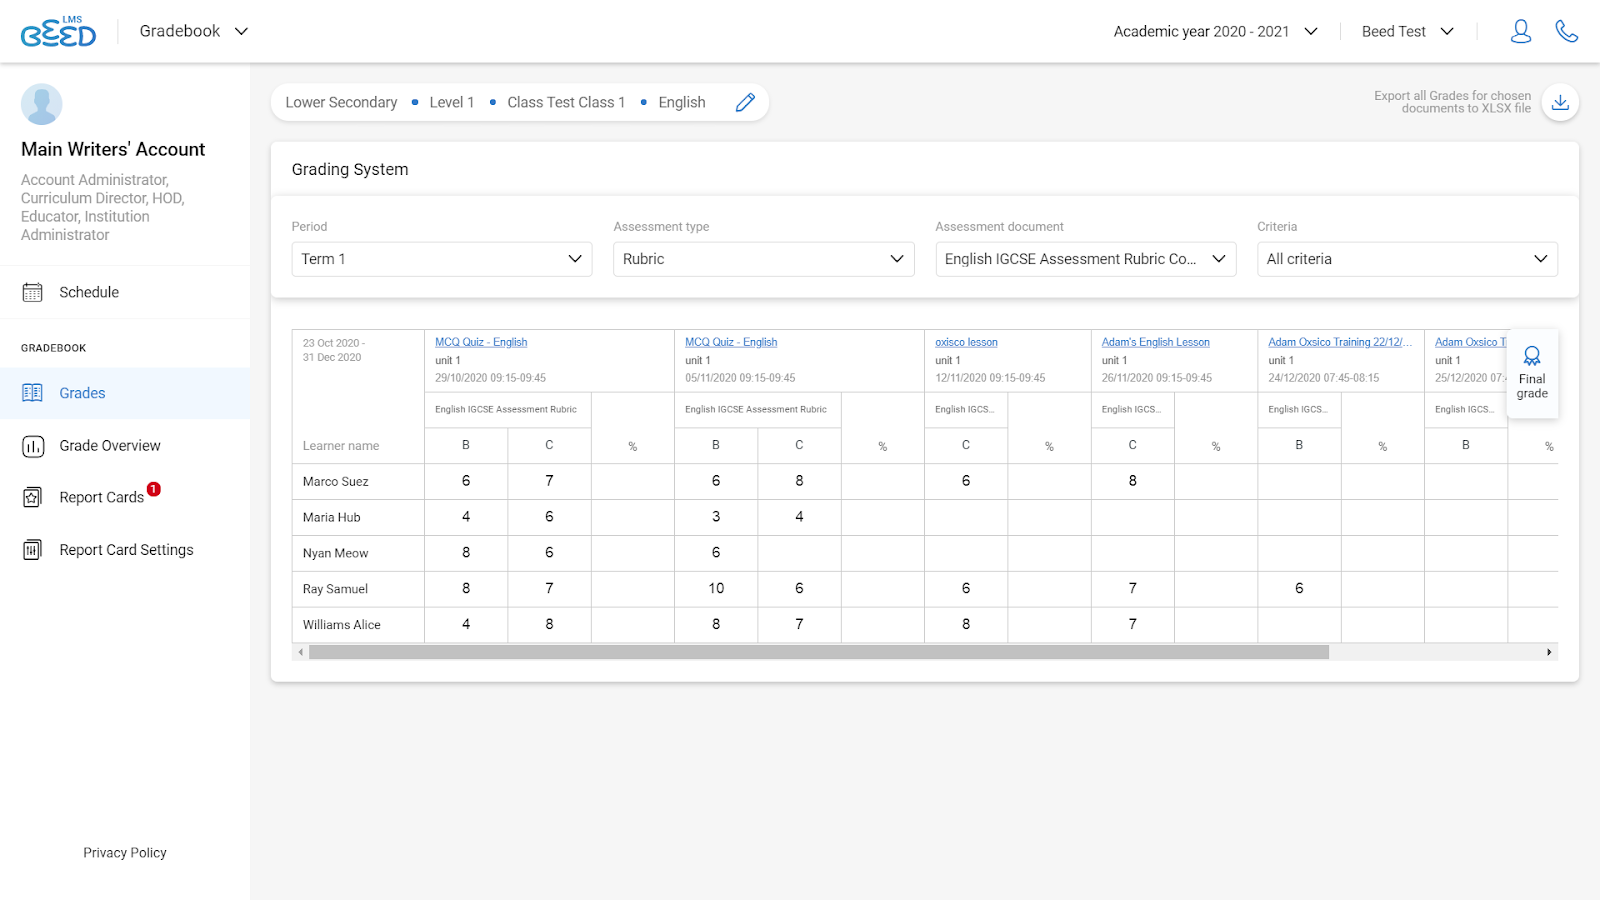
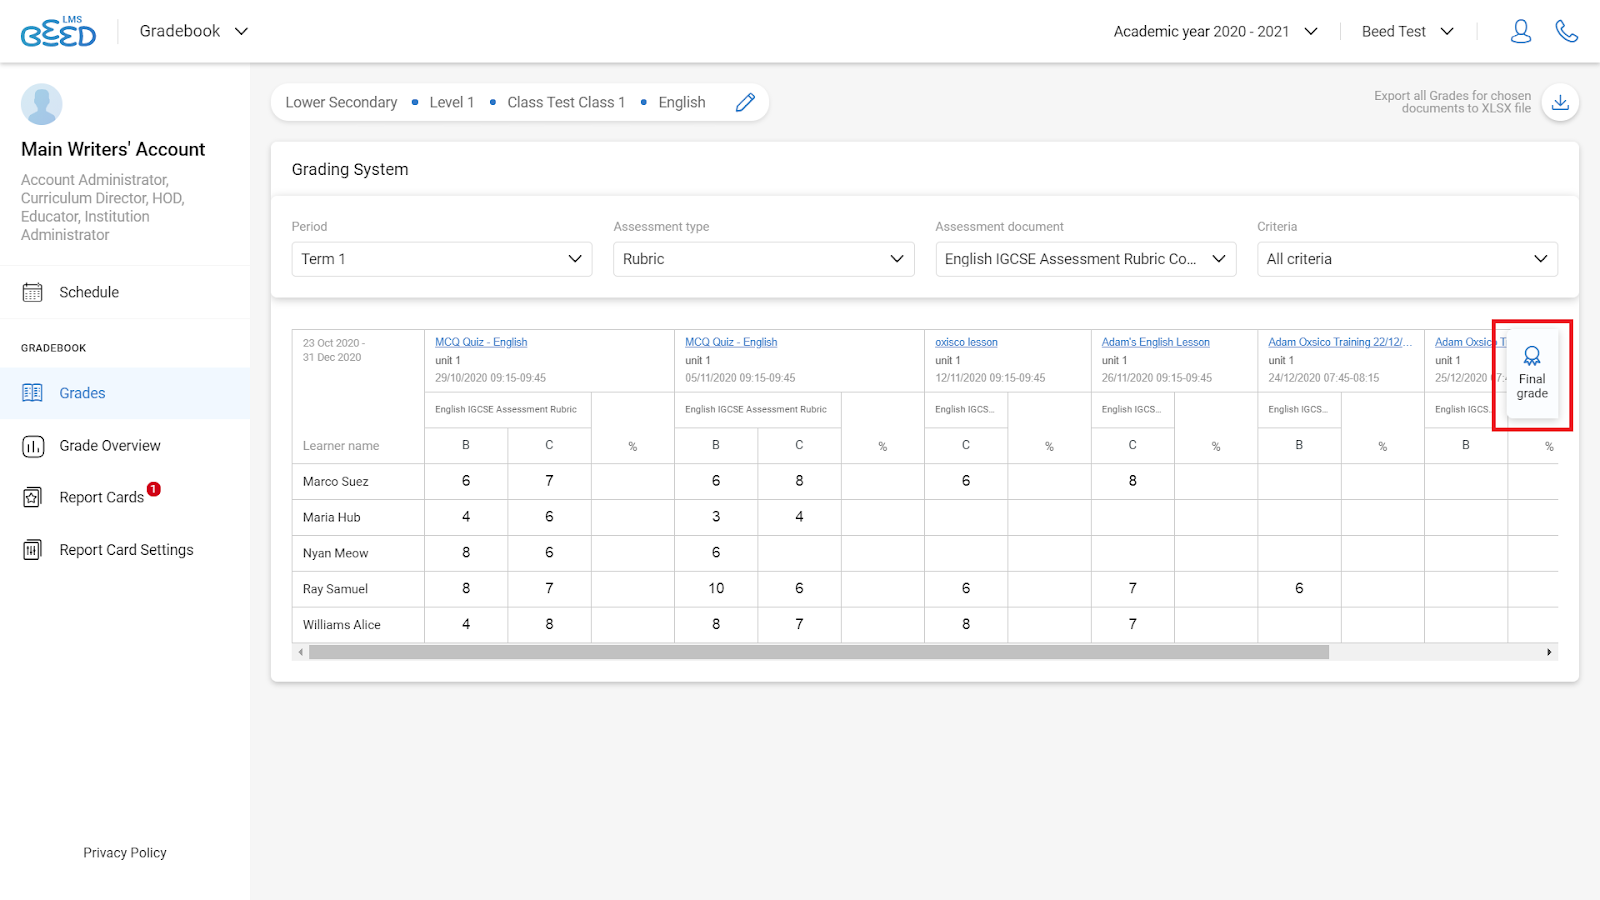
How do I add Final Grades for my Learners?
1. Click Grades on the leftmost column.
2. Select the relevant Segment, Level, Class and Course from the drop-down menus. Then, click Apply.
3. Select the relevant Period, Assessment type and Assessment document from the drop-down menus.
4. Click on the Final grade icon on the right hand corner of the table.
5. Click on the empty cell to add in the Final Grade for the specific criteria.
You can also leave a comment, or edit/ delete a comment for the Final Grade.
How do I include a comment for my Learners in Final Grade?
To include a comment in Final Grade:
1. Select Grades on the leftmost column.
2. Select the relevant Segment, Level, Class and Course from the drop-down menus. Then, click Apply.
3. Select the relevant Period, Assessment type and Assessment document from the drop-down menus.
4. Click on the Final grade icon on the right hand corner of the table.
5. Click on the plus icon under Comment to add a comment for the Learner.
6. Write down your comment in the box provided. Then, click Save.
Both Learners and Parents can view the comment included in Final Grade.

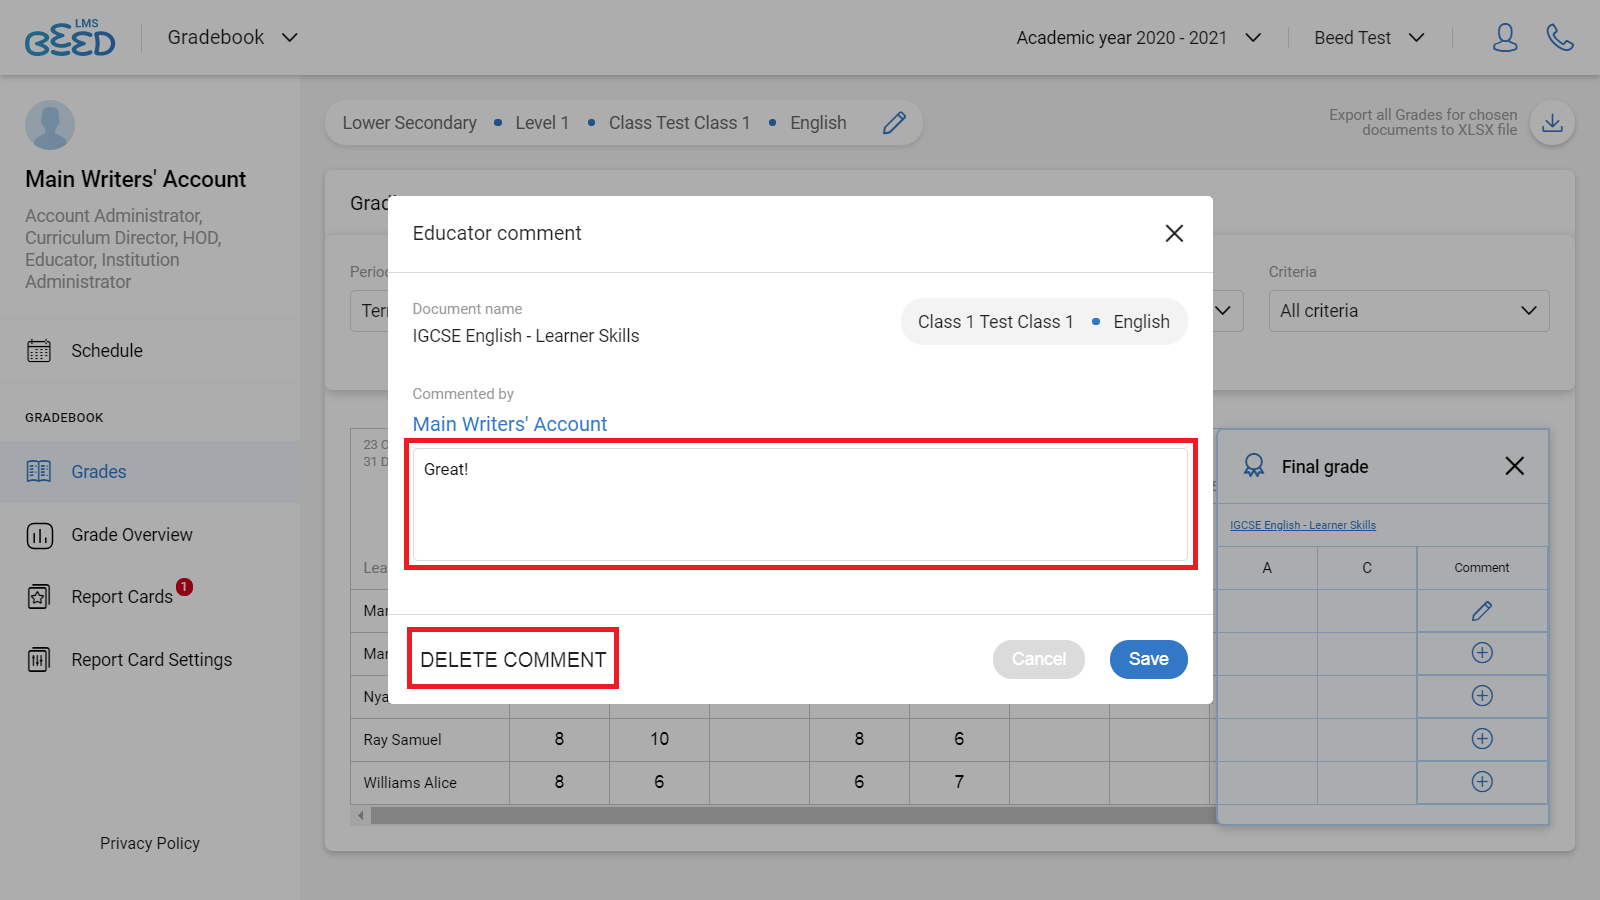
How do I edit or delete a comment for my Learners in Final Grade?
To edit or delete a comment in Final Grade:
1. Select Grades on the leftmost column.
2. Select the relevant Segment, Level, Class and Course from the drop-down menus. Then, click Apply.
3. Select the relevant Period, Assessment type and Assessment document from the drop-down menus.
4. Click on the Final grade icon on the right hand corner of the table.
5. Click on the pencil icon under Comment on the right of the Learner’s name.
6. To edit a comment:
Re-write the comment. Then, click Save.
To delete a comment:
Click on Delete Comment in the bottom left.
What is the difference between Grade and Final Grade?
A Grade is given to the Learner for achieving a specific criteria in a Lesson while the Final Grade is the aggregated score of these specific criteria in all the Lessons in a Term.
What is the Grade Overview?
The Grade Overview is where you can visualise your class's grades and performance throughout a term or year. Click through the tutorial below for a more in-depth look at Grade Overview:
What is the Segment Aggregator?
The Segment Aggregator tab can be found on the leftmost column in the main Gradebook page.
Note: Only Homeroom Educators can access the Segment Aggregator tab.
The Segment Aggregator is used by the Homeroom Educators to determine and produce Final Grades for a Learner. The Segment Aggregator criteria are based on the Assessment Rubric created in Curriculum Builder by Educators within your Institution.
Steps to view and make changes to grades under the Segment Aggregator tab are similar to how you do them under the Grades tab. See:
How do I view a Learner’s Grades?
How do I add Grades for a Learner?
How do I add Final Grades for my Learners?
Troubleshooting - Why are my Learner's percentage grades not appearing?
If Learners’ grades are not appearing, it could be because of either of the following:
- The educator has not finished grading the lesson yet. Once all points are given, the percentage grades will be displayed.
- There are no points for this Lesson, so there is no percentage grade given.
Report Cards Function In Gradebook
How do I view a Report Card?
To view a Report Card:
1. Click Report Cards on the leftmost column.
2. Click on the pencil icon in the upper segment of the page. Select the relevant Segment, Level and Class. Then, click Apply.
3. Select the relevant Term and Card status from the drop-down menus.
4. Click View on the right of the Learner’s name.

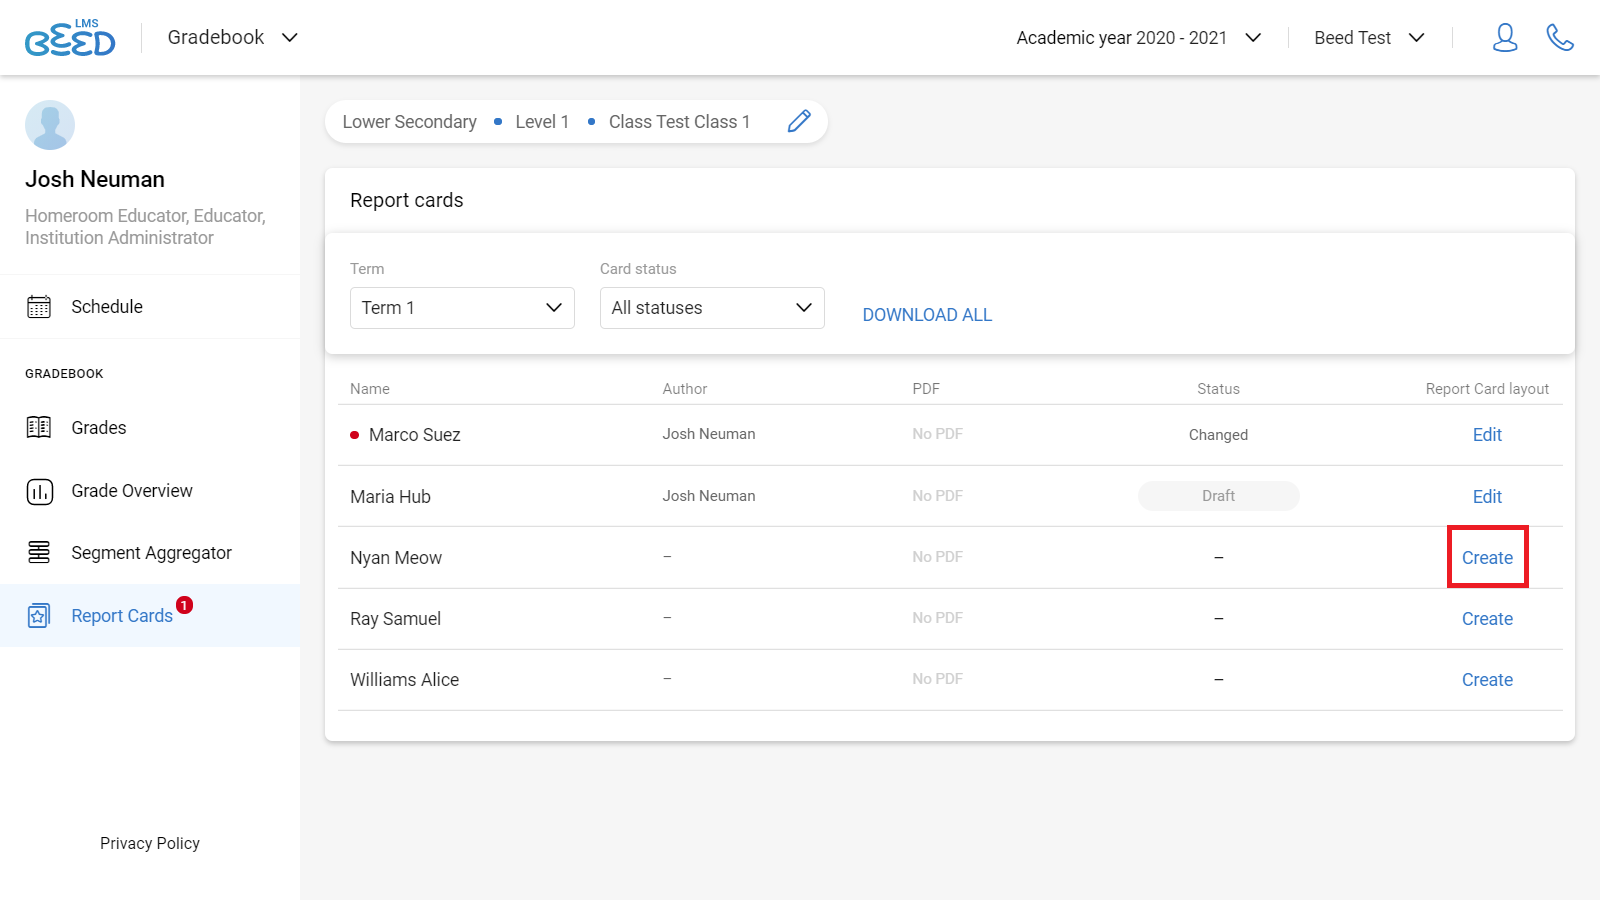
How do I create a Report Card?
1. Click Report Cards on the leftmost column.
2. Click on the pencil icon in the upper segment of the page. Select the relevant Segment, Level and Class. Then, click Apply.
3. Select the relevant Term and Card status from the drop-down menus.
4. Click Create on the right of the Learner’s name.
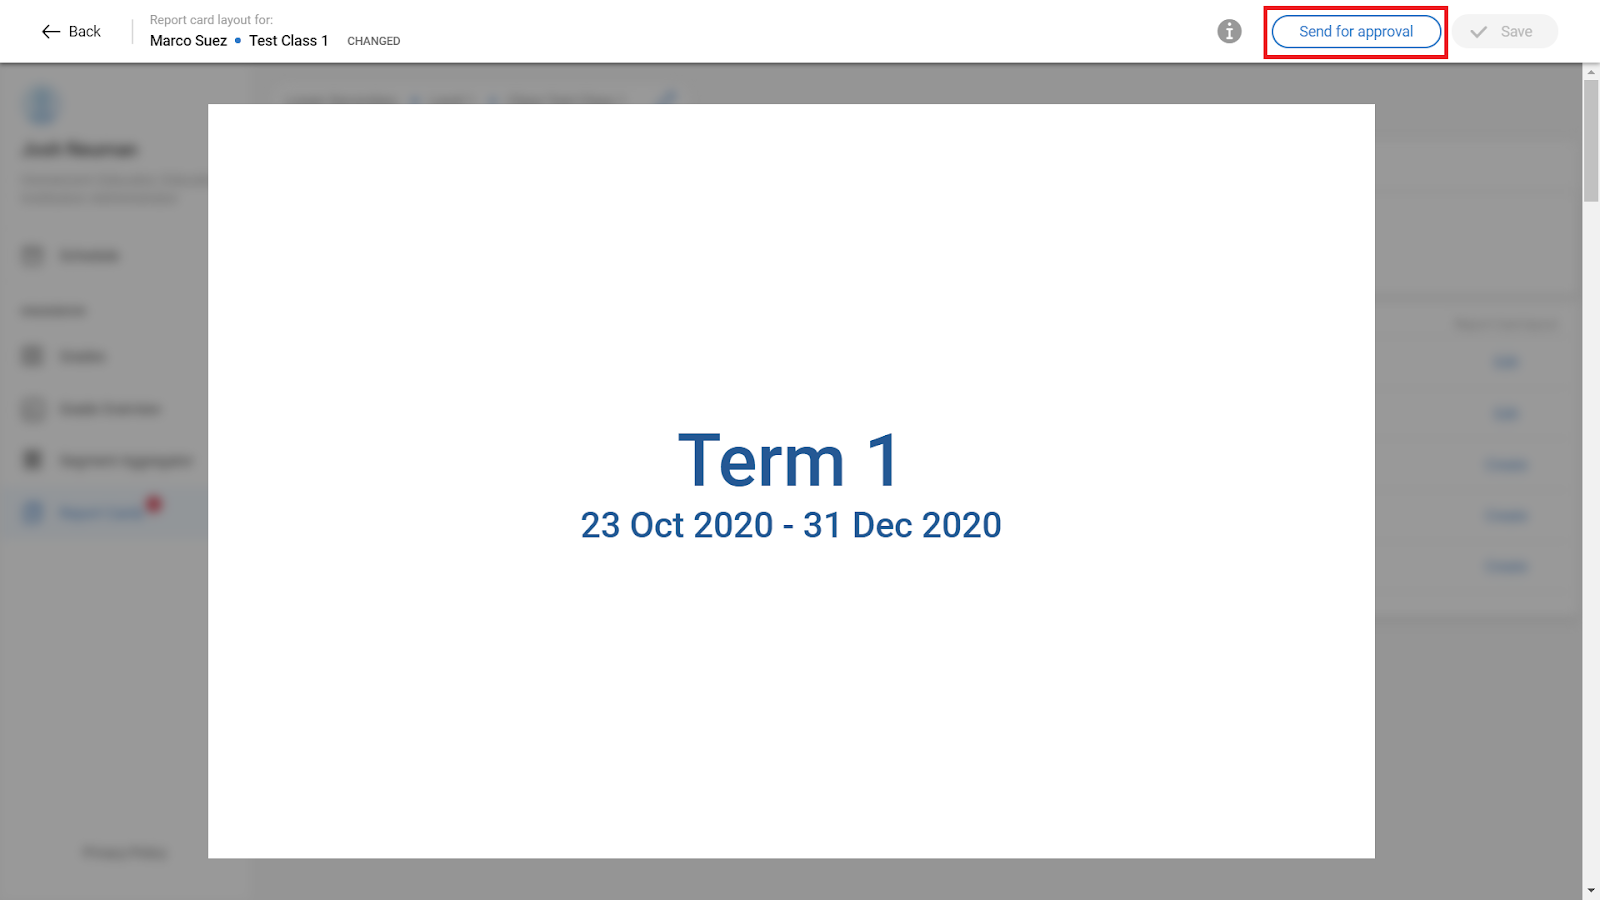
5. Fill in the necessary. Then, click Save in the top right.
Note: If you are an Educator, you will have to send the Report Cards for approval. You can do this by clicking Send for approval in the top right.
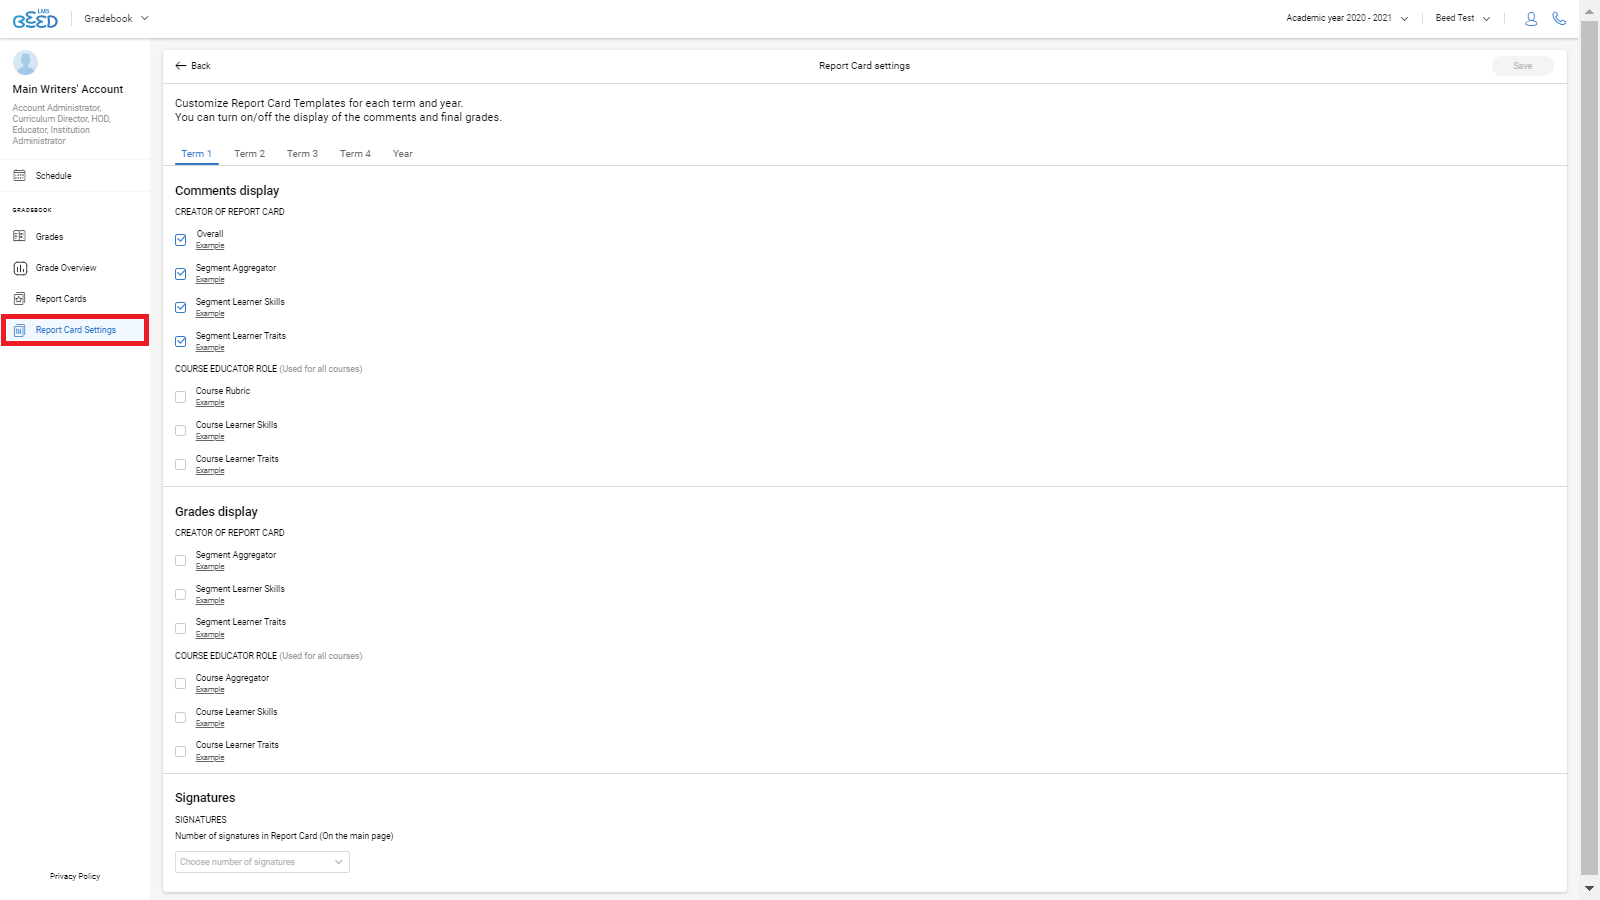
Can I customise a Learner’s Report Card?
Yes. To do this:
1. Click Report Card settings on the leftmost column.
2. Click Go to settings under Report Card settings.
3. Click on the Term or Year tabs to customise.
4. Under Comments display and Grades display, tick the boxes for options you want to include in the Report Card. Under Signatures, select the Number of signatures to display on the Report Card.
Note: Click Example right below each option to view how it will be displayed.
5. Click Save in the top right.
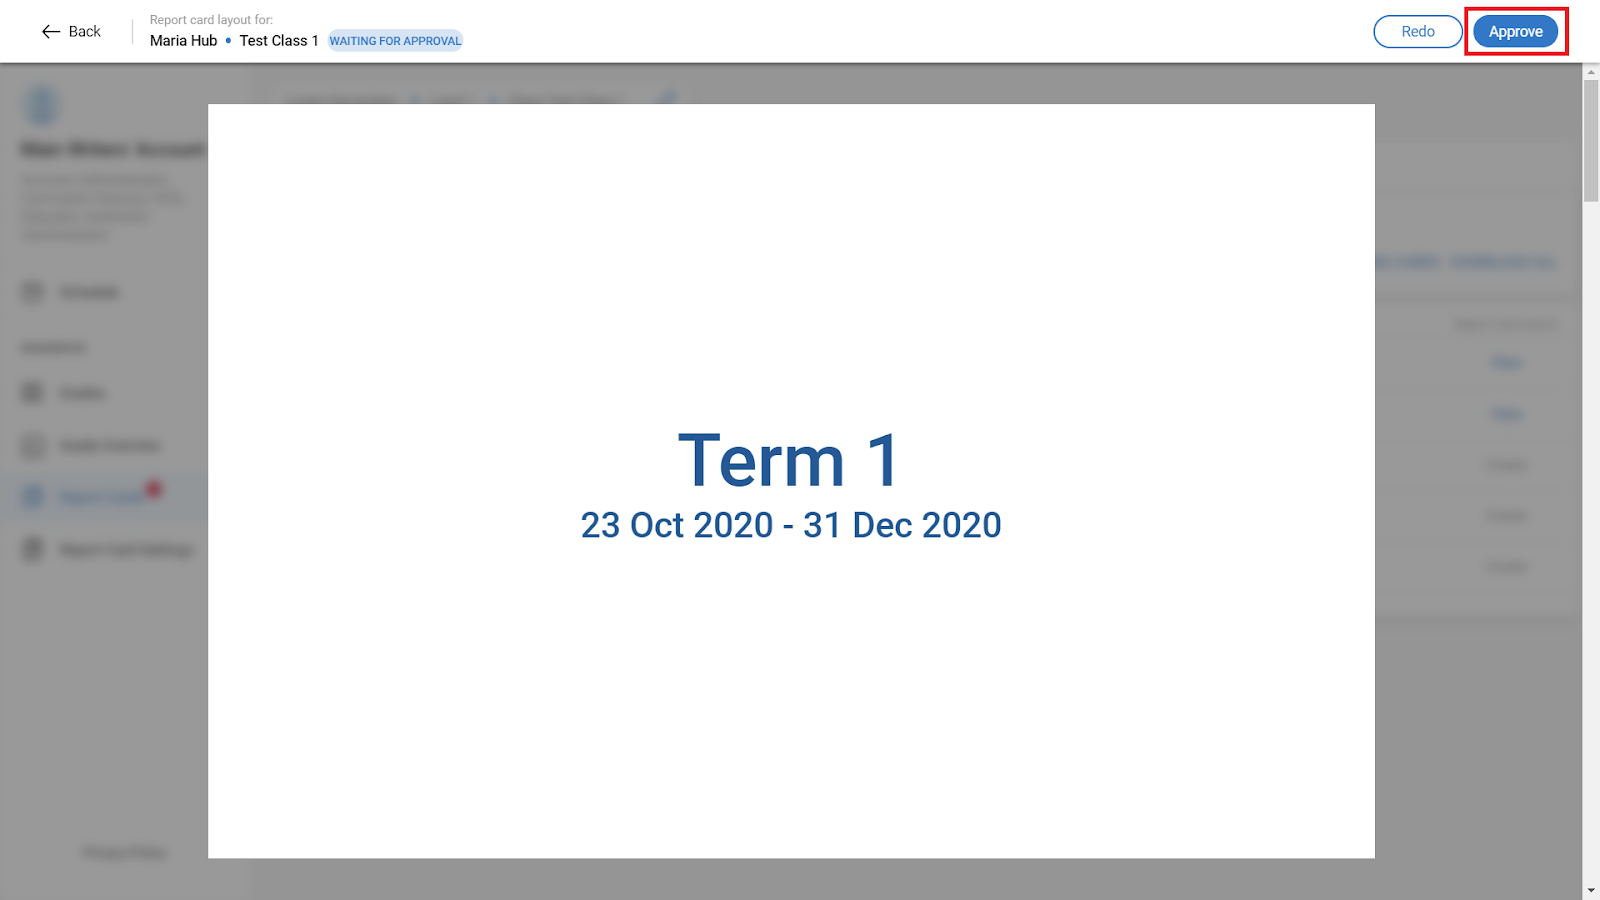
How do I approve a specific Report Card?
To approve a Report Card:
1. Click Report Cards on the leftmost column.
2. Click on the pencil icon in the upper segment of the page. Select the relevant Segment, Level and Class. Then, click Apply.
3. Select the relevant Term and Card status from the drop-down menus.
4. Click View on the right of the Learner’s name.
5. Click Approve in the top right.
You can also approve all Report Cards at once.
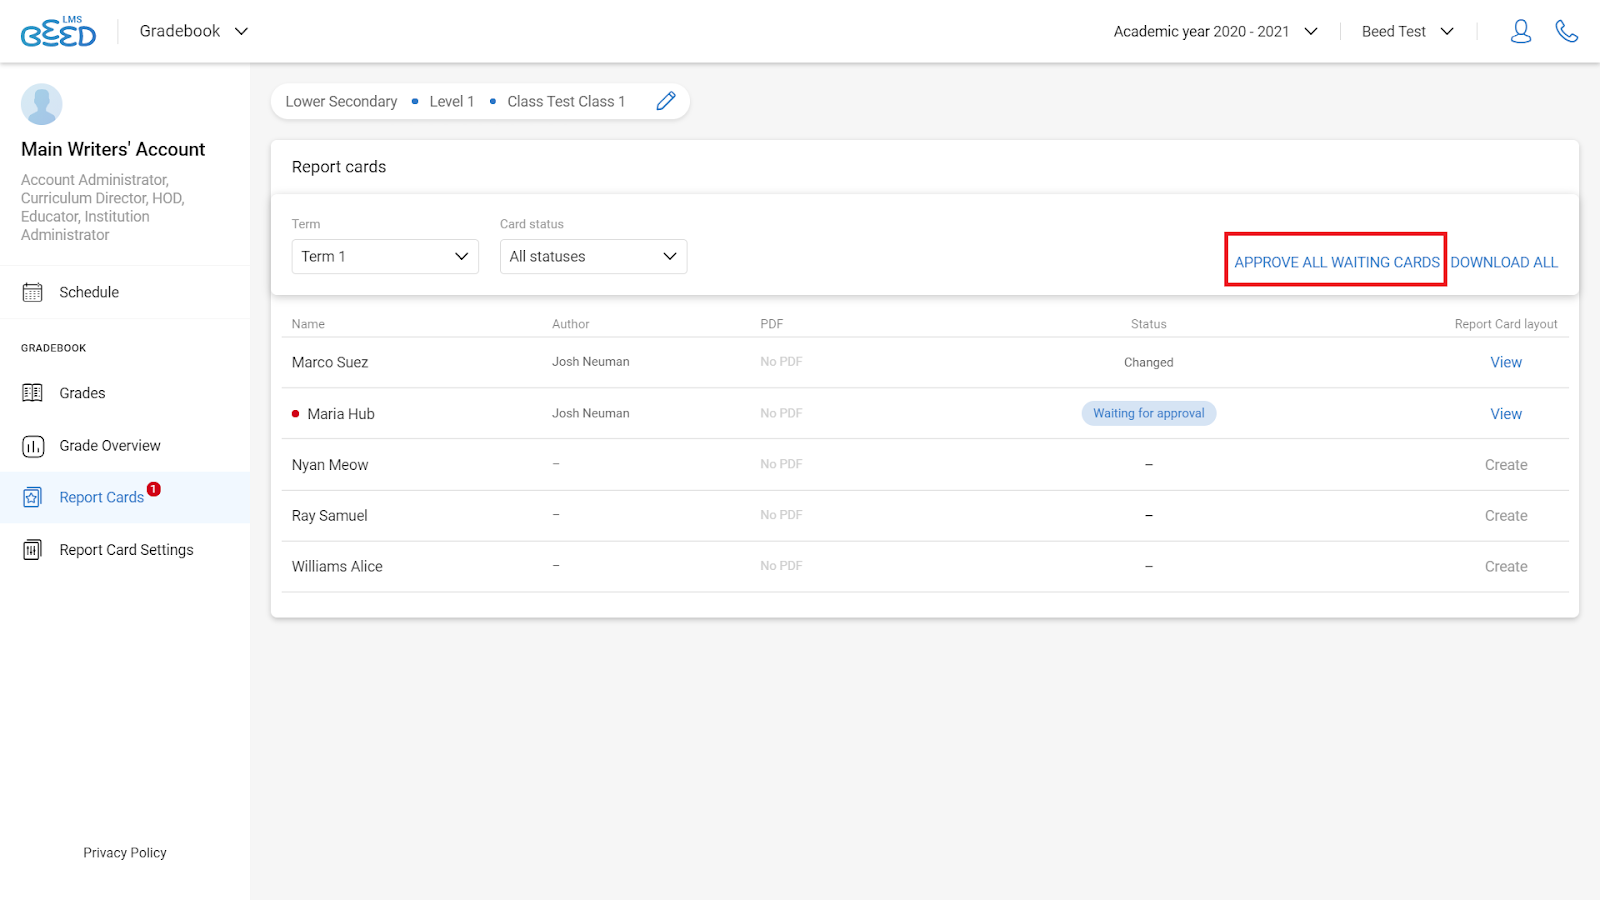
How do I approve all Report Cards at once?
To approve all Report Cards at once:
1. Click Report Cards on the leftmost column.
2. Click on the pencil icon in the upper segment of the page. Select the relevant Segment, Level and Class. Then, click Apply.
3. Select the relevant Term. Then, select Waiting for approval under Card status.
4. Click Approve All Waiting Cards in the top right.
You can also approve a specific Report Card.
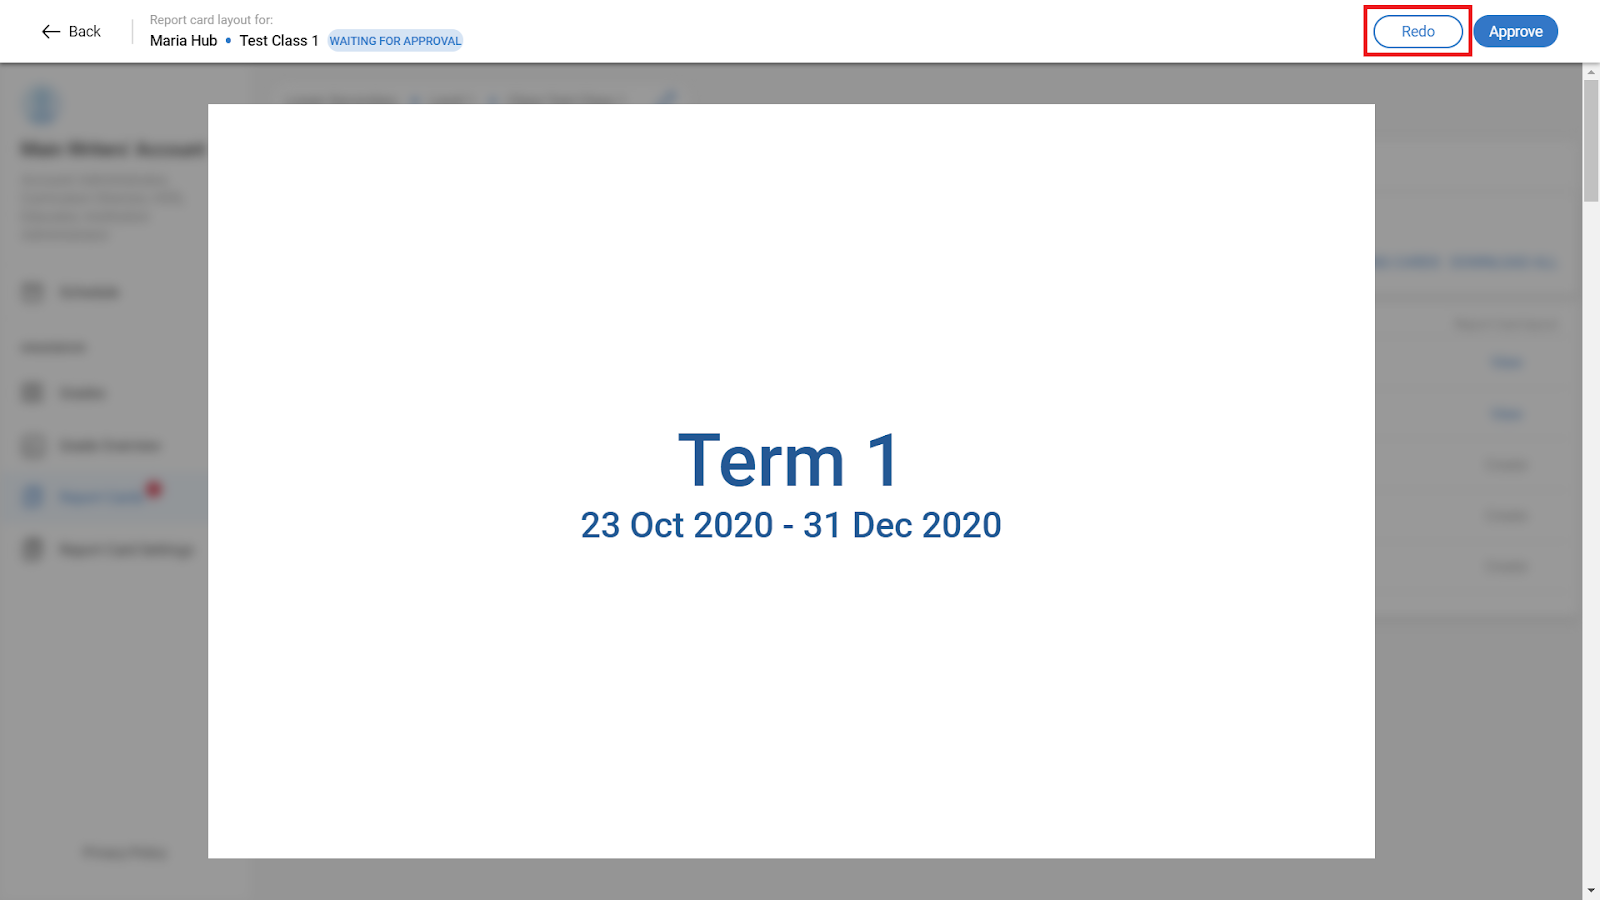
Can I request for a Report Card to be revised?
Yes. To do this:
1. Click Report Cards on the leftmost column.
2. Click on the pencil icon in the upper segment of the page. Select the relevant Segment, Level and Class. Then, click Apply.
3. Select the relevant Term and Card status from the drop-down menus.
4. Click View on the right of the Learner’s name.
5. Click Redo in the top right.
What do the various status of a Report Card mean?
|
Draft |
The Report Card is in the preliminary stages of creation. |
|
Sent for approval |
The Educator has sent the Report Card for approval by the Curriculum Director. |
|
Changed |
A Report Card that has been changed after the approval process. |
|
Rejected |
The Curriculum Director has requested that the Report Card be revised. |
|
Sent to Learner |
The Curriculum Director has approved the Report Card and the Learner will receive the Report Card through email. |
Can I assign an Educator to create Report Cards for a Class?
Yes. To do this:
1. Click Report Card settings on the leftmost column.
2. Click Go to assignment under Assignment.
3. Enter the Class name in the search bar provided.
4. Select the specific Educator from the drop-down list next to the Class name.
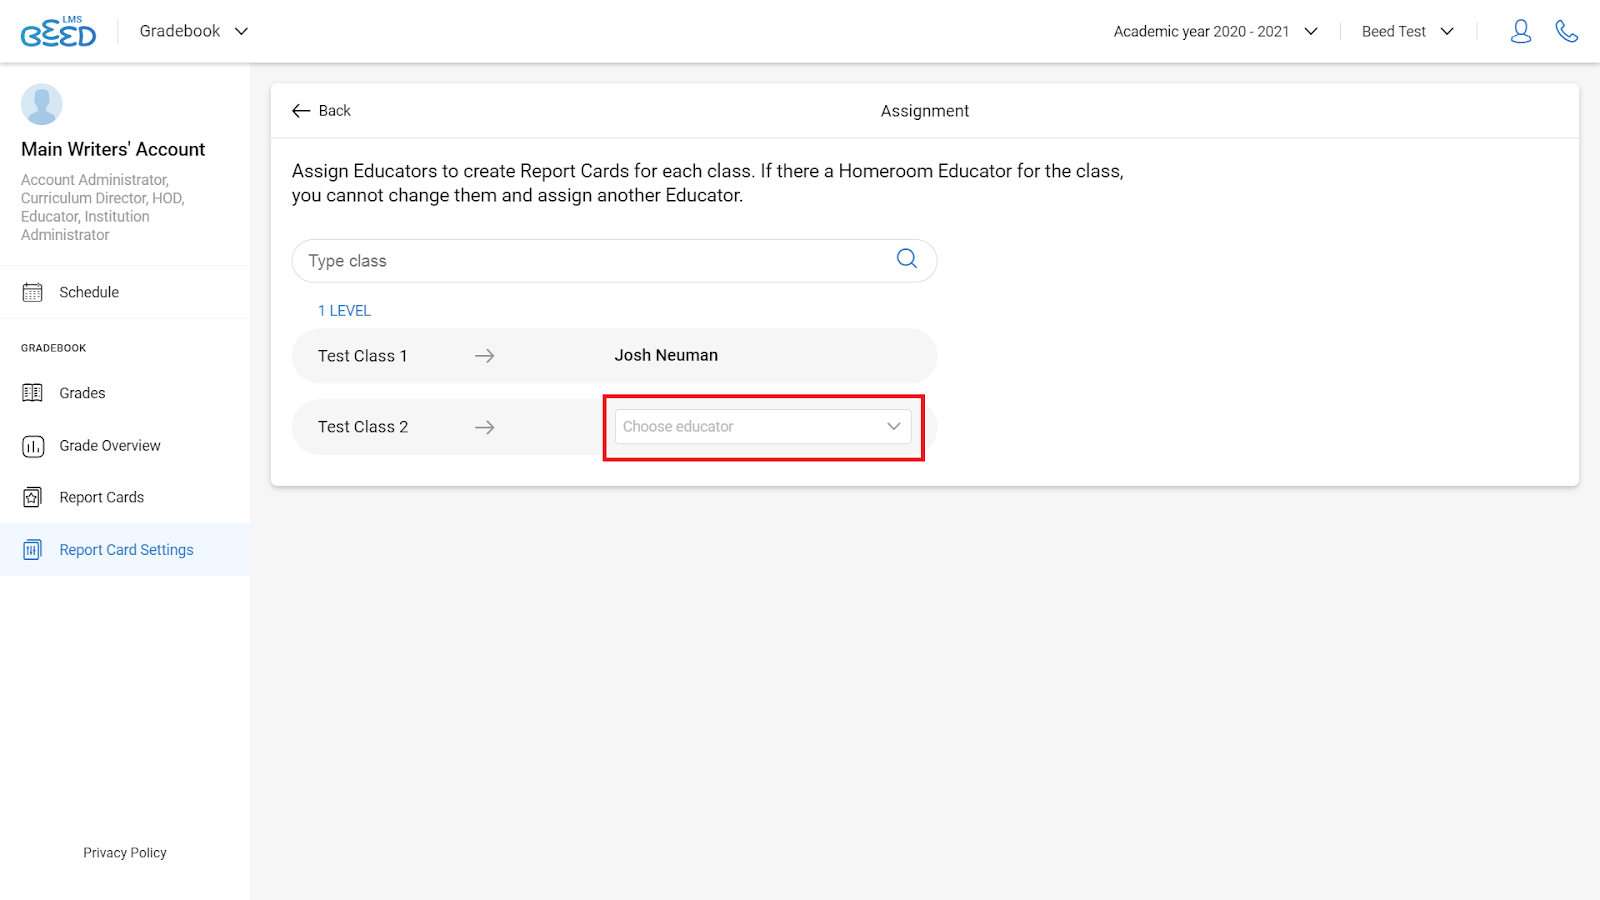
Note: If there is already a Homeroom Educator for a particular Class, you are unable to assign another Educator to this Class.
I’ve been assigned to create a Report Card, how should I proceed?
Being a Homeroom Educator automatically allows one to create Report Cards for the Learners. However, in cases where there is no Homeroom Educator for the class, the Curriculum Director may assign an Educator to create the Report Cards.
To approach an assignment:
1. Click Report Cards on the leftmost column.
2. Click on the pencil icon in the upper segment of the page. Select the relevant Segment, Level and Class. Then, click Apply.
3. Select the relevant Term and Card status from the drop-down menus.
4. Click Create on the right of the Learner’s name.
5. Fill in the necessary. Then, click Save in the top right.
6. Click Send for approval in the top right.

See What happens after my Report Cards are approved by the Curriculum Director?
What happens after my Report Cards are approved by the Curriculum Director?
When your Report Cards have been approved by the Curriculum Director, your Learners will receive a soft copy sent to their emails by default.
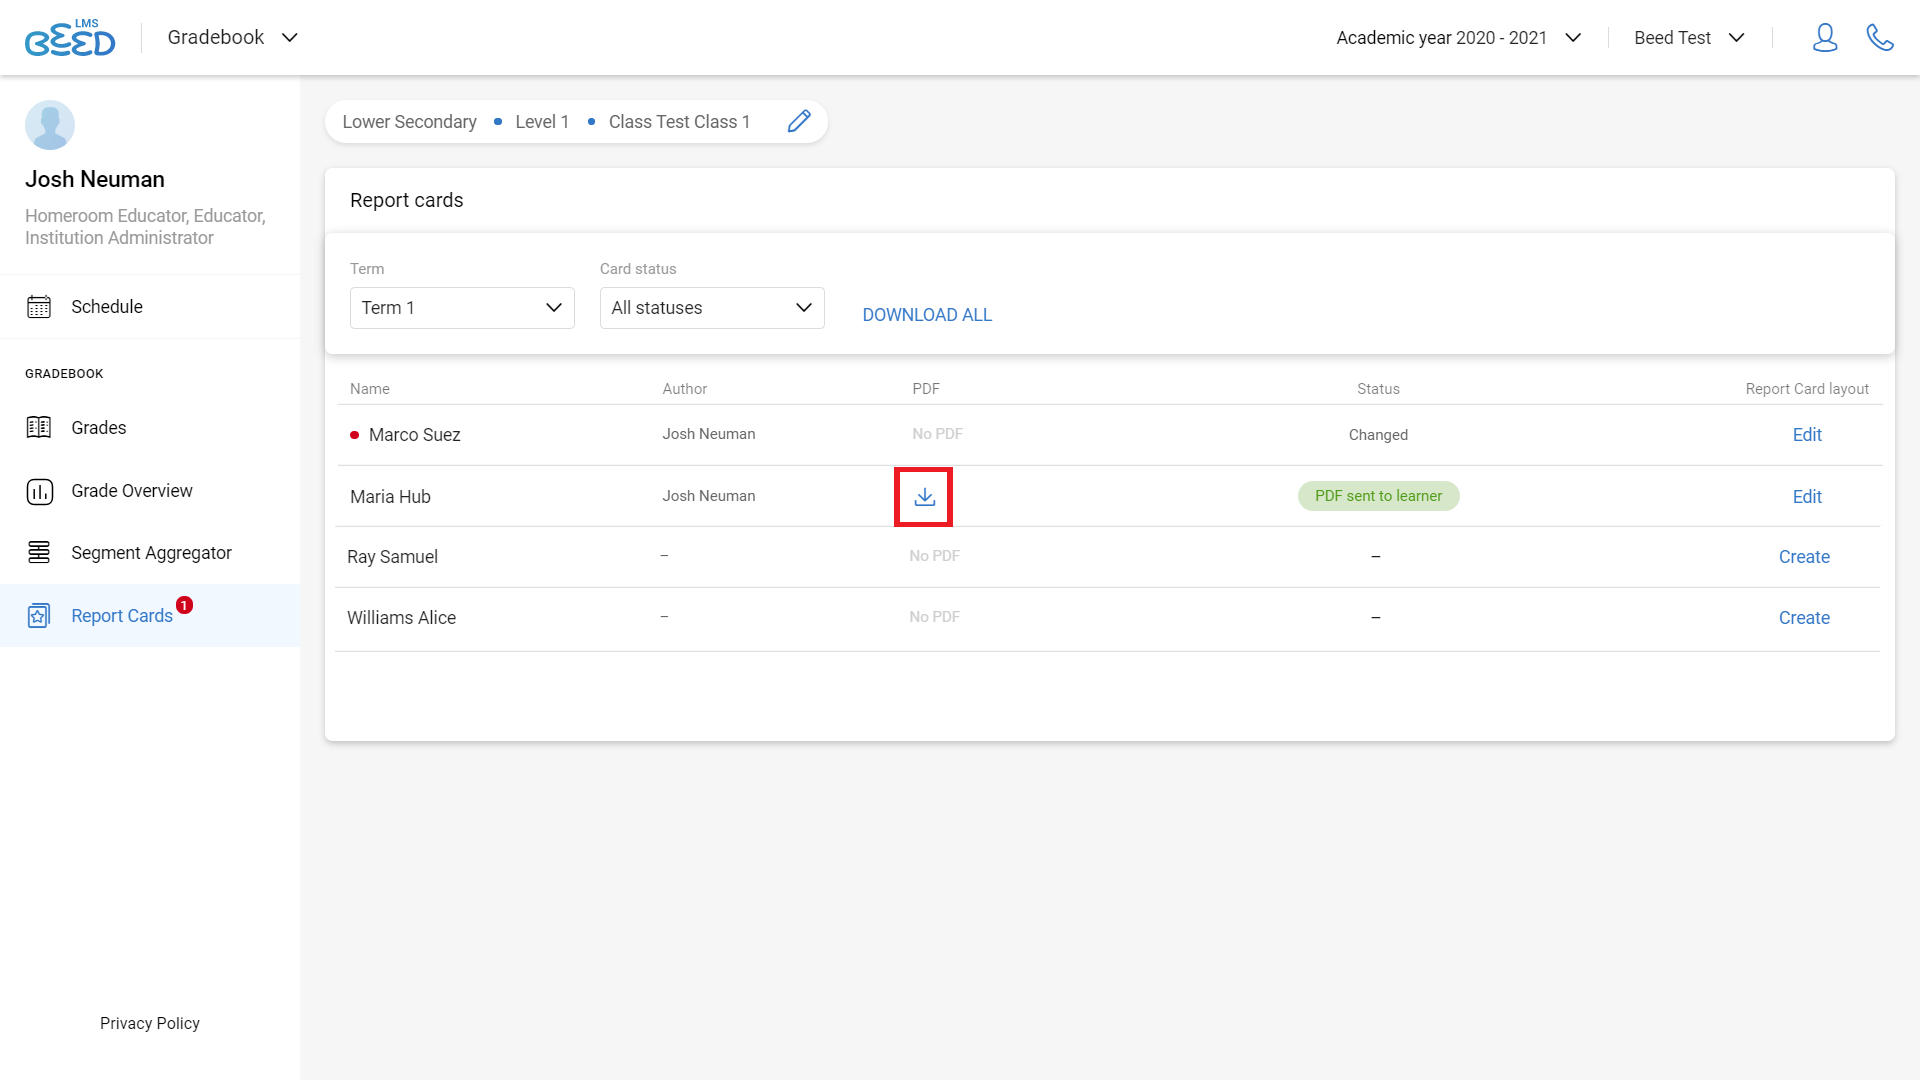
You will also be able to download the Report Cards.
To download an individual Report Card:
1. Click Report Cards on the leftmost column.
2. Click on the pencil icon in the upper segment of the page. Select the relevant Segment, Level and Class. Then, click Apply.
3. Select the relevant Term from the drop-down menu.
4. Click on the download icon under the PDF section on the right of the Learner’s name.
What happens when my Report Cards are not approved by the Curriculum Director?
The Curriculum Director can request for the Report Cards to be revised.
To revise a Report Card:
1. Click Report Cards on the leftmost column.
2. Click on the pencil icon in the upper segment of the page. Select the relevant Segment, Level and Class. Then, click Apply.
3. Select the relevant Term and Card status from the drop-down menus.
4. Select the Learner Report Card you would like to revise.
5. Edit the contents of the Report card. Then, click Save in the top right.
6. Click Send for approval in the top right.
No Comments