LMS - Admin Panel
How to set up a new Institution
New Institution - Introduction
In the LMS, you can set up multiple institutions under your organisation. These institutions can be:
- Different branches of your organisation (e.g. BeED Malaysia, BeED Estonia and BeED Belarus)
-
Different divisions of your organisation (e.g. BeED University, BeED K-12 and BeED Journeys)
This section will teach you how you can set up new institutions according to your needs as well as edit them in the future.
What is an Institution in the LMS?
An Institution is your organisation or school. You can set up and manage Facilities, Courses, Staff, Educators, Learners and Parents across all individual or network institutions in your organisation.
In the LMS, you can set up and manage multiple institutions under your organisation. These institutions can be:
- Different branches of your organisation (e.g. BeED Malaysia, BeED Indonesia and BeED Singapore)
- Different divisions of your organisation (e.g. BeED University, BeED Secondary and BeED Primary)
How to set up a new Institution
How to create a new Institution
Step 1. On the leftmost column, click on the Institution tab under Personnel. This page lists down all the Institutions under your organisation.
Click on the Create Institution button on the top right corner to set up a new Institution.

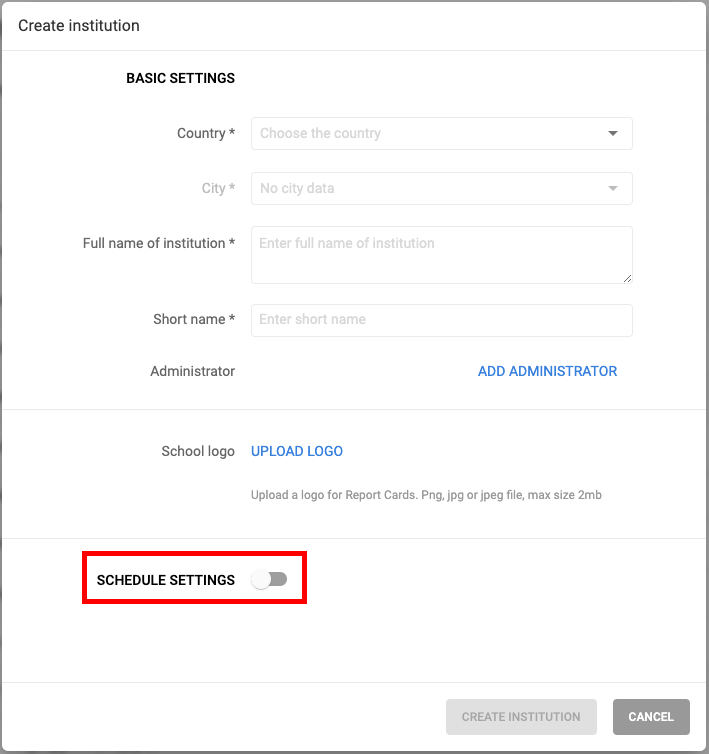
Step 2: On the Create institution page:
-
Select the Country and City where your Institution is located
-
Type out the Full name of Institution as well as the Short Name (the Short Name determines how the Institution name is displayed in the LMS when space is limited).
-
(Optional) You can choose to Add Administrator now. But we will go over this in a later section.
-
Upload your Institution’s logo, which will appear on all Learner Report Cards.
-
(Optional) You can choose to set up your Institution Schedule Settings now by toggling this section on. But note that once you create an Academic Year, you will NOT be able to change it later. We will go over this in more detail in Section 1.2.
Once you are satisfied with the current settings, click on Create Institution. This will create your Institution.

How to set your Institution's Schedule Settings
How to set your institution Schedule Settings
In the Schedule Settings section, you set your institution’s time schedule by specifying the Academic Year, Terms, Study days as well as the Shifts in your institution.
Step 1: To access your Institution’s Schedule Settings:
(a) When creating a NEW Institution, toggle the Schedule Settings on.
(b) When editing an EXISTING institution, click on the edit icon next to the Institution name.

Step 2: Select the Academic Year you would like to set a schedule for.

Step 3: Add all the individual Terms inside this Academic Year.
Terms refer to the study terms/semesters an Academic Year is divided into. You can have multiple Terms per Academic Year.

Step 4: Set your Institution Study Days to specify the days in which your Institution will have classes and extracurricular activities. This will affect your Institution Timetable, as you will not be able to add classes to non-Study Days.

Step 5: Add Study Shifts to your Institution. These refer to groups of study periods or time slots in which you would slot in classes. You can have up to three separate shifts in your Institution. For example, your Institution may have a morning shift from 7:30am - 11:30 am, and then another afternoon shift from 1:30 pm - 5:30pm.

Step 6: Click on Add Duration to specify the lesson periods/time slots within each shift. For example, you may set a 45 min time slot (8.00am-8.45am) and another 1 hour time slot (8.45 am - 9.45 am) in a different shift.

Step 7: Click on Create Institution once you are satisfied with your settings!
Why am I unable to create a new Institution?
Why am I unable to create a new Institution
Only the System Administrator can create new Institutions.
If you would like to designate a new user as a System Administrator, please contact your nearest BeED representative and we will be happy to assist you.
Why can’t I view the list of all Institutions in my organisation?
Why can’t I view the list of all Institutions in my organisation?
Only the System Administrator can view the list of institutions. Other Admin staff can only view the details of the Institution they are assigned to.
If you would like to designate a new user as a System Administrator, please contact a BeED representative and we will be happy to assist you.
How to set up Administrators
Administrators - Introduction
The Administrator tab allows the master BeED account holder to create and manage Administrator roles.
Administrators are the only users who will have permission to access the BeED Admin Panel. They will not have access to the Curriculum Builder or Gradebook unless given Educator roles.
How to create and edit Administrators
Creating Administrators

1. In the Administrator page, click on the Add Administrator button on the top right corner.
2. Fill in the empty fields with the appropriate information.
3. At the bottom of the page, click on the Add Institution button. Select the Institution(s) this person will be an Administrator for. Save your changes.
4. Click on Create Administrator once you are satisfied with your entries.
5. You will now see the person listed under the Administrator page, with Administrator listed as his account Type.
Editing Administrators
Click on the three dot icon at the right hand side of the Administrator’s name. From the drop down menu, select Edit Profile. Change the necessary information in their respective fields and click Save.

How to deactivate/ reactivate/ delete Administrators
Deactivating Administrators
To deactivate an Administrator account, click on the three dot icon at the right hand side of the Administrator’s name. From the dropdown menu, click on Deactivate. This person will no longer be able to access the Admin Panel.

Reactivating Administrators
To reactivate an Administrator account, click on the three dot icon at the right hand side of the Administrator’s name. From the dropdown menu, click on Activate. The account will now be reactivated

Deleting Administrators
To delete an Administrator account, click on the three dot icon at the right hand side of the Administrator's name. From the dropdown menu, click on Edit Profile. Then, click on the Delete Administrator button on the bottom left corner of the menu.

How to manage roles of existing Administrators
Managing Roles
1. Click on the three dot icon next to the Administrator's name. Click on Change the Role

2. In the Roles page, you can now add, edit and delete the user's roles.
- To delete an existing role, click on the x button next to the role
- To edit an existing role, click on the pencil icon next to the role
- To add a new role, click on Add Learner's Role / Add Educators Role / Add Admin Role

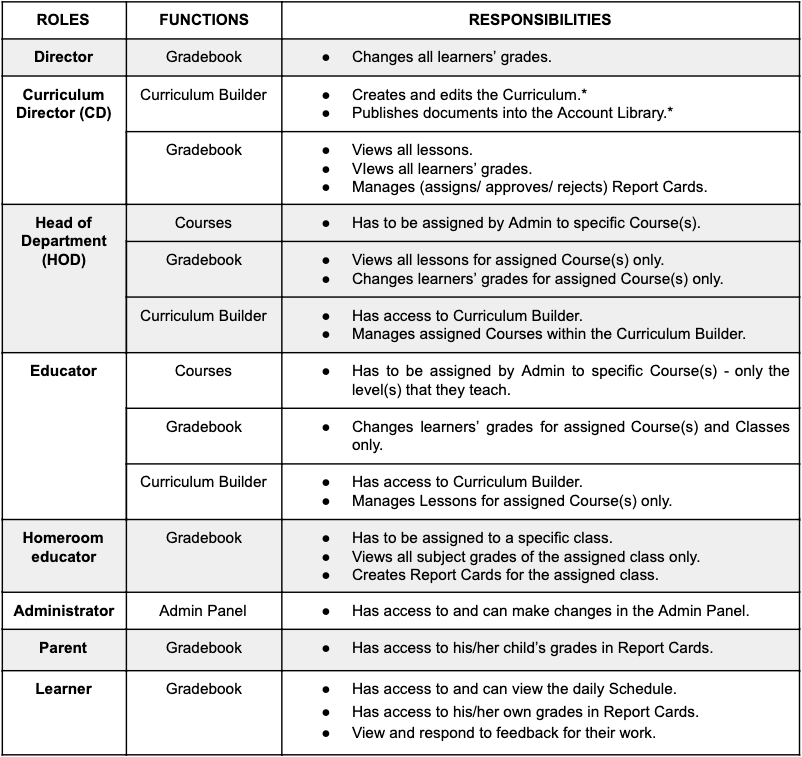
For a deeper understanding of each role, refer to the table below
How to set up Courses
Courses - Introduction
Creating a Course in the Admin Panel adds it to the list of subjects offered by your institutions. This will allow you to
-
link the Course to specific Facilities
-
assign the Course to Educators and Heads of Departments
-
create lessons, syllabi and other documents for the Course in the Curriculum Builder (a tool for for your Educators to build their lessons and curriculum)
-
add the course to the Timetable

How to create a Course
Creating a Course
1. Click on the Courses tab under Institution. This page lists all the Courses offered in your organisation, which applies to ALL institutions within your organisation.

2. Click on Create Course on the top right of the page. This will bring up a new menu.

3. Key in the Name of Course and click on Create Course. The Course will now be added into your organisation’s list of available Courses.


How to edit Course name
Editing Course name
1. Click on the Courses tab under Institution, then select the three dot icon at the right hand side of a Course’s name. From the dropdown menu, click on Edit. This will bring up a new menu.

2. Make your changes in the space provided, then click on Save.

How to set up Facilities
Facilities - Introduction
Adding Facilities to your Institution allows you to better manage your facilities with greater efficiency. You can designate which Facilities are available for certain Courses, or to limit large classes to large facilities only. Furthermore, this function will allow educators to set which facilities will be used on certain dates.

Examples of available facilities
How to create a new Facility
Creating New Facility
1. Click on the Facilities tab under Institution. This page lists all the Facilities you have under your Institution.

2. Click on Create Facility on the top right of the page to add new facilities. This will bring up a new menu.

3. On the Create Facility page, fill up the relevant fields.

4. Add the Courses you wish to tie to this Facility. This limits the choices of facilities that can be used in the timetable. (E.g. Science labs may be limited to only science courses).
To do so, click Add Course. This will open a new menu for you to select the Courses that are allowed to use this Facility.

You can select multiple Courses for each facility. Click Save Changes once you are satisfied.

5. (Optional) You can choose to assign an educator as the contact person for this facility. To do so, click on the Refers to drop down menu. You can then select the educator who should be referred to when using this Facility.

Note: You may skip this step and return to it later once the appropriate person to contact has been added to the educator list .
6. Click on Create Facility once you are satisfied with your entries.

How to edit a Facility
Editing a Facility
1. To edit Facility details, click on the Facilities tab under Institution. Click on the pencil icon on the right hand side of your facility name.

2. This will open up the Edit Facility menu. From here you can edit any of the relevant information.

3. You can click on Add Course to add multiple Courses for the facility by clicking on the respective Courses in the list. Click on Save Changes once you are satisfied.

How to delete a Facility
Deleting a Facility
1. To delete a facility, click on the Facilities tab under Institution. Click on the pencil icon on the right hand side of the facility name you would like to delete.

2. This will open up the Edit Facility menu. Click on Delete Facility at the bottom left of the menu.

3. A pop-up will appear to confirm if you would like to delete said facility. Click Yes to confirm your decision.

How to set up Learners
Learners - Introduction
In the BeED LMS, Learners are grouped into segments, levels, classes and subclasses for lessons and grading.
To better understand the differences, take a look at the following example:
|
Segment |
: Primary, Secondary etc |
|
Levels |
: Primary 1, Primary 2, Primary 3 etc |
|
Classes |
: Class 1A, Class 1B, Class 2A, Class 2B etc |
|
Subclasses |
: Boys vs Girls/ Science vs Arts electives / Remedial Math vs Standard Math etc |
The next few articles will teach you how to fully utilize the Segments, Levels, Classes and Subclasses feature in the Learner tab of the Admin Panel.

What are Segments, Levels, Classes and Subclasses in the LMS?
A Segment in the LMS is an educational stage in your school/organisation, e.g. Primary for kids aged 7-12 and Secondary for kids aged 13-18.
A Level in the LMS is the stage in your Segment, e.g. for a Primary Segment, you can have Levels 1-6 and for Secondary you can have Levels 7-12.
A Class in the LMS is a group of Learners who are in the same Level, e.g. for Level 1, you can have Class 1A, Class 1B and Class 1C.
A Subclass is a division within a Class, e.g for English, you can divide your class into Beginner, Intermediate and Advanced groupings.
How to create and edit Segments
Creating a Segment
1. To create a Segment, click on the Learners tab under Roles. This page lists down all the Segments, Levels and Classes you have under your Institution. Click on the blue Create Segment button.

2. Type in the Segment name and click on Create Segment. This will add the Segment into your list of Segments available. (E.g. Upper Secondary, Lower Secondary, and so on)

Editing a Segment
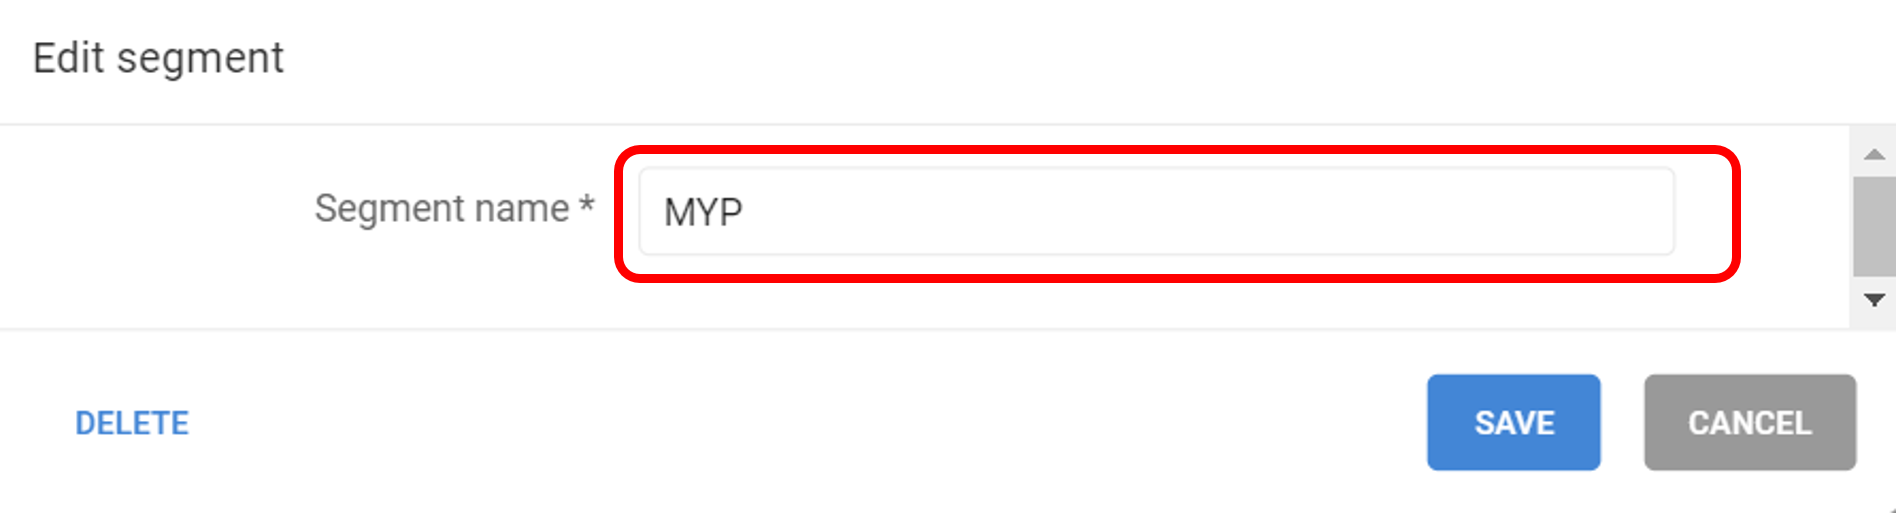
1. To edit a Segment, click on the Pencil Icon beside your Segment name.

2. Here, you can choose to edit the Segment Name. Click on Save once you are satisfied with your changes.
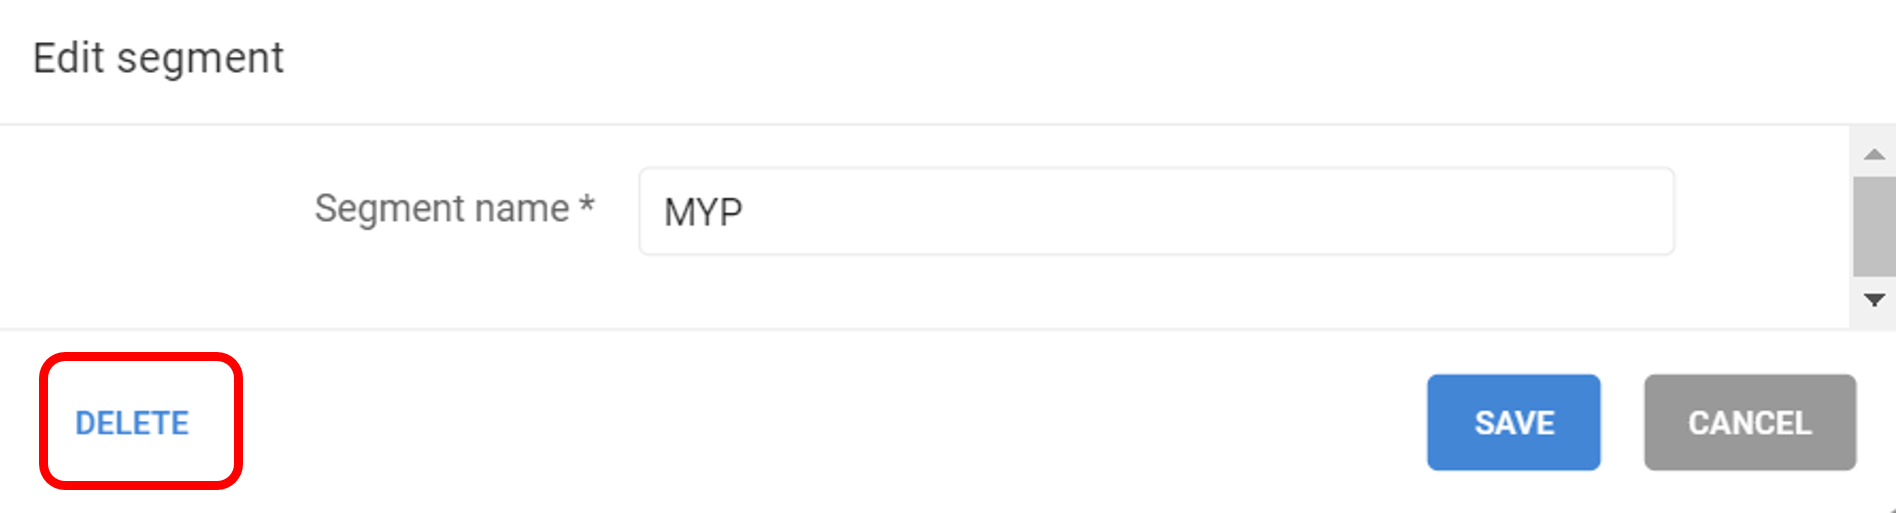
3. To delete a Segment, click on Delete in the bottom left corner of the popup.
How to create and edit Levels
Creating a Level
1. To create a Level, click on the Learners tab under Roles. This page lists down all the Segments, Levels and Classes you have under your Institution. Click on the blue Create Level button.

2. Select the relevant Levels to be added under the Segment. For example, Grade 1 will be Level 1 of Segment Primary School, and so on. Click on Create Level once you are satisfied with the changes.

Editing a Level
1. Click on the Pencil Icon beside your Level. This will open up a pop-up menu.

2. On the Edit Level page, you can change the Level to a different Level. Click on Save once you are satisfied with your changes.

3. To delete a Level, on the Edit level page, click on Delete on the bottom left of the menu.

How to create and edit Classes
Creating a Class
1. To create a Class, click on the Learners tab under Roles. Select the Segment and Level for which you would like to create the Class in. Click on the Create Class button.

2. Fill in the relevant information in their respective fields. Select a Homeroom Educator (Class Teacher) you would like to assign to the class. Homeroom Educators will have access to the Gradebook where they can view all grades for their class. Click on Create Class once you are satisfied with the changes.

Editing a Class
1. To edit a Class, click on the Pencil Icon beside your Class.

2. On the Edit Class page, you can change the Class Name as well as select a different Homeroom Educator. Click on Save once you are satisfied with your changes.

3. You can also choose to delete the Class on the Edit Class page. Click on Delete on the bottom left of the menu.

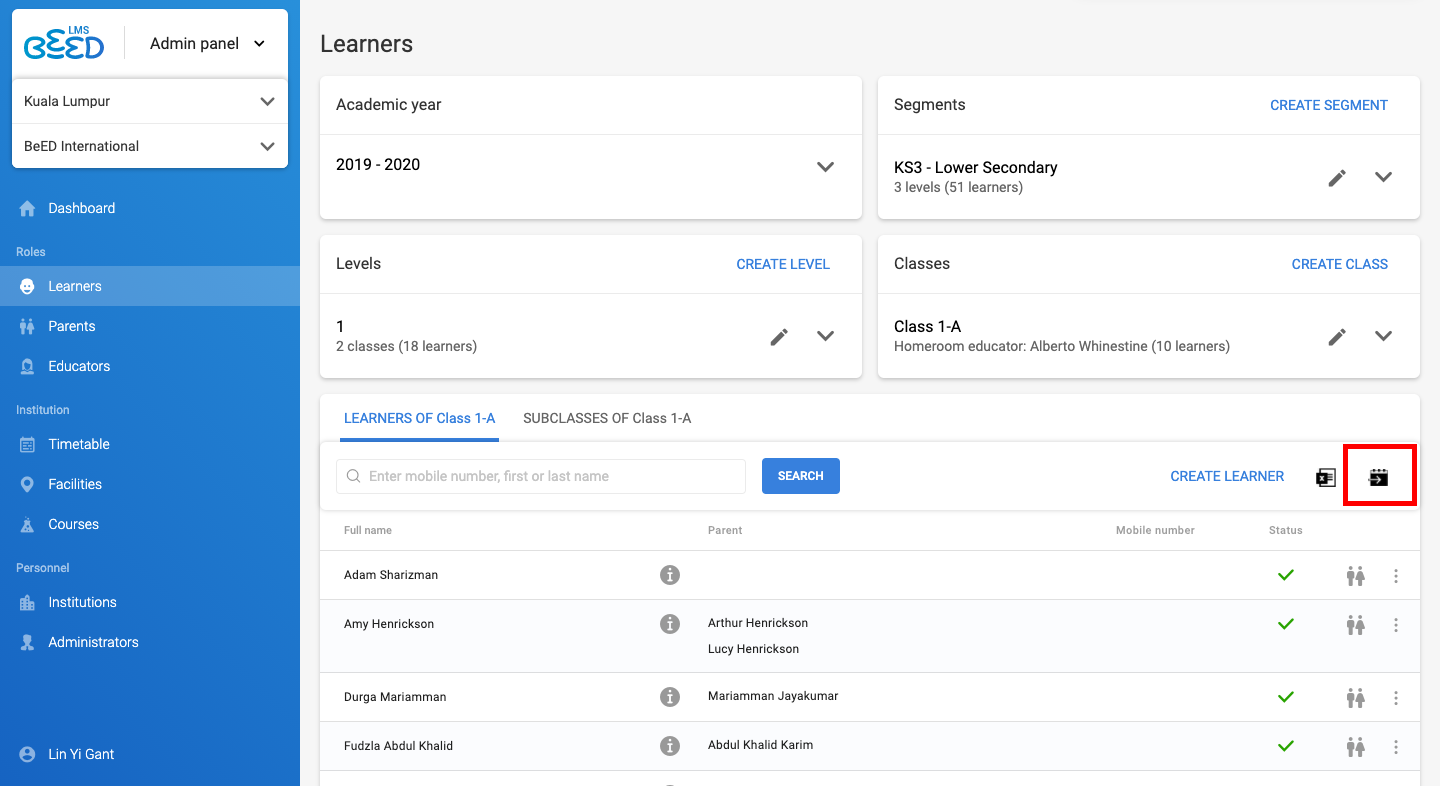
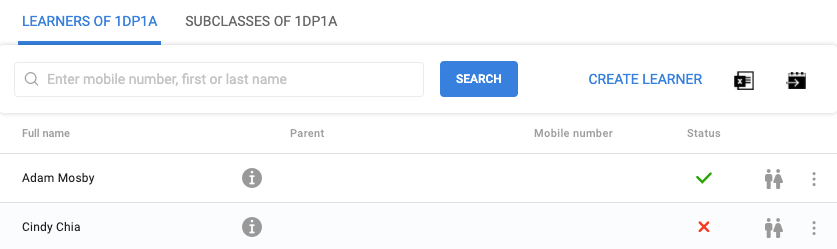
How to create Learner accounts
Importing Learners using Excel or CSV
1. In the Learners page, select the class you wish to import Learners into. Click on the Import Learners icon

2. Click on Download Example to download a .xlxs template for you to fill up

3. Open the downloaded file and fill in the details accordingly. Ensure that the required fields are filled in. Save the file as a .csv or .xlxs document

4. Back in the LMS, upload the completed .xlxs or .csv file. Then, click on “Import”. Your Learner accounts are now created.

Creating Learners directly in the LMS

1. In the Learners page, select the class you wish to create a Learner in. Click on the Create Learners icon.
2. Fill in the relevant information in their respective fields. You will notice a blue Add Parent button in one of the fields. You may add a parent if you have already created a Parent account. Otherwise, you may choose to ignore the button for now. Click on Create Learner once you are satisfied with the entries.
How to create and edit Subclasses
Creating a Subclass
You can sort learners in your class into subclasses as certain lessons may require classes to be divided into smaller subgroups. This allows for easier classroom management as well as for different learners to view a customized timetable based on their subclasses.

1. To create a Subclass, select the Segment, Level and Class for which you would like to create a Subclass. Click on the Subclasses of (Class) tab.
2. Click on the Create Subclass button.
3. On the Create subclass page, fill in the relevant information into their respective fields. Click on Create Subclass once you are satisfied with the changes.
4. This will bring you back to the Subclasses page. Click on the pencil icon to assign specific Learners to their respective subclasses.

5. The left column will be a list of unassigned Learners and the right column will list the subclasses available. Drag and drop unassigned Learners from the left column into their respective subclasses.
6. Click on Save once you are satisfied with your changes.
Editing a single Subclass

1. Click on the Pencil Icon next to the subclass you wish to edit.
2. On the Edit Subclass page, you may drag and drop Learners from one subclass to another.
3. You may also choose to rename subclasses by typing in a new name in the respective entry fields.
4. You can choose to delete a specific subclass by clicking on the trash icon next to the subclass name.
Deleting ALL Subclasses
1. In the Subclasses page, click on the Pencil Icon next to the subclass you wish to delete. This will open up a new menu.
2. Click on the blue Delete Subclasses button on the bottom left of the page.

How to transfer Learners across Classes
Transferring Learners
1. In the Learners page, go to the target class where you want to transfer your Learners into. Click on the Transfer Learner icon.
2. Select the academic year and class which your Learners are currently in. Click on Add Learner.
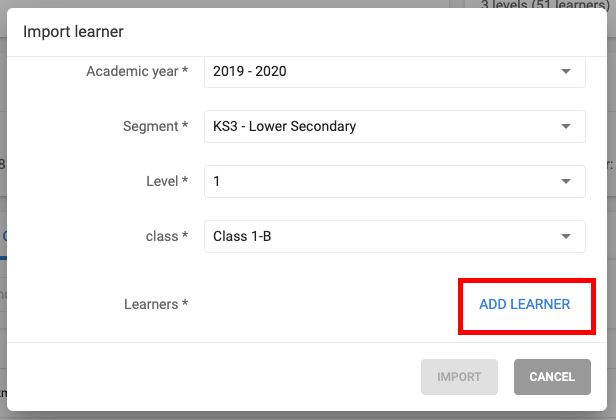
3. Select the Learners you wish to transfer out of the original class. Save your changes and import when you're done. Your learners will now be added to your target class.

Why can't my Learners log in?
Troubleshoot Learner Login
1. Have your learners activated their BeED account?
All new learners will receive an activation email from BeED. Make sure your learners click on the activation link in the email in order to set their passwords and start using BeED.
2. Have your learners' activation link expired?
Your learners can still reactivate their account by clicking on the Forgot Password link and keying in their email address. BeED will then send a reset password link to their email addresses which will activate their account.
3. Have your learners been deactivated?
Check the Learners page in the Admin Panel and ensure that your Learners have not been deactivated. If they are, click on the 3 dot icon on the right side of the page, and click Activate.
4. Have you changed your Learner's email address?
BeED user accounts are tied to their email addresses. Even if a Learner changes their email address, they must still login with their original email address used to sign up for BeED. If your Learners wish to use a different email address for BeED, please create a new Learner account for them in the Admin Panel Learner page.
If you are still unable to help your Learners log in, contact us and we will do our best to help you.
How to set up Parents
Parents - Introduction
Parent accounts will be able to access the Gradebook and view their Learners' lessons and grades, even across multiple Institutions.
Parents can only be added to the LMS via the Admin Panel by Administrators

How to create Parent Accounts
Importing Parents using Excel or CSV
1. To create Parent accounts in bulk, click on Import Parents

2.. Click on Download Example to download a .xlsx template which you can fill up with the details of your Parents

3. Open the downloaded file and fill in the details accordingly. Save the file as a .csv or .xlsx file and reupload it to the LMS.
Creating Parents

1. In the Parents page of the Admin Panel, click on the blue Create Parent button.
2. Fill in the relevant information in their respective fields. You will notice a blue Add Learner button at the bottom. You must link a Learner to the Parent account. Otherwise, the system will not allow you to create a Parent. Clicking on the Add Learner will bring you to a new popup.
3. Select Learners to link to the Parent account and click on Save Changes. Click on Create Parent once you are satisfied with the entries.
How to edit/ deactivate/ delete Parents
Editing Parents
1. Click on the three dot icon at the right hand side of the Parent’s name. Click on Edit Profile.

2. This will bring up a new menu. Change the necessary information in their respective fields and click on Save.
Deactivating/ Reactivating Parents
To deactivate a Parent account, click on the three dot icon at the right hand side of the Parent's name. From the dropdown menu, click on Deactivate. This user will no longer be able to access the Gradebook to view their Learner's information.
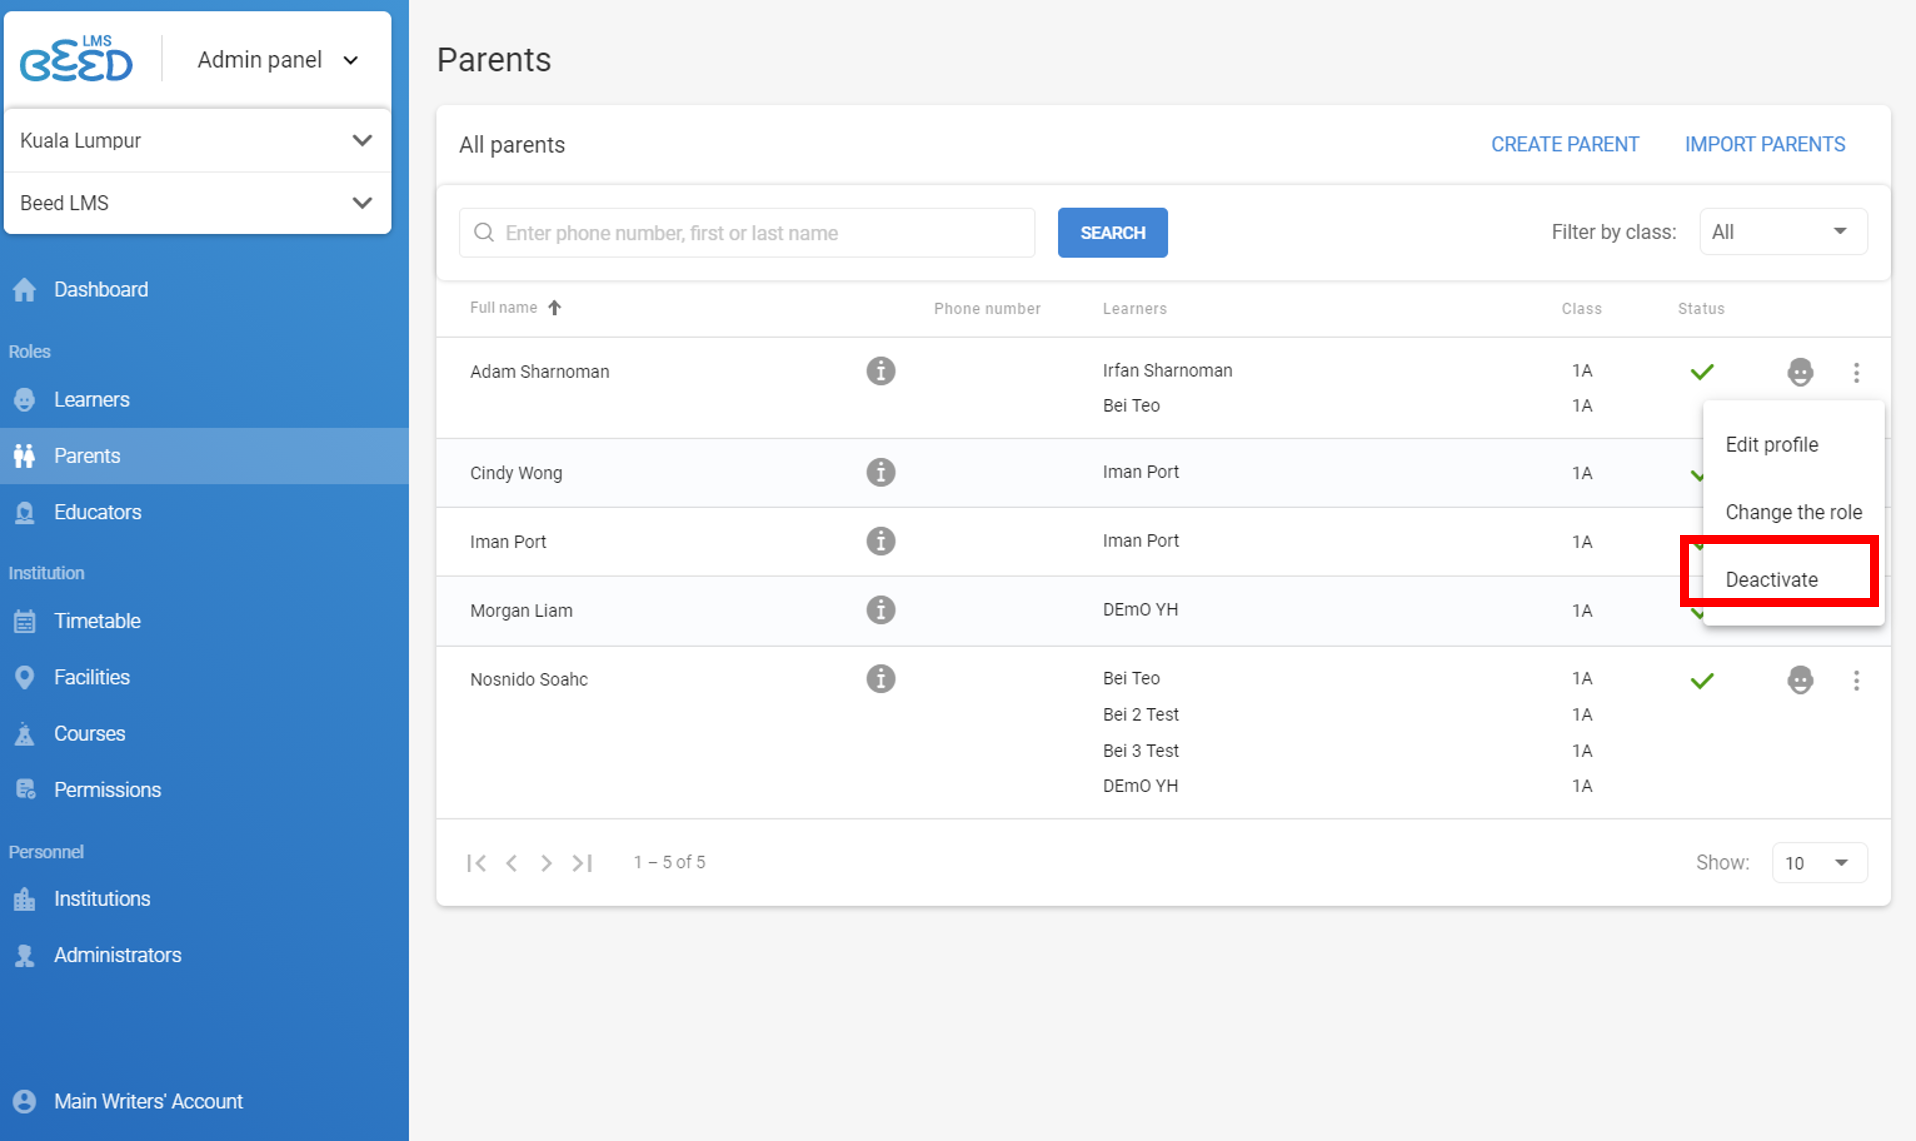
To reactivate, repeat the steps above but select Activate from the dropdown menu.
Deleting Parents
1. Click on the three dot icon at the right hand side of their name. Click on Edit Profile.
2. This will bring up a new menu. To delete a parent account, click the Delete Parent button on the bottom left of the menu.

How to Set Up Educators
Educators - Introduction
Educators have access to the Curriculum Builder and Gradebook limited to their Course and role defined in the Admin Panel.
Some of the Educator roles include
- Curriculum Director
- Head of Department
- Homeroom Educators
How to create Educator accounts
Importing Educators using Excel or CSV
1. To import multiple Educator accounts at a time, click on “Import Educators”:

2. Click on 'Download Example' to download a .xlsx template which you can fill up with the details of your Educators:

3. Open the downloaded file and fill in the details accordingly. Save the file as a .csv or .xlsx file and reupload it to the LMS.
Creating Educators

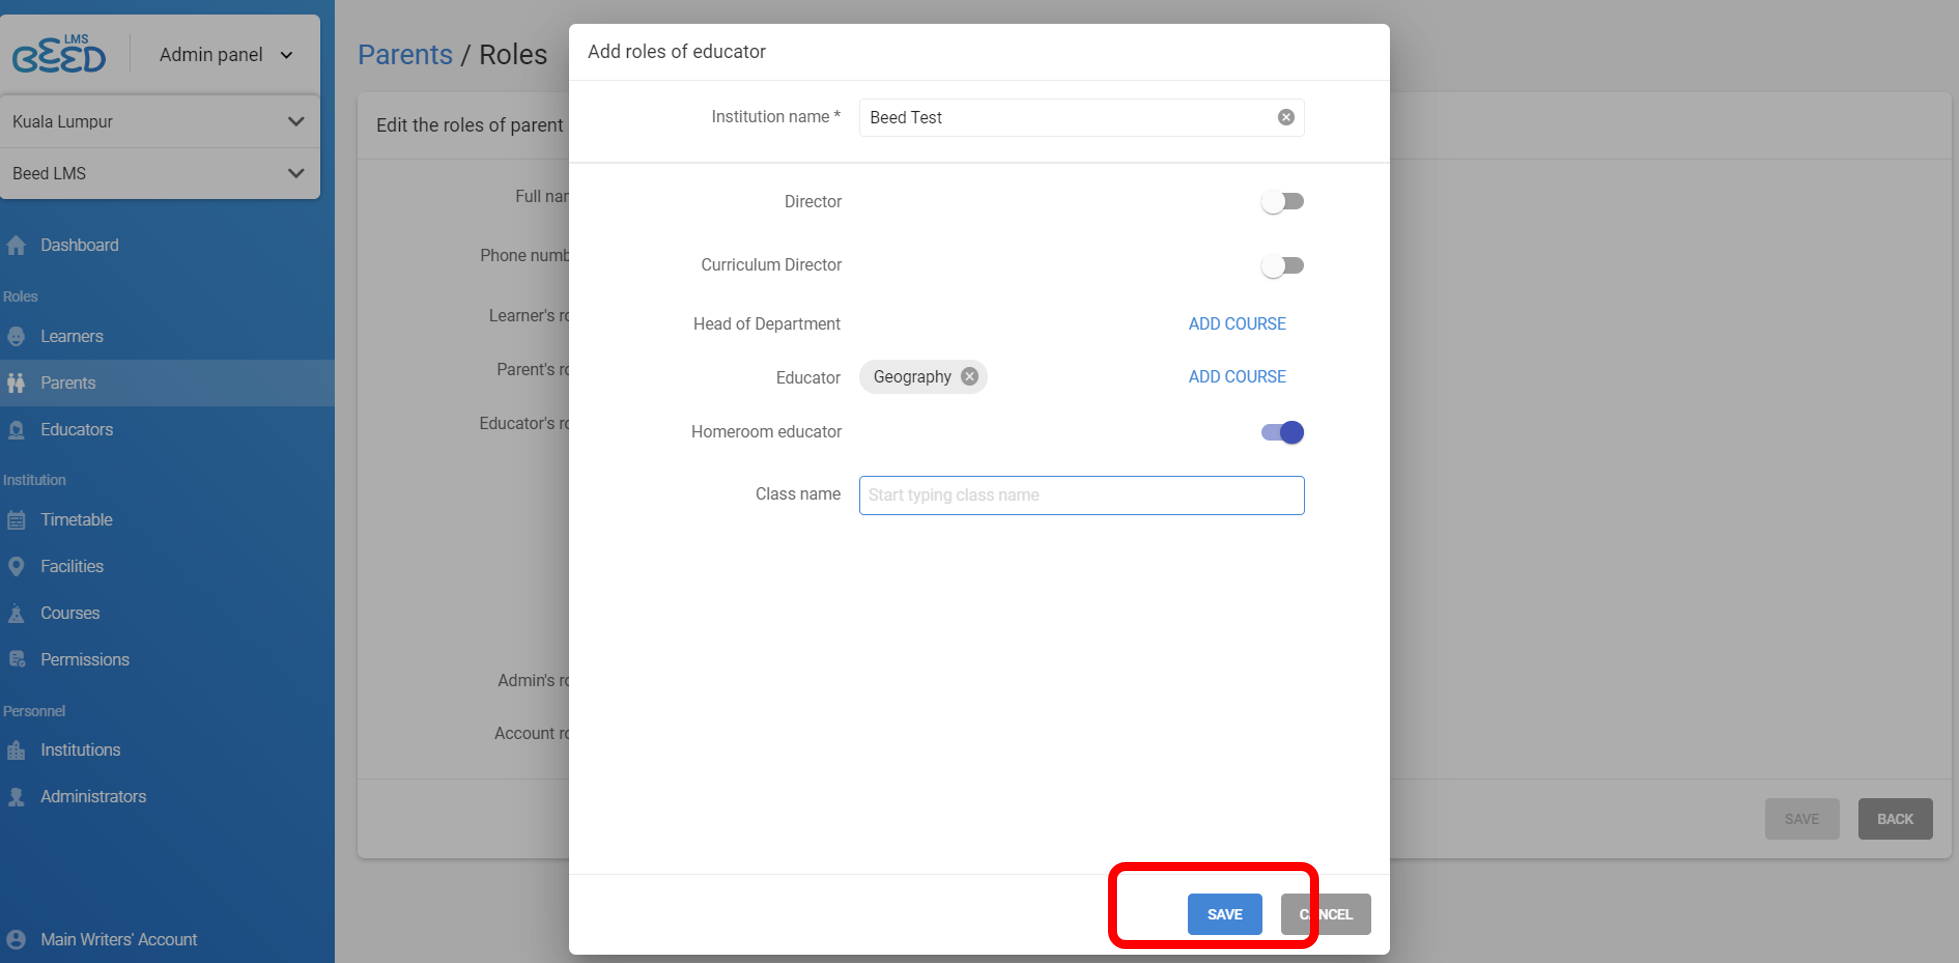
1. In the Educators page, click on the blue 'Create Educator' button.
2. In the new pop-up menu, fill in the empty fields with the relevant information.
3. At the bottom, you will see a section dedicated to Educator Roles such as Director, Curriculum Director, Head of Department, Educator, and Homeroom Educator. To assign these roles to your Educator, click on the sliders on the right hand side of each role
4. Confirm your changes by clicking on the Create Educator button.
For a deeper understanding of each role, refer to the table below

How to edit Educator accounts
Editing Educator Profile
Click on the three dot icon at the right hand side of the Educator’s name. Click on Edit Profile.
Change the necessary information in their respective fields and click on Save.

Editing Educator Role
1. Click on the three dot icon next to the Educator's name. Click on Change the Role.

2. In the Roles page, you can now add, edit and delete the user's roles.
- To delete an existing role, click on the x button next to the role
- To edit an existing role, click on the pencil icon next to the role
- To add a new role, click on Add Learners Role / All Learner / Add Educators Role / Add Admin Role.

3. Don't forget to save.
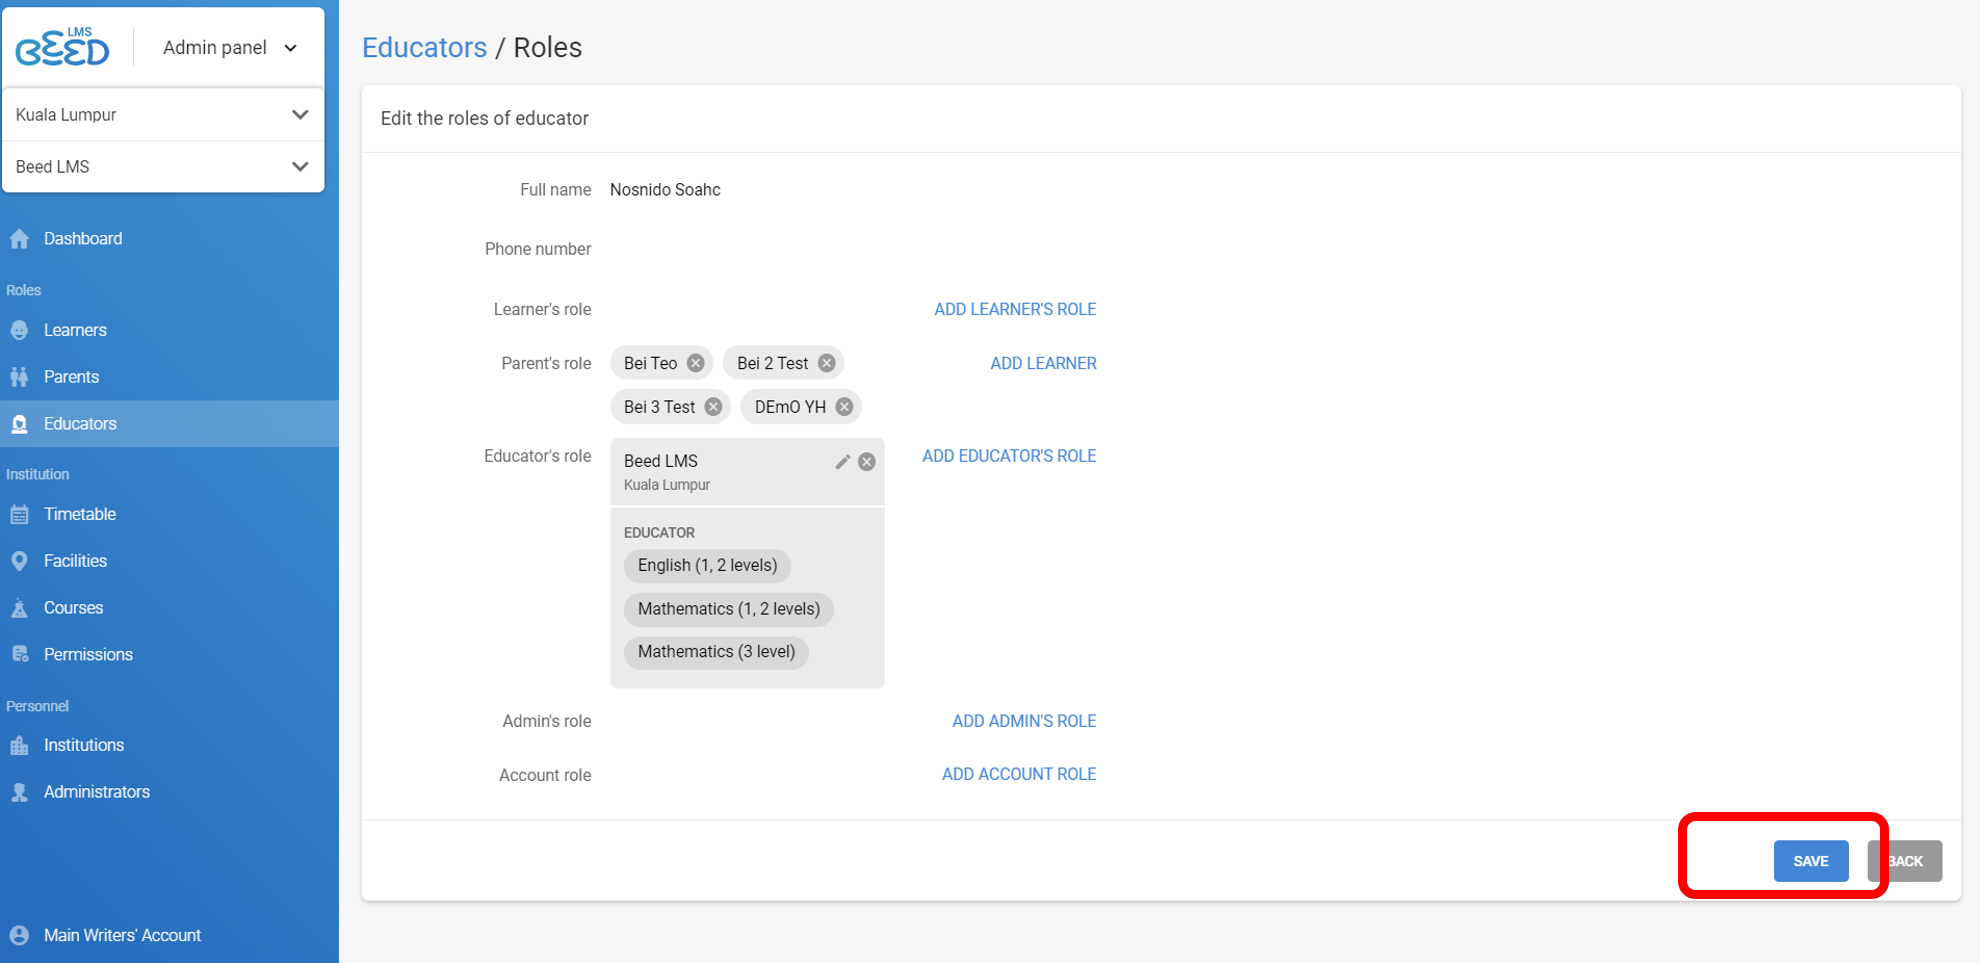
For a deeper understanding of each role, refer to the table below

How to deactivate/ reactivate/ delete Educators
Deactivating Educators
To deactivate an Educator account, click on the three dot icon at the right hand side of the Educator's name. From the dropdown menu, click on Deactivate. This user will no longer be able to access the Curriculum Builder or Gradebook for that Institution.

Reactivating Educators
To reactivate an Educator account, click on the three dot icon at the right hand side of the Educator's name. From the dropdown menu, click on Activate. The account will now be reactivated

Deleting Educators
To delete an Educator account, click on the three dot icon at the right hand side of the Educator's name. From the dropdown menu, click on Edit Profile. Then, click on the Delete Educator button on the bottom left corner of the menu.

How to set up Timetables
Timetable - Introduction
The Timetable is a useful tool for managing Course schedules for every Class throughout the academic year.
In the timetable, you can set:
- recurring lessons (e.g. Math class every Thursday at 10am)
- one-time lessons (e.g. Science Exam at 11am on 30th June 2019)
- lessons according to subclasses (e.g. separate Physical Education classes for Boys and Girls)
How to create Timetable slots
Creating Timetable Slots

Creating Timetables for Classes
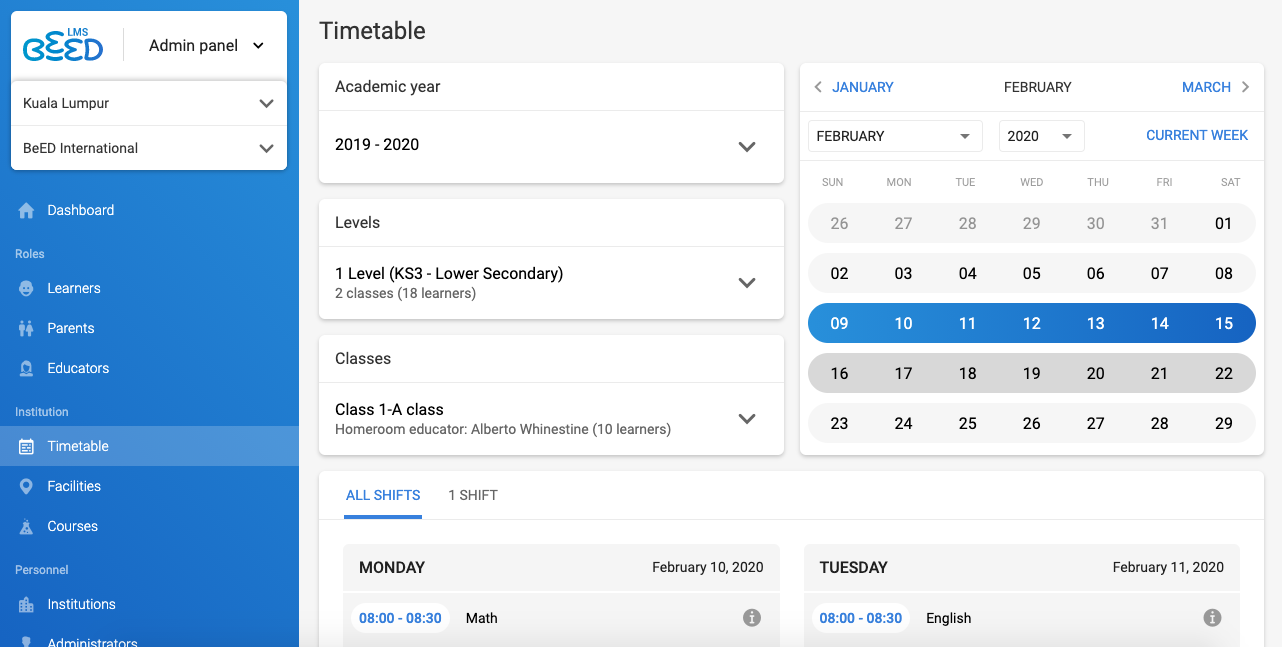
1. In the Timetable page, navigate to the class you wish to set the timetable for. Select the week you wish to modify.
2. Click “Add Lesson” on the day that you wish to modify.
3. Select a time slot, course, educator and facility for the Lesson. If you're unable to find your intended option in the dropdown menu, you need to navigate to the relevant part of the Admin Panel to create those options.
4. In the 'Set Interval' section, determine whether your Lesson will recurring weekly, bi-weekly or one-time only.
5. Once you’re satisfied, click “Save” to insert the Lesson into your Institution’s timetable.
Creating Timetables for Subclasses
1. Follow steps 1-2 above.
2. Select the time slot for this lesson. Then, tick the checkbox “By subclass”.
3. In the 'Set Interval' section, determine whether your Lesson will recurring weekly, bi-weekly or one-time only.
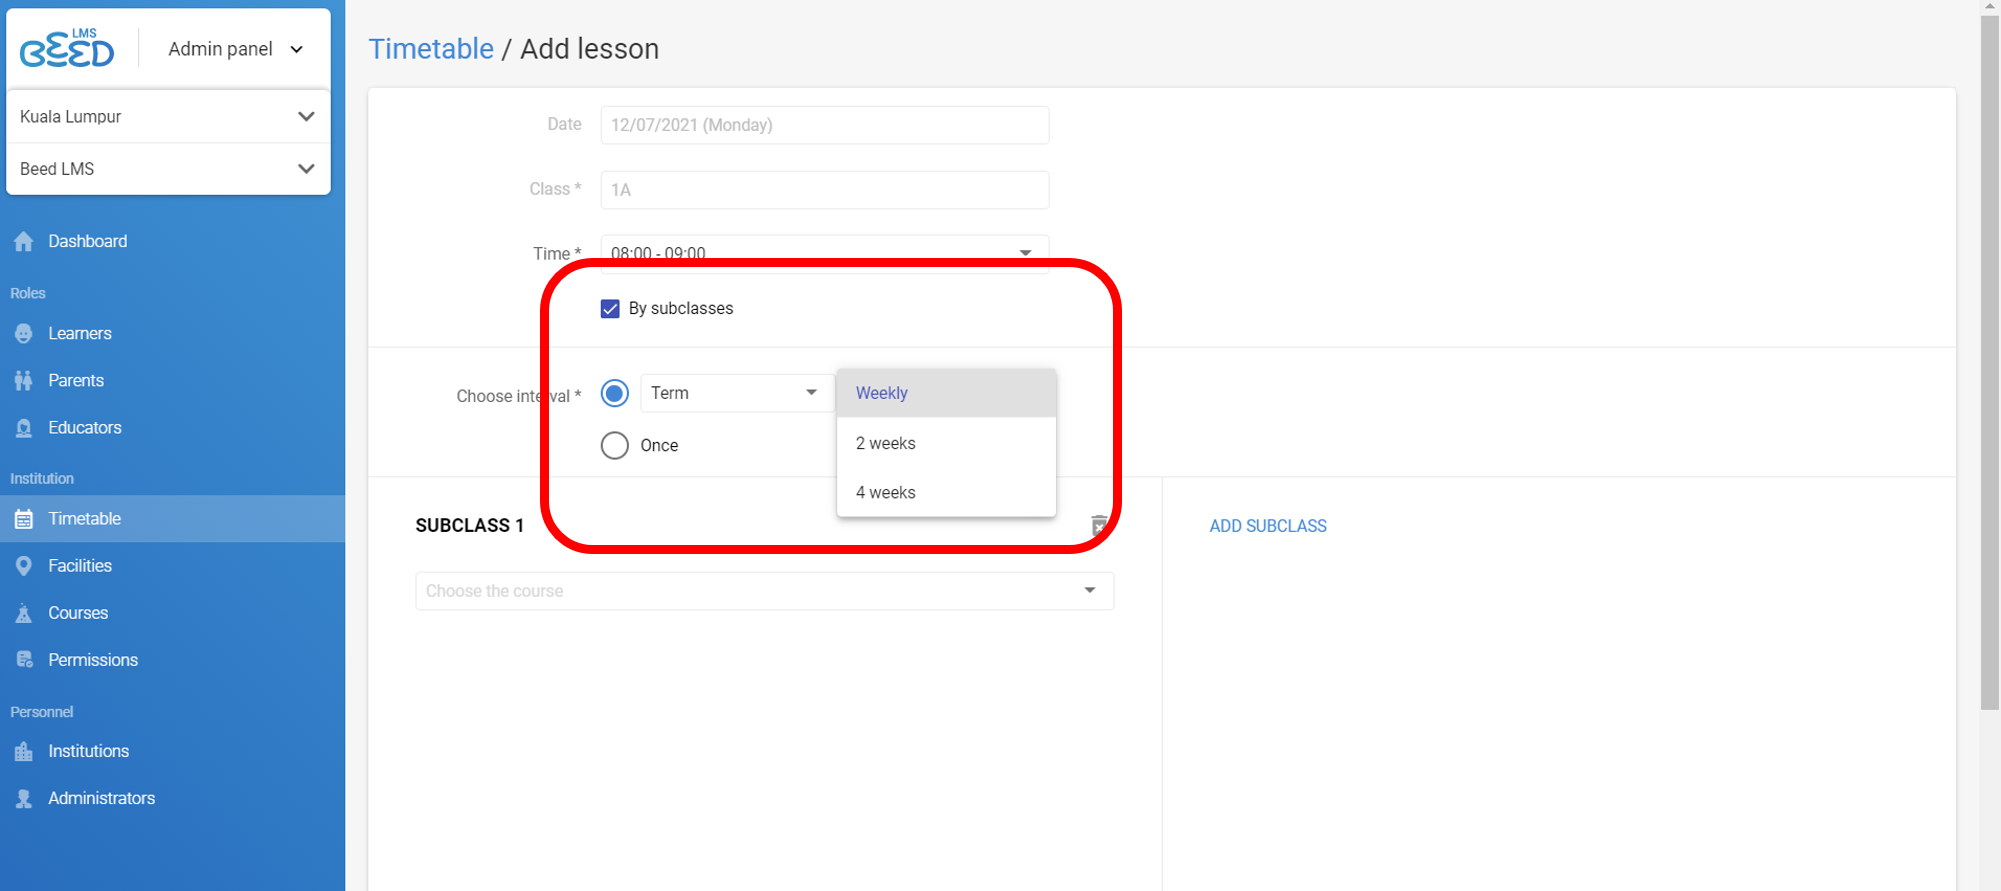
4. In the Subclass 1 section, select the course, subclass, educator and facility you wish to set. (Note: if your subclass does not appear here, you can create subclasses in the Learners page).
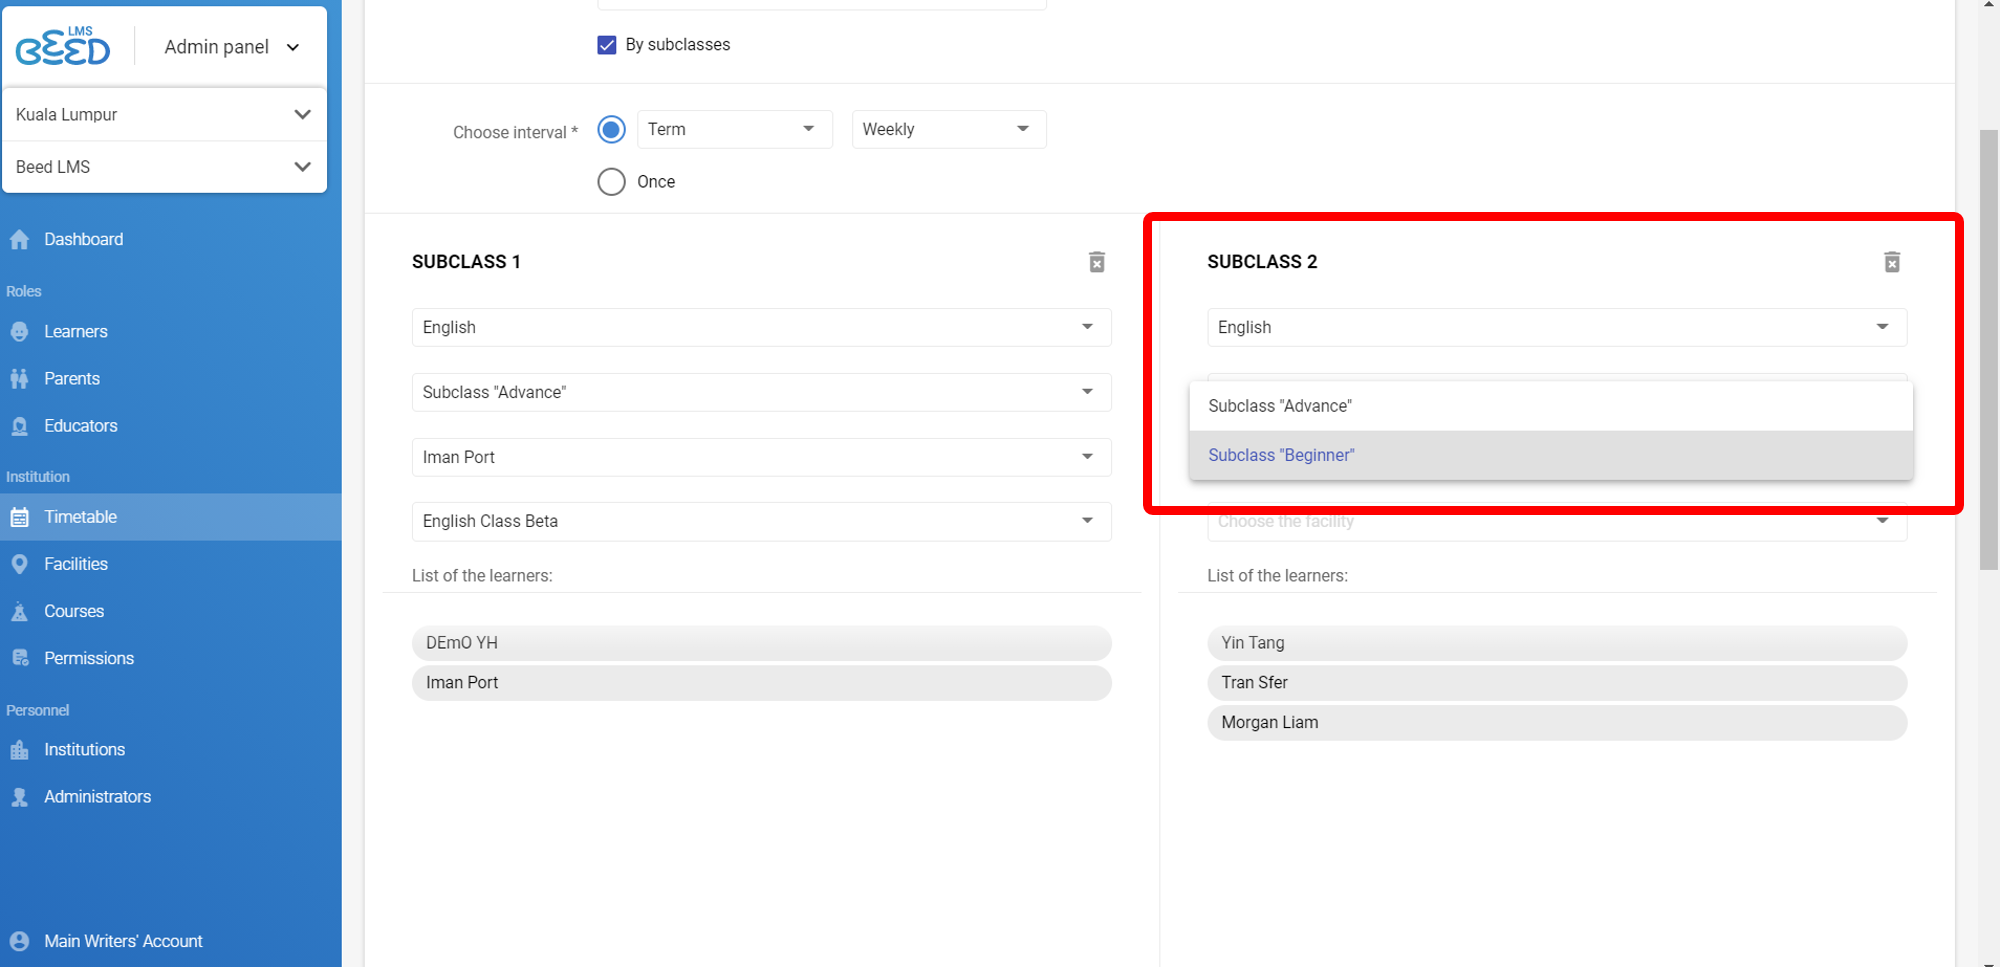
5. To add more subclasses, click on the 'Add Subclass' button and repeat step 4.
6. Once you are done, click save.
How to edit/delete Timetable lessons
Editing the Timetable
1. Click on the 3 dot icon next to a Lesson timeslot. Select Edit.

2. You can edit the Educator or Facility name, as well as Subclass details. (Note: you are not able to edit Time or Course. If you wish to edit these fields, please delete the existing Lesson slot and create a new slot in the Timetable)
Deleting Timetable Lessons
1. Click on the 3 dot icon next to a Lesson timeslot. Select Delete.

2. You will then be provided with options to:
i) delete only the current lesson on the selected date, or
ii) delete all instances of the lesson throughout the term.

Why can't I edit the Timetable for a particular date?
The Timetable is frozen for dates in the past up to the present date.
You can only add, edit or delete Timetable lessons for the current day onwards.
How to transition to the next Academic Year
How to get ready for the next Academic Year
To begin, Institution Administrators can log in to the Admin Panel and check out the slides below to set up the new academic year.

Once the Institution Administrators are done, Curriculum Directors can check out the slides below to set up the Active Curriculum for the new academic year in the Curriculum Builder.

When all preparations are complete, the Institution Administrator can go to the Institutions page and select the new Academic Year from the dropdown menu. Once saved, the new Academic Year will be made active.
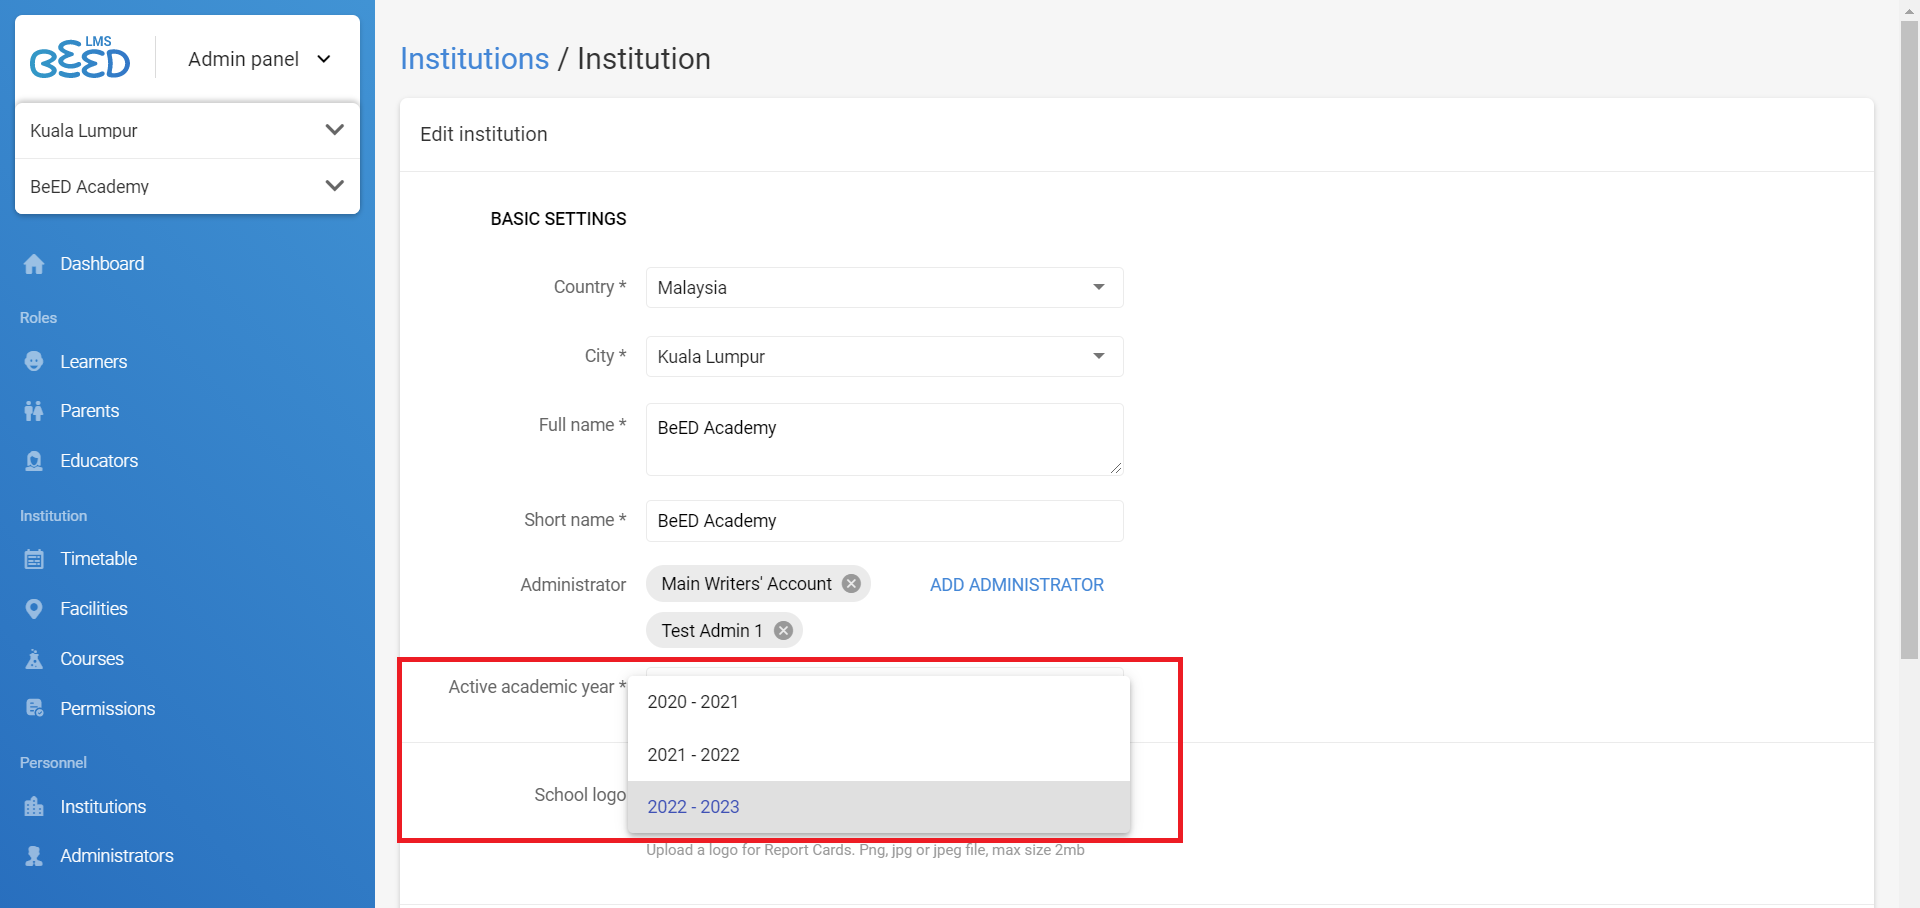
Refer to this article to see what changes will occur when changing the active academic year.
What happens when I change the Active Academic Year?
Once the Active Academic Year is changed in the Admin Panel, the following changes will occur in the LMS:
1. Admin Panel
- In the Learners page, the default year will be updated to the new year. Changes can still be made to the previous academic year.
- In the Timetable page, the default year will be updated to the new year. Changes can still be made to the Timetable in the past academic year as long as the selected date has not passed yet.
2. Curriculum Builder
- The Active Curriculum tab will now display the Curriculum for the new year.
- Curriculums for past years can still be viewed and extracted. However, they cannot be edited anymore.
3. Gradebook
- Learners and Parents can now access the Schedule, Lessons, Grade Overview and Report Cards for the new active academic year.
- However, all users will have certain limitations in what they can do in the past academic year.
|
Past Year |
Active Year |
Future Year |
|
|
Educator - view schedule - preview lessons - view feedback for learners - give/edit feedback for to learners - view grades - give/edit grades - view Grade Overview - view Report Card - create/edit Report Card |
✅ ✅ ✅ ❌ ✅ ❌ ✅ ✅ ✅ |
✅ ✅ ✅ ✅ ✅ ✅ ✅ ✅ ✅ |
✅ ✅ ✅ ✅ ✅ ✅ ✅ ✅ ✅ |
|
Learner - view schedule - view lessons - answer lessons - view feedback and grades - view Grade Overview - view Report Card |
✅ ✅ ❌ ✅ ✅ ✅ |
✅ ✅ ✅ ✅ ✅ ✅ |
❌ ❌ ❌ ❌ ❌ ❌ |
|
Parent - view schedule - view lessons - view feedback and grades - view Grade Overview - view Report Card |
✅ ✅ ✅ ✅ ✅ |
✅ ✅ ✅ ✅ ✅ |
❌ ❌ ❌ ❌ ❌ |
4. Connect
- Messenger, Restricted Words, Manage Reports and public Forums/Announcements will not be affected.
- Private topics and announcements that are linked directly to a user’s account will not be affected.
- However, users will lose access to private topics linked to their role in the previous academic year. E.g. if a topic is linked to Class 1A in 2020, once the active year changes, learners in that class will no longer have access.
- New private topics and announcements created during the new active academic year will only apply to roles in the new academic year, and not roles from previous years.
No Comments