Journeys - Using the Planner for Hubs and Itineraries
What is the Hub?
The Hub is a multi-functional tool allowing Admins and Educators to:
-
Manage Educator/Learner groups
-
Share purchased or created Learning Experiences with invited Learners
-
Track Learners’ Lesson Progress and Responses
-
Provide Personalized Feedback
-
Manage class trips and schedules
During a school trip or class lesson, Learners are assigned into different Hubs led by their respective Educators. You can also include Learning Experiences as well as Assessments in the Hub to test out Learners’ understanding of the trip or class!
Through BeED Journeys, you can share Learning Experiences to an unlimited number of email addresses by creating a Hub.
Creating a Hub through the Browser
-
Go to Planner on your web browser and select Hubs.
-
Click on Create New Hub.
-
Fill in the details of your new Hub such as Title, Description, Start and End Dates. These dates will determine when your added learners can participate in your Learning Experiences. Click on Create once you’re done.
-
When your Hub is newly created, click on the View button.
Creating a Hub through the App
-
Once you’re in the proper role, tap on the main side-bar menu.
-
Select Hubs.
-
Click on the + sign at the bottom right of your screen to create a new Hub.
-
Fill in the details for your Hub, such as name, description, start and end dates and cover image.
-
To edit your Hub, swipe left and select the Edit icon.
-
Once you’ve created your Hub, click on Add LE to add purchased or created Learning Experiences
7. Click on the user icon to add Educators and Learners to the Hub by inputting their email addresses.
Inviting Educators and Learners into your Hub
-
Once you’re in the selected Hub page, click on Invite Educator to select a user whom you would like to have manage this group. You can invite as many Educators as you want to manage multiple groups of learners. Just add in their email addresses!
-
Once you’re done adding in your Educators, invite your learners in by adding their email addresses. If your learners are below 13 years of age, you may want to ask for parental consent first by ticking on the Parental Consent checkbox. You will then have to key in their parents’ email addresses to have a confirmation email sent to them for approval.
-
Instead of keying in individual learner email addresses, you can perform a Bulk Invite by clicking on the Bulk Invite button and downloading the csv template.
-
Alternatively, you may wish to invite members into your Hub by sending them the designated QR code to scan and join.
To add your users with a QR code, follow the steps below:
Through the browser:
-
Select the hub you would like to invite members to.
-
Invite your educators into the hub first.
-
Once you have done so, screenshot or show the QR code in the hub to your learners. Your learners will then need to scan it using the QR code scanner in their app.
Through the app:

-
To add an Educator, select your Hub, and click on the Add User button.
-
Tap on the QR scanner located on the top right of your app screen.
-
Scan the Educator’s QR code (every user in BeED has a unique ID belonging to them in the form of a QR code in the app).
4. Once the Educator’s name appears in a pop-up box, tap on Invite User. The Educator will now be listed as one of the Educators for the Hub.
-
To add a Learner, add your Educator first into the Hub. Then, have your Learners join the Hub by scanning your Hub’s QR code. Your Learners can access their QR scanner through the Tools option in the main menu.
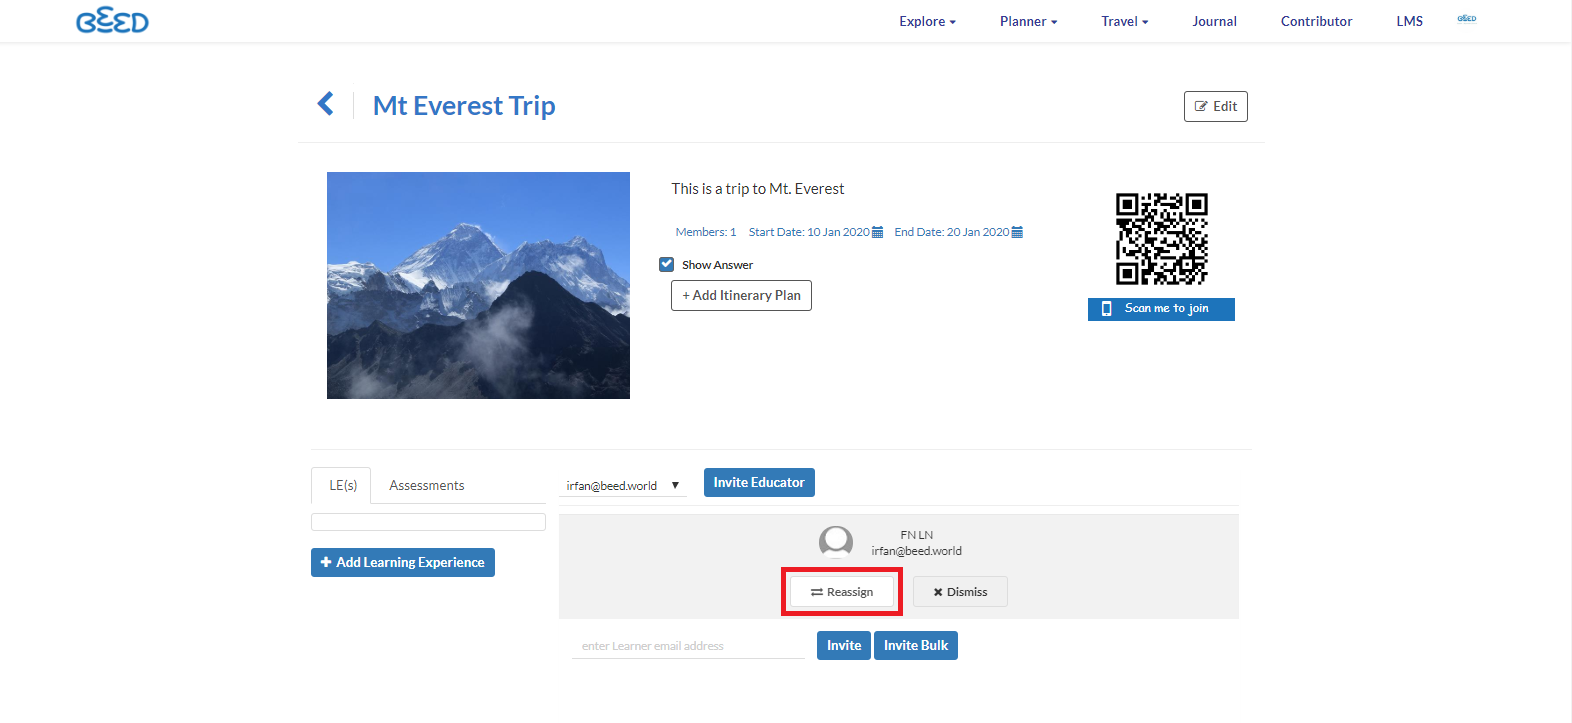
Reassigning/Dismissing Learners
-
To reassign a Learner to another Educator, click on the Reassign icon next to the Learner’s name.
-
Select another Educator through the drop down menu.
-
Click on Reassign Learner.
-
To dismiss a learner, click on the Dismiss button next to the Learner’s name.
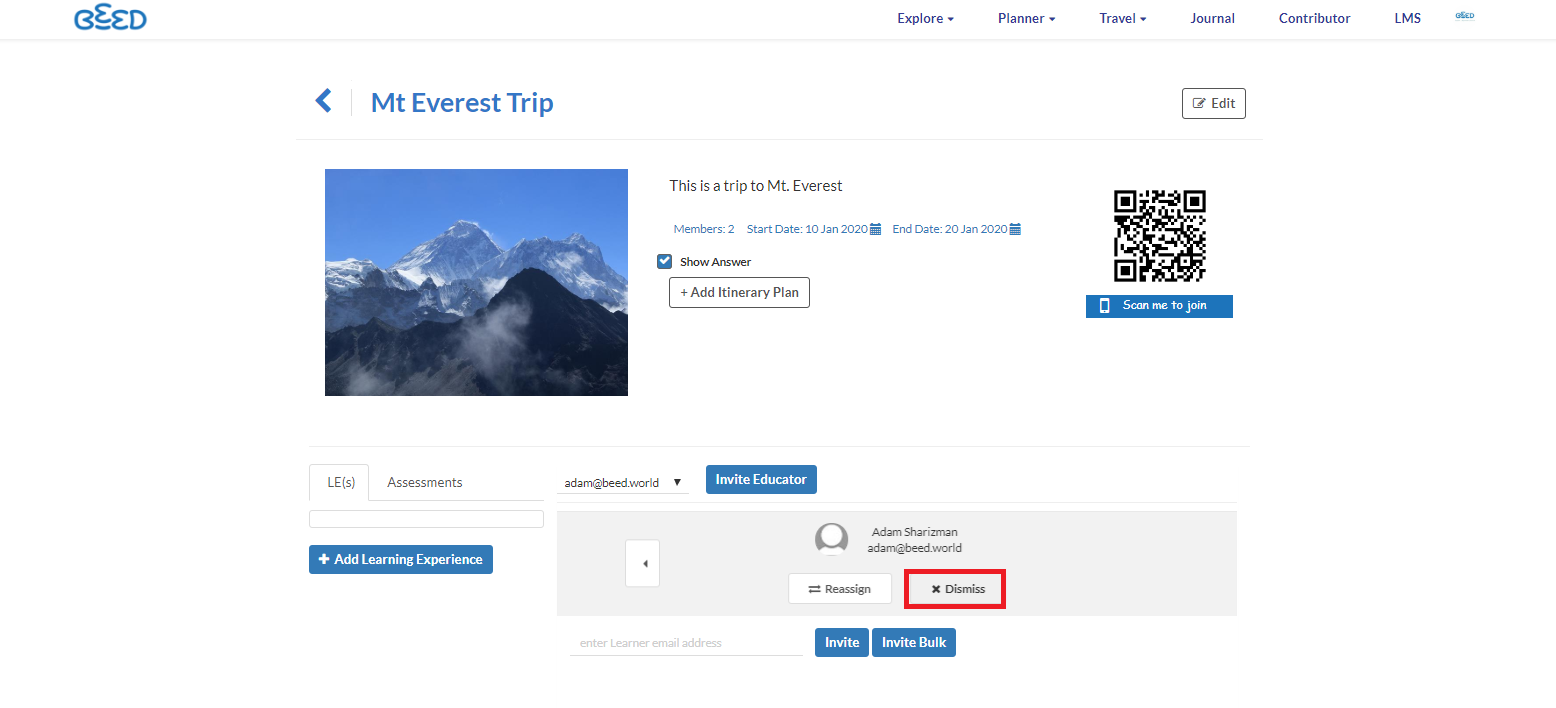
Reassigning/Dismissing Educators
-
If you need to reassign a group of Learners to another Educator, or switch the Educators in charge of two different groups, click on the Reassign button under the name of an Educator in your selected hub.

-
Enter the email of the Educator you’d like to invite. If you enter the email address of an Educator that isn’t already in the hub in charge of another group, the Educators will swap places. If you enter a new email address, the current Educator will be dismissed and the new Educator will take his/her place.
-
If you need to dismiss an Educator, click on the Dismiss button next to the Educator’s name.

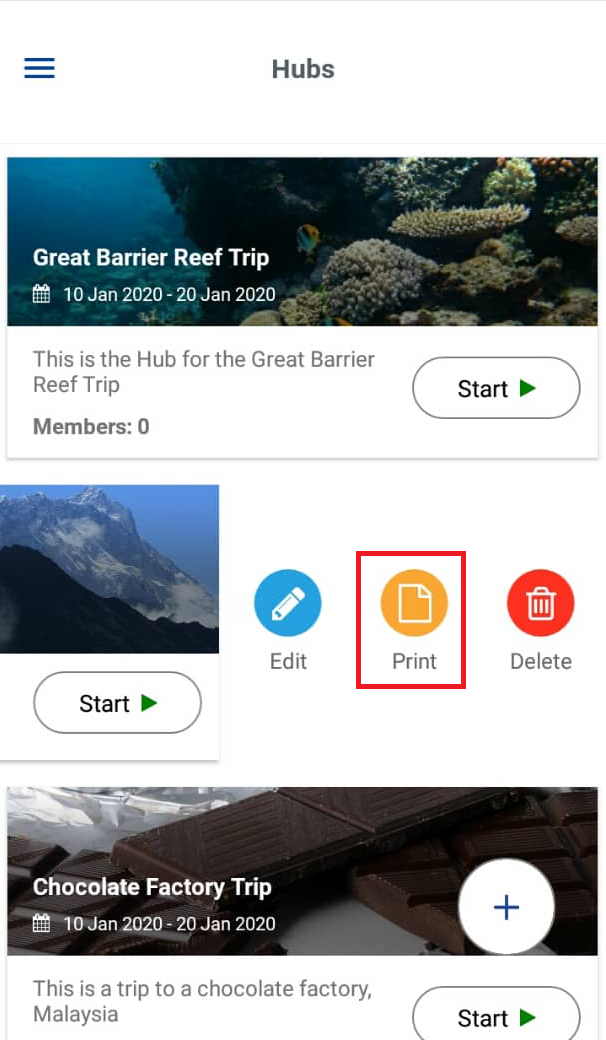
Printing/Downloading a Hub
You can export a Hub into PDF format in both the web browser and app.
In your browser, go to the main Hub list page, select the Hub you want and click on Print.

In your app, go to the Hub list page and swipe left on the Hub you wish to print. Select the Print icon to download.
Hub Status
What happens when I end a hub?
You can end a hub by pressing the End button. By ending a hub:
- You will not be able to add additional users, LEs and itineraries into the hub.
- You will be unable to edit the hub details (Name, Description, Start/End Date).
- Learners will not be able to continue answering their lessons.
Why am I not able to restart a hub?
Only the hub owner is able to restart his/her hub.
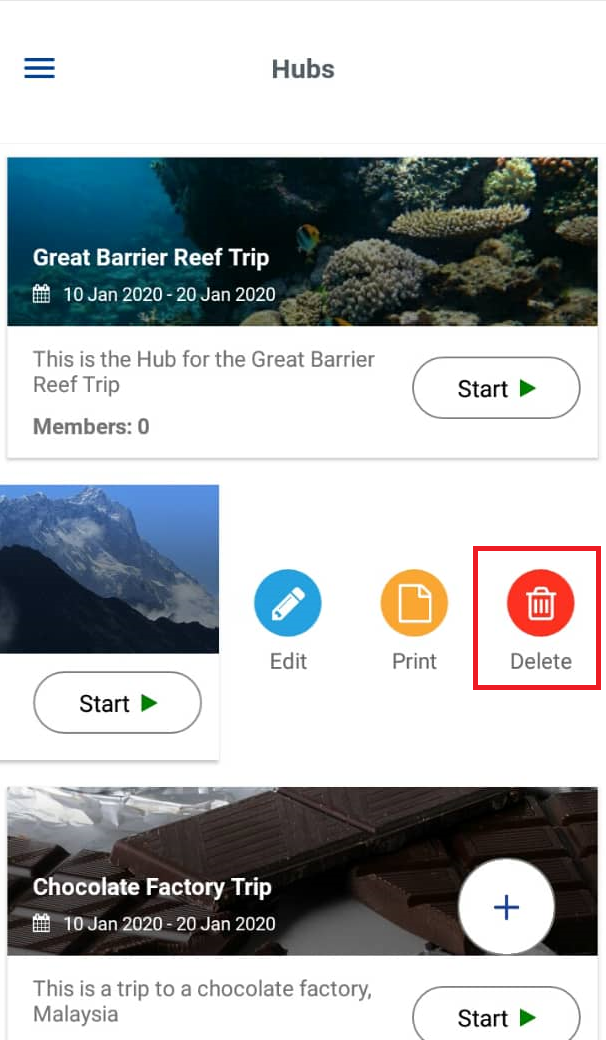
Deleting a Hub
You can delete a hub only if your learners have not participated in any Learning Experiences yet.
If you want to delete through the browser, navigate to the Hub list page and click on the Delete button of the Hub you wish to delete.

If you want to delete through the app, go to the Hub list page and swipe left on the Hub you wish to delete. Select the Delete icon.
What is the Itinerary Planner?
The Planner is a versatile scheduling tool that enables Educators or event planners to set schedules for classes, field trips, and events, complete with important information such as contact information, location, etc.
The Planner allows you to:
- showcase the itinerary for school trips or other events
- display the timetable for classroom lessons or workshops
You can select from the following options to populate your planner:
- Include visiting popular places of interest, events or activities in your chosen location or classroom.
- If you’re going on a trip, choose from more than 1 million different selections across the globe.
- Activity
- Indicate the arrival/departure times of any flights if relevant.
- Plan your meals day by day by choosing from an endless variety of restaurants in your chosen location.
- Enhance your trip by selecting Learning Experiences that you have created or purchased for your chosen location.
Create a Planner from the Browser
Here’s how to create your own customized itinerary through your browser:

-
Once you have logged in, click on the “Planner” option located in the toolbar, and go to “Itinerary”.
-
Click on the “+ New Planner” tab.
-
Fill in the initial details such as the title and dates, and you’re ready to create your new planner!
-
To edit your itinerary after creating it, click on the “View” icon.
-
Click on the “Introduction” tab to include a brief description of your planner.
-
You can add events to your itinerary to planner and maximize your entire schedule by selecting the “Event” tab . Click on the “Add event” option to add to your planner.
-
Clicking on the Location tab would allow you to directly access the map locations of the events created in the Event tab.
-
You can Add or Remove days in your planner by selecting the “Add Day” or “Remove Day” buttons.
-
You can Print, Duplicate, or Delete your planners by selecting the corresponding icons for your selected planner in the main Planner list page.
Create a Planner through the App
Here's how to create your own customized planner through the app:

-
Tap on the main sidebar icon on the top-left of your screen.
-
Select “Tools”.
-
Select “Planner”.
-
Tap on a Planner you would like to view, or tap on the + icon located at the bottom right of your screen to create a new planner.
-
Fill in the necessary details for your new planner, such as a cover image, title and start and end dates.
-
Tap on Create to confirm. Your new itinerary has now been created!
-
To edit your planner, swipe left on your itinerary in the main Planner page and click on the “edit” icon. You can then populate your planner by filling events for the days listed.
Note: You cannot create an introduction to your planner through the BeED app - please do so through the BeED website, and the data will be ported over to the app version. -
To delete a day in the planner, swipe left on it and select the delete icon.
-
To duplicate or delete your itinerary, select your itinerary from the main Planner page and swipe left to select the respective icon.
-
To export your itinerary, click into the itinerary and then select the “export” button on the top right corner of your screen.
Adding a Planner to a Hub
When you add a planner to a Hub, you are making it visible for all members of that hub. Follow the steps below to share your planner to your users:
From your browser:
-
At the top of your dashboard, select “Planner” and then “Hubs” from the drop down menu.
-
Select a hub that you would like to add the planner to by clicking on View.
-
Click on the “Add Itinerary Plan” button.
-
Select the planner that you would like to attach. Note: The start and end dates for the planner must fall within the duration of the hub for it to appear in the selection list.
-
The planner is now attached to your hub.
From your app:
1. Tap on the main sidebar icon on the top left of your screen.
2. Select the Hub that you would like to add your Itinerary to by tapping on the Hub.
3. Tap on the Gear icon located at the top right of your screen to access the hub settings.
4. Tap on the “Add Itinerary Plan” button. Select the planner that you would like to attach.
No Comments