Best Practices With BeED
1. Maximizing Your Teaching/Learning Experience with BeED
1.1 Using BeED in the classroom
The BeED platform can help educators create an extra edge to their regular classroom lessons, whether they are done in a physical or virtual environment.
With features such as interactive media, integrated online conferencing, forums and more, educators and learners are able to carry out the teaching and learning process seamlessly without having to juggle multiple platforms.
A few of the possibilities the BeED platform offers include the following:
- Full step-by-step lessons that slowly guide the learners through a new topic.
- Videos, audios, images and hyperlinks that act as extra learning materials on top of lectures for the learners.
- Integrated forums/messaging groups that help learners collaborate together in a virtual classroom.
- One-on-one interaction with the educator through personalized feedback or annotations on a specific assignment.
- Private journal for Learners to continuously reflect on their progress.
- Digitally recorded responses instead of cumbersome physical textbooks and workbooks.
1. Sharing of Best Practices
Educators can share their created lessons in the school library, allowing their peers to assess and exchange ideas for even stronger lesson delivery. As learners are able to input answers in the form of text, audio or visual, educators can brainstorm and share new activities that are best suited for mLearning.
2. Interactive Mapping for the Best Teaching-Learning Approach
The Lesson Builder’s customised mapping feature empowers learners to learn with or without a facilitator, depending on the lesson and/or the learners’ needs. As Learners click on organized map points, detailed instructions and scaffolded media-rich content allow them to learn at their own pace before moving on to the next section. Through this feature, educators can organise their lessons in various ways, such as:
Differentiated Learning
Point A: Beginner (Facilitator)
Point B: Intermediate (Group)
Point C: Advanced (Individual)
In the lesson format above, those who struggle with the topic can stay in Point A with their educator, who focuses on their weaknesses. Those who have already mastered the content in Point A can proceed to Point B, where they engage in group activities simultaneously while their educator focuses on those in Point A. When the learners have completed Point B, they can then move on to Point C, where they engage in independent tasks. This way, the educator can ensure that all his/her learners remain engaged while giving extra attention to the slower learners.
Flipped Classroom
Point A: Prep at Home
Point B: In-Class Activities
Point C: Take-Home Activity
Through the mapping format above, educators can also conduct a flipped classroom lesson to maximize their time in class.
For more tips on how to use BeED’s mapping feature for the pedagogy of your choice, click here.
1.1.1 Holistic Evaluation for Progressive Learning
Personalized Feedback
Apart from grades, you can also provide personalized feedback to your learners to encourage them throughout their progress in a lesson.
Through this feature, educators can focus on their individual learners’ work at a more personal level by writing comments to guide learners to find the correct answers to the questions given in a lesson.

As learners receive feedback, they are thus encouraged to reflect and try again to reach answers in their own time, allowing for a mastery of content rather than just the memorization of information. Click here to find out how to provide personalised feedback to your learners.
Annotations
Educators are able to directly annotate on any image, document or video that the learner has uploaded as part of his/her response. The BeED annotation tool allows you to highlight, comment, draw and more as a way of responding to your learners’ work.
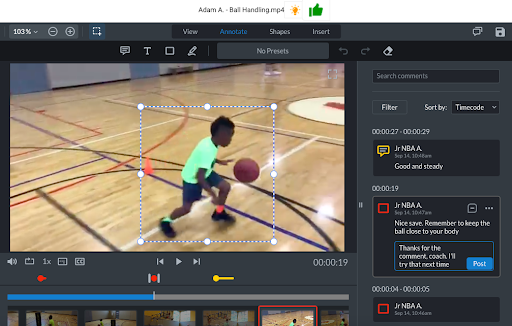
Some scenarios in which the annotation feature may prove to be particularly useful is in the following:
- Visual arts or design courses where the learners need to submit artwork.
- Music lessons for learners to submit videos of them playing an instrument.
- Essays that need highlighting or commenting.
- Lessons for younger learners that include simple activities like matching, labelling and so on.
On top of this, learners are also able to respond to their Educators’ annotations through the same interface themselves, encouraging a direct two-way interaction over their work.
To learn more about the BeED Annotations Tool, click here.
1.2 Using BeED Offline
Overcoming Poor Digital Infrastructure with the BeED App
One major issue with introducing a full e-learning module to academic institutions is that a majority of institutions have poor or inadequate internet infrastructure to support a fully online module.
We understand that building infrastructure to support online learning can often be expensive and time consuming. Hence, through the BeED App, learners can initiate online learning by pre-downloading the lessons before classes. This gives educators the convenience of having their lessons in an easily accessible, centralized location while learners can continue to access their lessons uninterrupted.
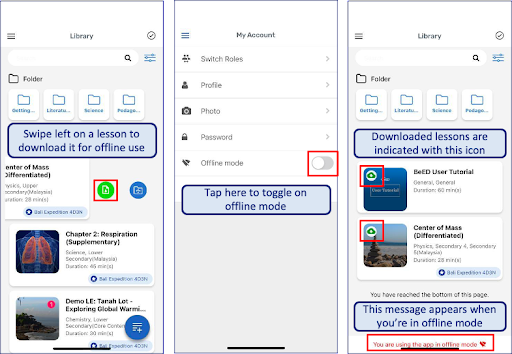
To use the offline mode, tap on the menu icon and tap on “Account Settings”. Toggle on “Offline mode”.
When learners answer their lessons, the answers are saved into their mobile devices until the learners regain internet connectivity. Answers are then synced to the servers once connectivity is restored.
Downloading Lessons Locally for Offline Use
To fully utilize the BeED App’s offline capabilities, your Learners will need to download their lessons before going offline. To download lessons for offline use, tap on the menu icon and navigate to your Library. Swipe left on the lesson you would like to download and tap on the download icon. This will download the contents of the lesson into your mobile device.

Using Offline Mode to Administer Quizzes and Tests
Through the offline mode, you can create an environment where your learners are unable to access the internet to refer to other sources of knowledge. By doing this, you can administer quizzes or exams by requesting your learners to complete their lesson through the app using the offline mode. If the quiz is a timed one, learners are still able to answer the questions offline, as their answers will be synced locally to their phone. Once they’re done with the questions, they can reconnect and their answers will be synced back to the system for Educators to view.
To learn how to create a timed lesson, click on the link here.
1.3 Using BeED beyond the classroom
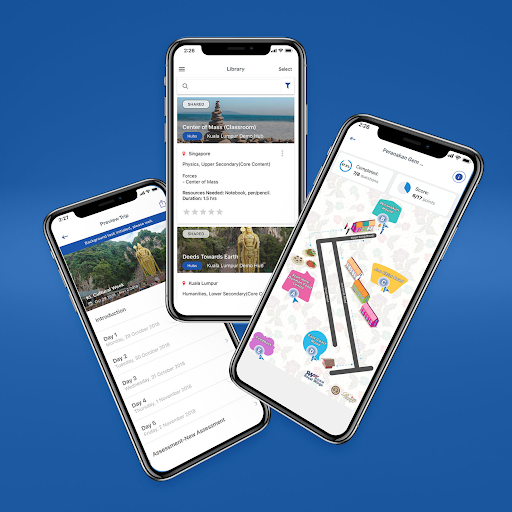
Based on the core belief that learning should not just take place in a classroom, BeED Journeys is designed to support a learner’s educational process anytime, anywhere using their preferred mobile device. Through its first-of-a-kind mobile delivery inclusive of a location-based mapping feature, Journeys allows users to take their lessons on the go even without Internet connectivity. Users can choose to learn independently or with a facilitator at any place beyond the classroom to help make the connection between academic knowledge and real-world relevance.
1.3.1 BeED Tools for Excursion/Outdoor Activity Management
BeED offers a wide variety of tools you can use to manage your learners through BeED Journeys, whether it be for an excursion or an extracurricular workshop.
Hubs
Hubs are mobile, simplified classroom systems built to manage groups of learners,
teachers as well as organize what lessons will be distributed to learners.
For more information about hubs, click here.
Itinerary
The Planner is a versatile scheduling tool that enables Educators or event planners to set schedules for classes, field trips, and events, complete with important information such as contact information, location, etc.
For more information about itineraries, click here.
Concierge Services
BeED also offers concierge services to help you plan exciting EduTrips around the world. To learn more about our services, or about our new Virtual Trips, contact us or click here.
Connect
BeED Connect is a module open to both our Journeys-only or LMS clients to create a conducive learning environment for both learners and educators to participate and interact with academic discussions. Furthermore, with an integrated messaging feature, learners and educators can private message each other as well as create messaging groups.
1.3.2 BeED Journey’s Interactive Mapping Feature
One of BeED’s most flexible feature is the interactive mapping feature, available for use in lesson builders.
Through this customizable feature, educators can create map images for various uses, such as a navigation map for excursions.
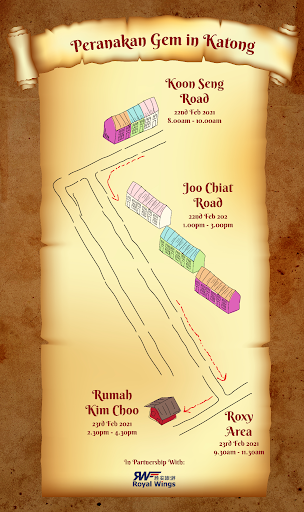
An outdoor learning map of Peranakan Houses in Koon Seng Road, Singapore
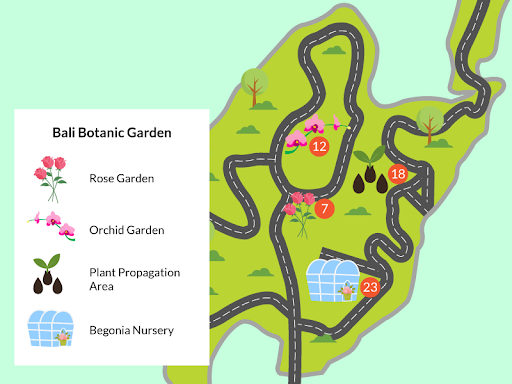
An outdoor learning map depicting the Bali Botanic Garden
As shown above, the interactive mapping feature opens up the opportunity for educators to fit in an outdoor map location to guide learners through a specific location. To learn how to use this feature in a lesson, click here.
1.3.3 BeED Tools for Learners in Excursion/Outdoor Activities (App)
BeED also offers several learning tools opening up more possibilities for learners to dynamically interact with your outdoor lessons! To gain access to these features, learners simply have to download the BeED App. Scroll on below to have a look at what features may be useful for planning your lesson.
Offline Learning Capabilities
The BeED app allows learners to download their lessons before any excursions or activities in situations where there is no connectivity to the internet. This lets you plan your lessons out without worrying about any connection issues that may occur.
To find out how learners can go offline through the BeED App, click here.
Photo Editor
The photo editor lets learners edit photos snapped using the app. Learners can choose to add labels, stickers or even draw on their photos before uploading it as an answer!
For detailed instructions on how the photo editor works, click here.
Journal
The Journal is a unique BeED feature that enables you to keep records of your daily reflections, either through the browser or the app. You can choose to include text, audio, images or even videos in your journal to keep track of your thoughts, or for learners to track their learning progress.
For more information about Journal, click here.
1.4 Conducting Virtual Tours with BeED
Despite the Covid-19 Pandemic, traveling doesn’t have to stop with BeED. Through our interactive live virtual tours, learners can still explore the world with us and apply what they’ve learned in school to actual places of interest.
Our virtual tours are carefully tailored to cater to different age groups, and can be customized to fit the learning needs of your learners.
For a quick look at how our virtual tours work, click here:

To find out more about our virtual tours and what we offer, drop us a line at contact@beed.world.
2. Setting up a Pedagogically Focused Curriculum
2.1 Ensuring Standardization throughout the Active Curriculum
2.1.1 Standardization through Curriculum Documents
The Active Curriculum allows educators across an institution to collaborate on the curricular framework of a particular academic year.
Curriculum Directors and/or Heads of Department can set the foundation of the curriculum by creating Syllabus, Objectives and rubrical documents as needed for every course under a segment within their institution.
This way, educators can then select the appropriate strands or criteria from these documents to use as a guide and reference for their own unit plans and lessons. The open visibility of the platform for all teaching content also ensures that pedagogical standardization is upheld throughout the entire institution.
2.1.2 Standardization through Templating
Through the Unit Plan and Lesson Templates, institutions can further ensure the pedagogical standardization of their daily learning materials.
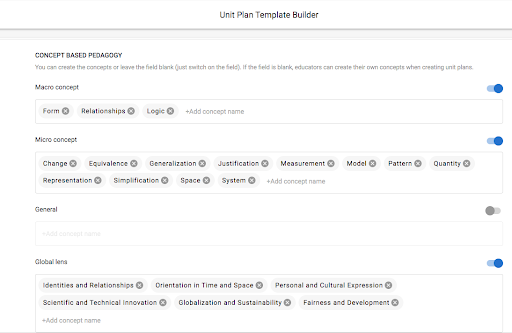
The Unit Plan Template helps educators form the groundwork of each learning section, so that they can connect the competencies, concepts and curriculum-framing questions together to create a unified picture for their learners.
The Unit Plan template is not only available at the course level, but at the segment level as well, allowing for even greater standardization when creating educational materials throughout the institution.
The Lesson Template, on the other hand, allows educators to create a uniform guide based on the pedagogy of their choice for all lessons in a particular course. By setting the designated stages, Curriculum Directors, Heads of Department and Educators assigned to that particular course can set the structure for educators to follow when creating their lessons.
2.1.3 Standardization through Shared Documents
Another way for educators to standardize their materials is to share lessons and/or Curriculum documents through the Account Library. This way, any exemplary work may be duplicated, edited and then imported into the Active Curriculum for another lesson/Course to follow.
To learn how to copy and duplicate documents, click here.
To learn how to import documents into the Active Curriculum, click here.
2.2 Setting up the Curriculum for Different Models of Assessment
Different curriculums require different modes of assessments. With BeED, you have the flexibility to construct your curriculum in line with various types of assessment.
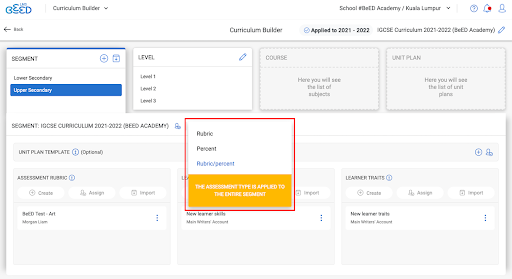
Tip 1: Set up your curriculum’s Assessment Type
When setting up Segments or Courses in your curriculum, specify whether your curriculum’s assessment type consists of rubrics, percentages or both. This will help tailor the options available to your teachers later when it comes to creating and grading their assessments.
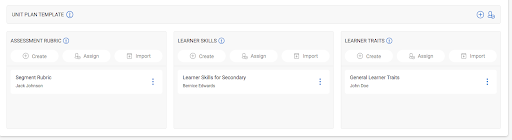
Tip 2: Set up rubrics for assessments, learner skills and learner traits
BeED’s rubrics are not limited to just the assessment of academic knowledge, but they also support the holistic evaluation of learner skills and traits. Click on these links to learn how to customize your own Assessment Rubrics, Learner Skills Rubrics and Learner Traits Rubrics for your segments and courses.
Tip 3: Cherry pick assessment criteria for each unit plan.
Once you’ve created Unit Plans, you can pick and choose the specific assessment criteria that apply to each unit. This ensures that Unit Plans are closely aligned to the curriculum standards, and prevents Unit Plans from straying from curriculum guidelines. Check out this article to find out more.
Tip 4: Customize lesson content in line with assessment needs
Make full use of a range of lesson customization options to cater to different assessment types.
For assessments graded using the Segment or Course rubrics, you can select specific criteria that are applicable to your assessment. This makes rubric selection and grading more transparent to teachers at all levels.

For assessments graded by percentages, you can allocate point values for each specific question. Questions can be graded automatically for MCQ questions, or with a personalised touch for open response questions. Once graded, assessment scores will be automatically calculated and displayed in the Gradebook and Report Card.
For assessments that enforce academic integrity and proper citation standards, you can turn on the inbuilt plagiarism checker, which will automatically check any documents submitted by learners for plagiarism.
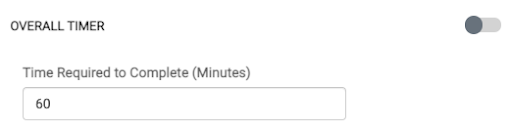
Tip 5: Schedule timed assessments ahead of time
Toggle on the overall timer for timed assessments. For remote assessments, you can also schedule release dates and deadlines to ensure that assessments are only available exactly when you want them to be.
3. General Recommendations for Lesson Building
3.1 Utilizing Interactive Mapping to Organize Learning Content
One of BeED’s most powerful features is the Lesson Builder’s interactive maps. By creatively using maps, points and maplinks, you can create engaging lessons to suit any pedagogy.
Click through the slides below for some ideas on using maps to organize different types of lessons.

Start using interactive mapping to engage your students with these four tips below:
Tip 1: Use pedagogical Map Templates from BeED
For busy teachers, BeED has prepared several Map Templates based on several pedagogies such as inquiry based learning, Bloom’s Taxonomy, flipped classroom and more. You can download these Map Templates here.
Tip 2: Find Map images online
You can also use images found online as Lesson maps as long as you attribute the source accordingly. Check out this guide to images and copyright for your lessons.
Tip 3: Design your own Maps
Can’t find an image that suits your needs? Want to try something out of the box? Make use of simple image editing software to design your own Map images. Some of our Academic Team’s favourite free resources include
- Google Slides: Simple way to create slides for use as learning maps.
- Canva: Make use of thousands of free templates to edit your map images.
- Flaticon: Millions of customisable icons that you can use when designing your maps in another software.
Tip 4: Optimize Map Layout for Learners
If most of your Learners use BeED on the mobile app, use map images in portrait orientation. And if they mostly use BeED through a web browser, use map images in landscape orientation.
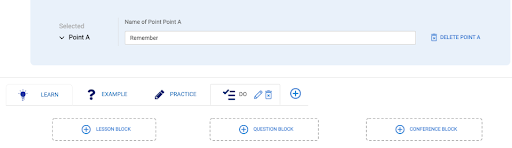
3.2 Scaffolding Lessons through Stages and Blocks
Tip 1: Scaffold Blocks and Stages
The Lesson Builder’s customizable blocking feature is well-suited for the scaffolding of content, enabling the Learner to progress through the lesson at a comfortable pace. For example, if your lesson is based on a Flipped Classroom approach, you can further break down the blocks and stages in the following manner*:
- Point A: Before Class
- Stage 1: Recap of previous lesson
- Stage 2: Introduction of new topic
- Stage 3: Pre-Reading Materials and Activities to form a basic understanding of the new topic
- Point B: During Class
- Stage 1: Warmer Activity to gauge learners’ understanding of new material
- Stage 2: Lecture/Discussion of new material
- Stage 3: Group Activity to practice and apply new information
- Stage 4: Educator evaluation of learners’ understanding
- Point C: After Class
- Stage 1: Independent Learner assignment to apply new content learned
- Stage 2: Learner reflection on new topic, and any challenges faced
*Within each stage, the educator can further break down any new information/activities given in a step-by-step manner that progresses from easy to difficult.
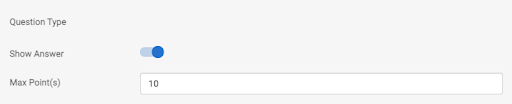
Tip 2: Use the Hint and/or Show Answer options to guide your Learners
The Lesson Builder’s “Guide” button further allows you to provide clues to help Learners arrive at the correct answer.
When creating a particular question, add in a clue in the form of a question, prompt or additional information that will help the Learner form his/her answer.
You can also toggle on the “Show Answer” button for correct answers to appear once the Learner has attempted to answer the question. This is particularly useful for self-guided learning.
Tip 3: Scaffold vocabulary with glossaries
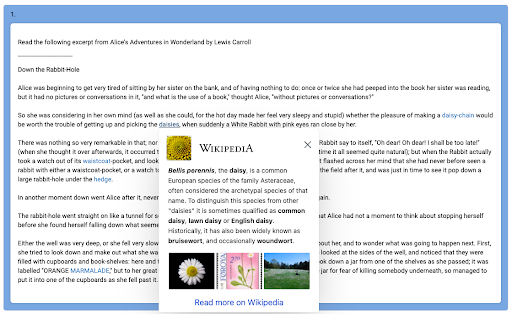
When teaching a new topic, the introduction of new terminology and vocabulary can be overwhelming for learners.
Scaffold their learning by starting new topics with a glossary, or hyperlinking new vocabulary to Wikipedia articles, so that learners can hover over them to see a quick definition without leaving the text.
References:
[1] Vanderbilt University Center for Teaching, CC BY-SA 4.0 <https://creativecommons.org/licenses/by-sa/4.0>, via Wikimedia Commons
3.3 Self-Paced Learning with Optional Assessments
Self-paced learning is a democratic learning method where learners are able to decide when and how fast they learn. Unlike traditional classrooms, the pace of a lesson is dictated by the learner’s schedule and ability. This offers several benefits such as:
- Allowing struggling learners to spend more time on a topic until they master it.
- Catering to learners with atypical schedules.
- Training learners to be responsible and self-motivated.
- Helping learners take ownership of their learning.
- Guiding learners to progress at their own pace through guides, sample answers, automarking and optional grading.
3.4 Sourcing Rich Media for Lessons
Make your lessons more interactive and engaging by including images, videos, audios and even hyperlinks as added resources. These would be particularly useful for lessons with younger learners, or for subject-specific courses such as language, art or music where learners will find it easier to learn through other methods instead of just reading.
If you are including rich media into your lessons, please make sure that they abide by copyright laws. BeED will not be held responsible for any copyright infringement incurred by users of the platform.
To learn more about CC laws, check out the following article here.
4. Teaching Tips for Specific Pedagogical Methodologies
4.1 Building Differentiated Lessons for Diverse Learners
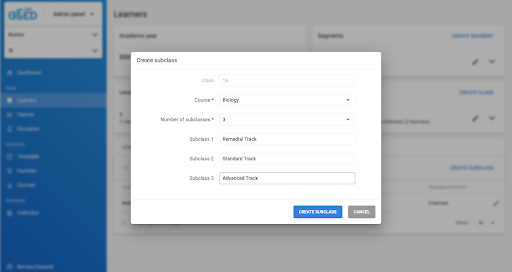
Differentiation means tailoring instruction to meet individual needs, because at the heart of it, each learner is different and unique.
Create subclasses to organise your learners based on proficiency or interest, assign custom timetable slots and link different learning content tailored to each group.
You can differentiate lesson content by difficulty or teaching style. Simply download one of our Map Templates and use them to organise your content in the Lesson Builder. You can also design your own Maps based on your learner’s interests and needs.
Once the structure of your lesson is set up, you can further differentiate by giving your learners multiple formats to answer their lessons through text, audio, video, images and documents.
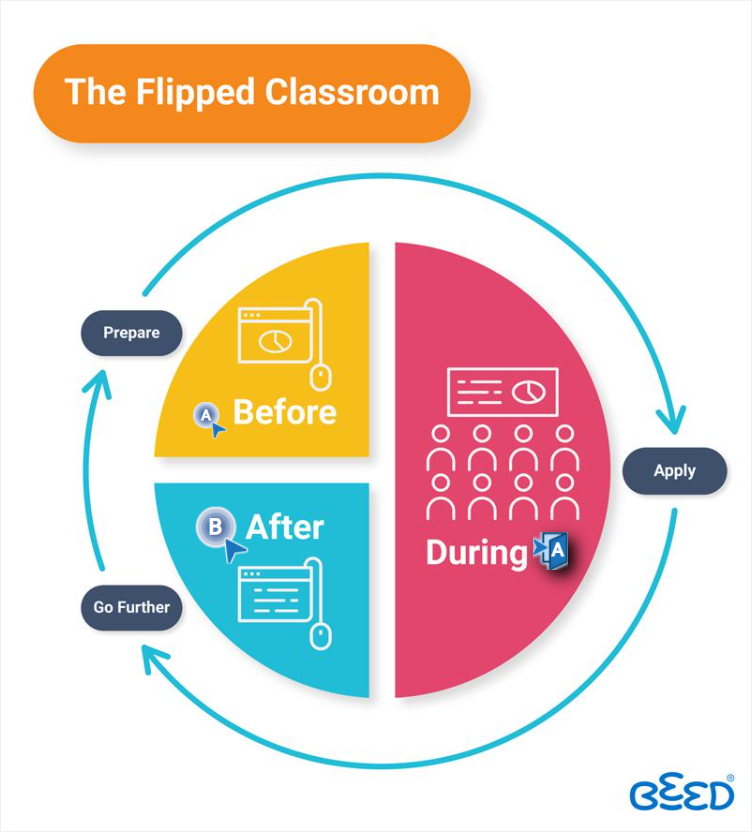
4.2 Building Lessons for a Flipped Classroom
A flipped classroom is a type of blended learning where students are introduced to content at home and practice working through it at school.
This is the reverse of the more common practice of introducing new content at school, then assigning homework and projects to be completed by the students independently at home.
You can create Flipped Classroom style lessons by downloading the Map Template and using it to organise your content in the Lesson Builder.
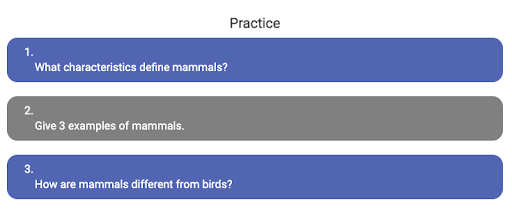
- Assign warmer activities pre-reading articles in the ‘Before’ section.
- Engage with students through conference blocks, timed quizzes and other activities in the ‘During section.
- Follow up with Forum discussions or autograded MCQ questions for homework in the ‘After’ section.
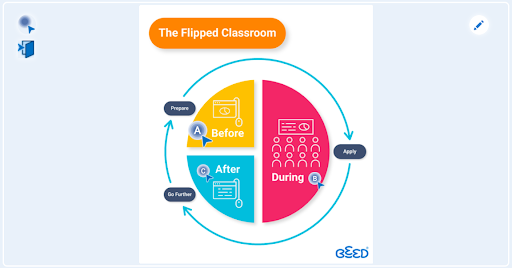
You can also set release dates and deadlines to help your students manage the time they should spend on the before- and after- portions of the lesson.

4.3 Building Collaborative Learning through Lessons and Connect
Collaborative learning is possible in several ways through the BeED platform, even during virtual lessons. To encourage collaborative activities during a lesson, create a Conference block in your lesson.
Your learners will then join a live conference where they can be organized into groups to work on activities simultaneously. If you have signed up for our Zoom integration, you can further organize them into breakout groups where they are able to utilize the whiteboard feature to brainstorm, draw, write and more for a collaborative group activity.
If activities are meant to take place outside of class, create a private forum through BeED Connect where learners can then discuss and work on the assignment together.
4.4 Building Lessons Based on Bloom’s Taxonomy
Scaffolding is the art of breaking down complex information, concepts and skills into bite-sized chunks of increasing complexity to aid in the learning process. One popular scaffolding approach is through the use of Bloom’s Taxonomy.
Bloom’s Taxonomy consists of 6 stages with gradually increasing complexity.
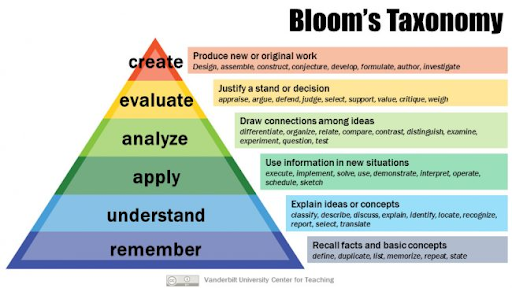
[1] Educators start by giving tasks that train learners to remember new information, and slowly work their way through increasingly complex tasks until learners are able to create original work using the new information or skill.
As a BeED Educator, you can make full use of the various features on the BeED platform to implement effective scaffolding in your classrooms.
Tip 1: Use Bloom’s Taxonomy in your lesson maps.
When creating lessons, you can download the map template for Bloom’s Taxonomy to help you organise your lesson contents. Create one Point for each stage of Bloom’s taxonomy, from Point A to Point F. You can then create different learning activities for each point in accordance with it’s respective stage in Bloom’s Taxonomy.
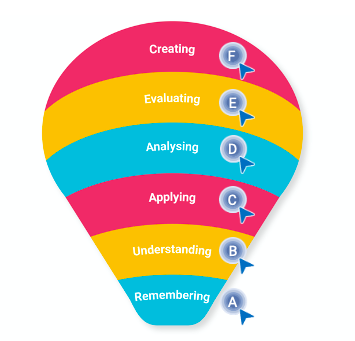
Tip 2: Use Stages and Blocks to further breakdown activities into smaller chunks
Even in each step of Bloom’s Taxonomy, you can choose to further break down your activities/tabs to help scaffold your learners step by step.
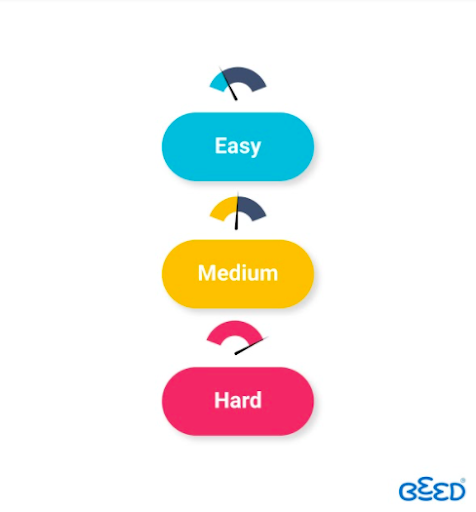
When creating question blocks, try not to have more than one question per block, and slowly increase the difficulty from easy to hard.
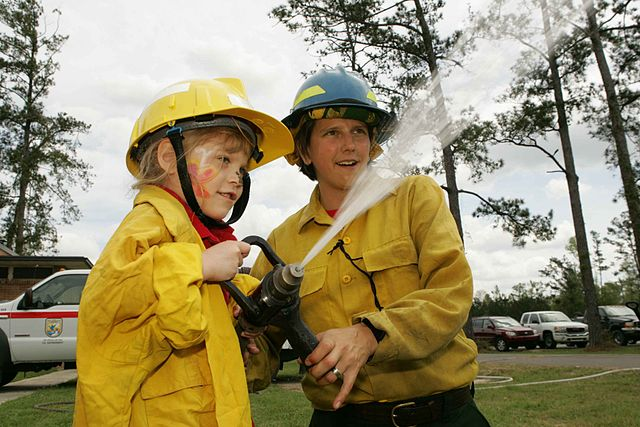
4.5 Building Lessons for Crossover Learning
Crossover learning integrates both formal and informal teaching and learning environments to provide a deeper contextual understanding of subject matter. Formal settings include a traditional classroom setup, while informal settings include places like museums, zoos, seminars and so on.
The BeED LMS can be used as a tool to support crossover learning for lessons within and beyond a classroom setting.
To begin, organize your crossover learning content by downloading the map template and using it in the following ways:
- Create separate Points for Inside the Classroom and Beyond the Classroom.
- For “Inside the Classroom”
- In this point, introduce new queries or questions that you would like your learners to investigate in the informal setting.
- Use interactive rich media such as audios, videos and external links to introduce the subject matter to your learners step by step.
- You can also scaffold your questions by using open-response or MCQ question blocks to set the foundation for their own investigation.
- You may even want to create a “Questions” stage for your learners to pose any questions for you to answer before they begin their own investigation.
- For “Beyond the Classroom”
- If your learners are going to a specific place such as a museum or zoo, you can even upload a floor map as a maplink within this point for them to navigate on their own.
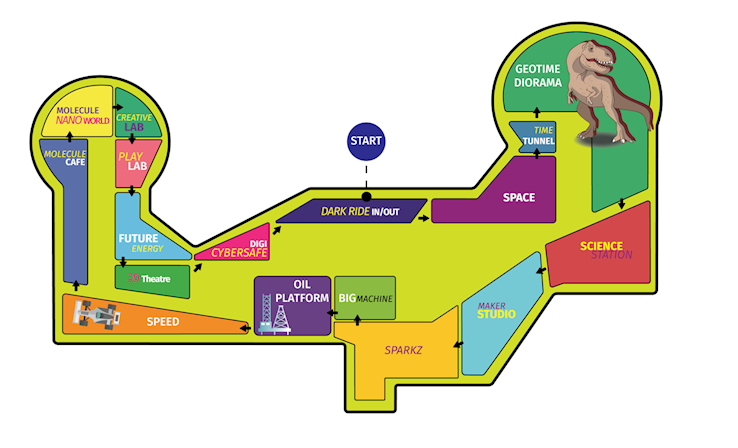
- Encourage learners to use the camera/audio feature in the BeED app to capture videos/images or even audio recordings as evidence of their learning in the informal setting.
- Learners can take observation notes in their Journal, or even self-reflections of what they learn outside the classroom.
- Host forum discussions for learners to share collected information with their classmates after the trip.
- For a greater interactive experience that enables learners to bring their lessons outside the classroom, check out our Virtual Trips.
Our Virtual Trips provide learners opportunities to:
- Discover worldwide destinations even in times of travel restrictions and bans.
- Make connections between classroom content and real world scenarios through our specially-curated Learning Experiences.
- Engage with local tour guides to build cultural appreciation and understanding.
- Develop essential skills such as collaboration, communication and cultural awareness all from the safety and comfort of their own home.
For more information about our virtual trips, please email contact@beed.world.
4.6 Concept-based Learning
In concept-based curriculum and instruction, students focus on discovering the “big ideas” of content, rather than on the facts or skills of a topic. They are encouraged to bring real-world meaning into everyday classroom lessons, making learning more engaging and relevant for them as 21st century thinkers.
The BeED LMS can be used as a tool to support concept-based learning within and beyond the classroom.
To begin, plan out your units by identifying the key concepts and “big ideas” that you want your learners to understand throughout the academic year, and list them within the Segment Unit Plan Template.
These concepts can then be applied to all courses in the segment, and can help guide Educators during their lesson planning.
You can also organize your lessons to support concept-based learning by downloading the Map Template and using it in the following ways:
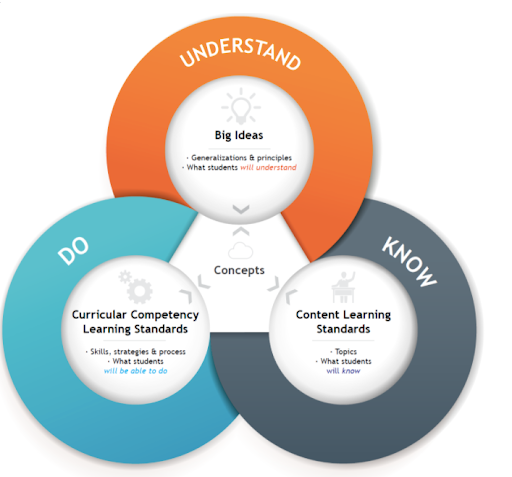
- Create separate points for Know-Understand-Do to help guide your learners through the lesson.
- Assign subject material for the learners in the “Know” point by providing interactive videos, images and even links to set the stage for their learning.
- Organize step-by-step questions/activities to scaffold learning in the “Understand” section. You can create factual questions using individual open-ended or MCQ Question blocks, and slowly build up to conceptual and debatable questions.
- Create activities that test their understanding in the “Do” section. You can utilize the BeED Photo editor or video/audio attachment feature to encourage learners to practice their understanding in various methods.
- You may also choose to create a “Reflection” stage in the “Do” section to encourage learners to perform a self-reflection after the lesson. Alternatively, learners can also record their reflections and experiences in the Journal feature.
- To facilitate collaboration and communication throughout the lesson, incorporate Forum discussions for learners to post questions, share findings or even engage in debates.
4.7 How to Encourage Self-Learning Goals in Learners
Learners can be encouraged to go through the reflective process of setting their own goals through the BeED platform. All you have to do is download the map above (or by creating a similar one) and by creating a Lesson with the following points.
Point A: Getting Started
In this point, you can ask preparatory questions to help set the objectives and mood for their journey, such as:
- What are your goals, and why have you chosen them?
- What steps do I need to take to achieve these goals?
- What skills and knowledge will I need to be successful?
- What difficulties do you think you’ll face, and what plans do you have for overcoming them?
- If your plans don’t work, what will you do?
- How will you know when you have achieved your goals?
Point B: Checkpoint 1
Create as many checkpoints as you need for this self-reflective lesson. You may wish to create several checkpoints if their task is to track their progress over an entire academic year.
Some questions to help them monitor their progress may include:
- How are you progressing?
- How happy are you with your progress?
- What are some of the challenges you have faced so far, and what have you done to overcome them?
- What challenges do you still have to overcome?
- What additional help do you need?
Point C: The Finishing Line
At the end of this journey, sum up their achievements and possible failures through a few probing questions at the final point to aid them in their overall reflection. These questions may include:
- How happy are you with what you have achieved this term?
- What were some of the things that didn’t work out as well as they could have?
- What are some things you wished you could’ve done differently?
- Reflect on your overall experience, and how you have grown this year.
Once you’ve created this Lesson, you can link it to certain “checkpoint” dates throughout the term or year for the Learners to refer to and to track their progress. To see how to link Lessons to multiple dates, click here.
No Comments