LMS - Getting Started with the LMS
Logins and Passwords
Welcome to the BeED Community!
To get started on your learning or teaching journey, make sure you’ve first activated your account with us by clicking on the activation link in the confirmation email sent to you*.
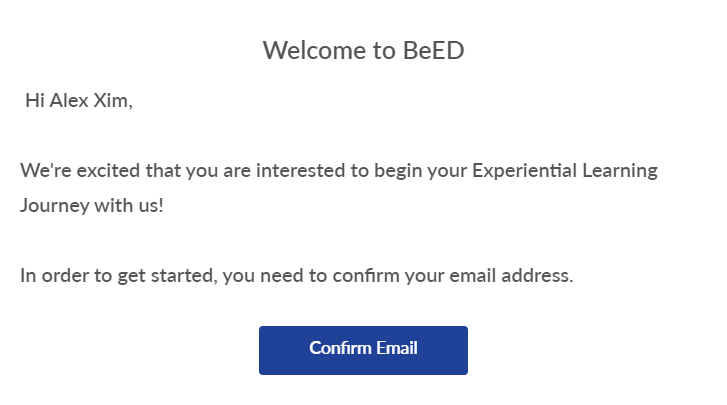
You will then be asked to set your password after clicking the activation link.
In order to use the Google or Facebook Single Sign-On (SSO), the email that has been registered to your BeED account must be the same email linked to your Google or Facebook accounts.
*If you haven’t received the confirmation email, please check your spam folder or contact your Institution Administrator.
I received an ‘invalid token’ error. What should I do?
Invalid tokens happen due to one of several reasons:
1. Your account activation link may have expired.
- To get a fresh link, click on the Forgot Password link which can be found at the login page. Key in your email address and click submit. You will receive an email with a new link for you to set your password and activate your account.
2. Your password may have been double-saved by your browser during account activation
- Go to the BeED login page and login using the email address and password you’ve previously set. You should be able to successfully log in.
If you’re still having trouble, contact us through the Help Desk icon in the bottom right, or email us at contact@beed.world.
How do I change my password?
Go to the BeED login page and click on the Forgot Password link. Key in your email address and click submit. You will receive an email with a new link for you to reset your password.
How do I set up Google or Facebook Single Sign-On (SSO)
1. Log in to Facebook or Google using the same email address as your BeED login.
2. Go to the BeED login page and click on the Facebook or Google icons. You’ll be automatically logged in.
A Quick Walkthrough of the Admin Panel
Thank you for choosing the BeED LMS - we’re ecstatic to have you onboard with us!
With the BeED LMS, you can now manage your entire institutional network under the same account without having to juggle multiple platforms. Here’s a brief look at what you can do with the Admin Panel:
- Create and manage all Learners
- Create and manage all Educators
- Create and manage all Parents
- Create and manage all Admins
- Create and manage Educational Segments
- Create and manage all Facilities
- Create and manage all Courses
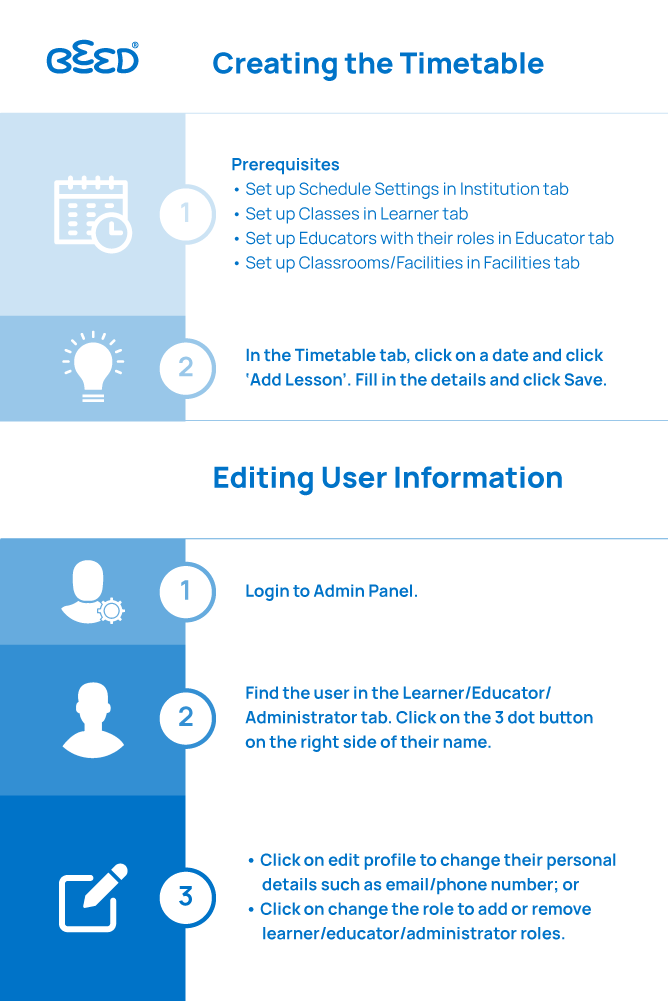
- Set up Timetables
- Set up Classes
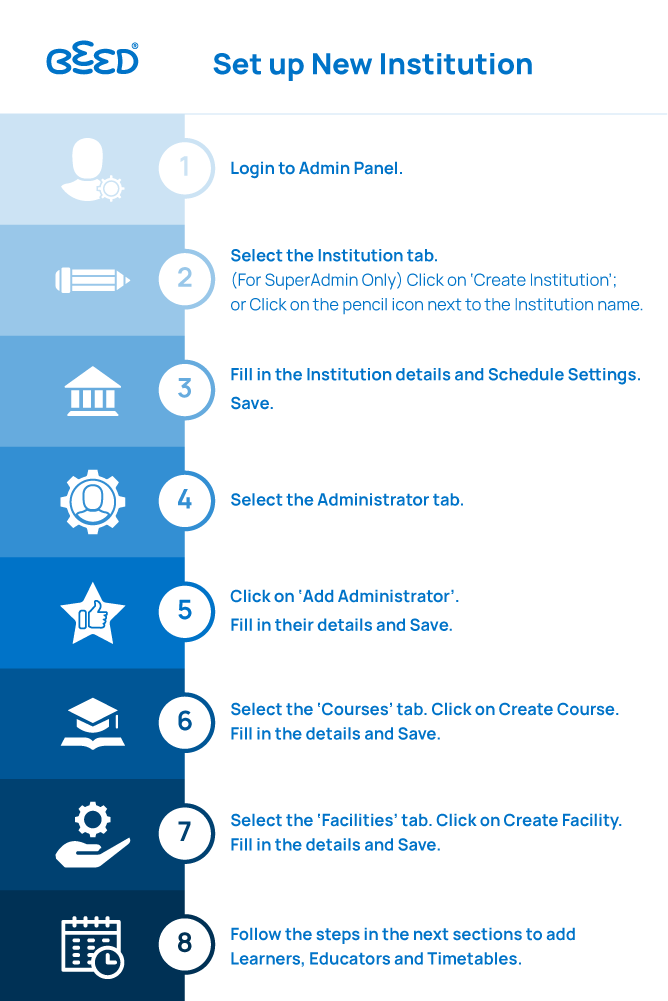
For a quick overview of how to first set up your Institution on the Admin Panel, please refer to the flowchart below for a step-by-step guide.
For more detailed instructions on how to perform a particular task, please refer to any of the categories in this section and select the article that is relevant to you.
If you still cannot find an answer to your question, please contact us through the Help Desk and we’ll be more than happy to assist you.
How to get started with BeED Admin Panel in 9 easy steps
Step 1: Set up your Institution and Institution Schedule


Step 2: Add your Administrative Staff

Step 3: Add your Courses
Click here to start adding Courses to your LMS.
Step 4: Add your Facilities

Step 5: Create your Segments, Levels and Classes
Click here to get start creating your Segments, Levels and Classes
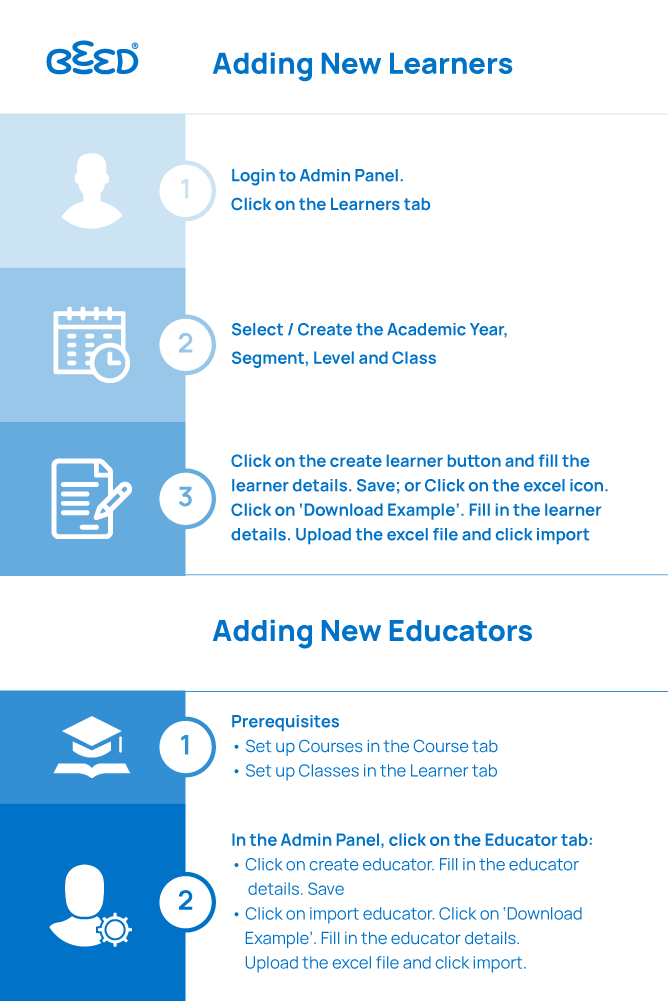
Step 6: Create your Educators and assign them to their roles

Step 7: Add Learners

Step 8: Add Parents

Step 9: Create Timetables for all Classes

No Comments