LMS - Curriculum Builder
Getting Started in the Curriculum Builder
Navigating the Curriculum Builder
Welcome to the Curriculum Builder!
The Curriculum Builder allows you to create a centralised and transparent curriculum both independently and collaboratively to suit your institution's needs.
At the top right corner, you will see the following:
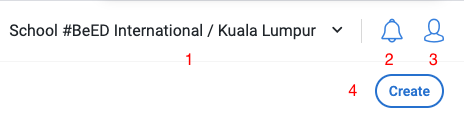
1. Your institution name. You can navigate between different institutions through the dropdown menu.
2. Notifications icon.
3. Profile icon
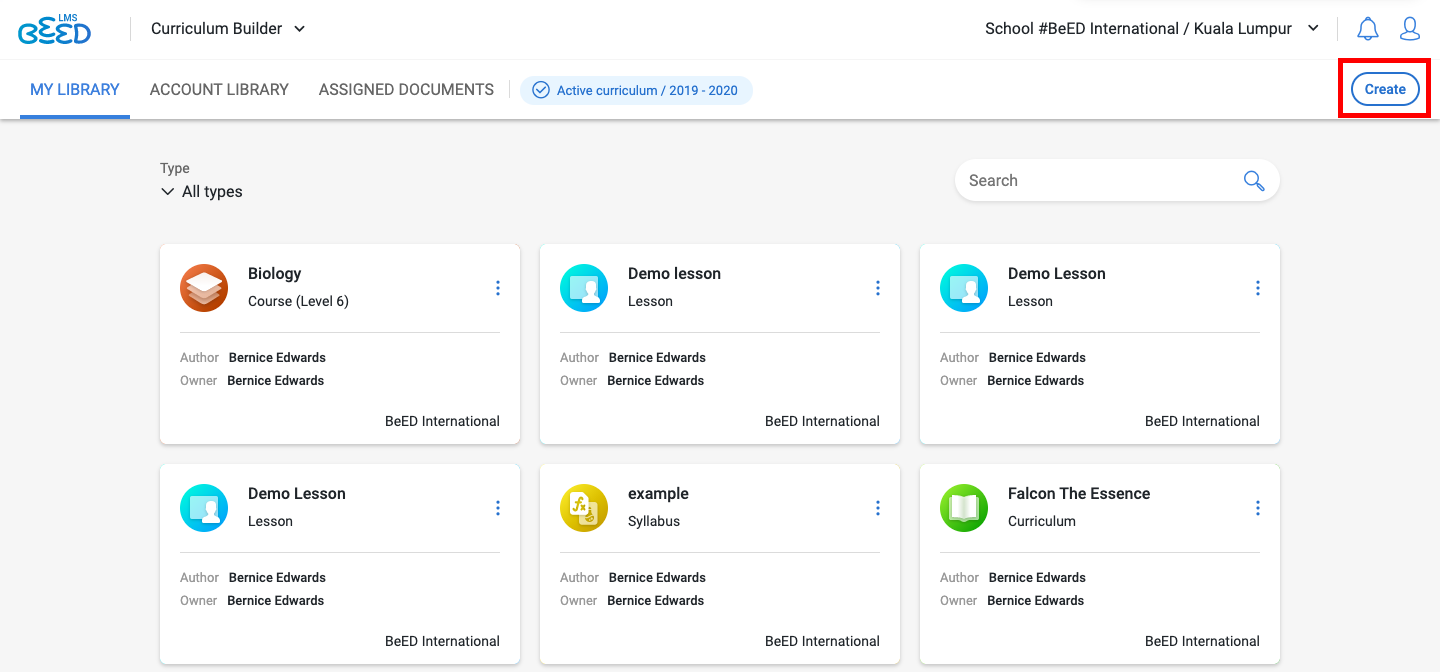
4. Create button. Allows you to create new documents in My Library.
On the top left corner you can navigate to the main sections of the Curriculum Builder - My Library, Account Library, Assigned Documents and the Active Curriculum
|
My Library |
Stores documents you’ve individually created.
|
|
Account Library |
Stores documents which are publicly shared in your Institution.
|
|
Assigned Documents |
Keeps track of document assigned to you, as well as document assigned by you to other educators. |
Roles and Responsibilities
Here is a brief overview of the roles and permissions of the different account types:
|
Curriculum Director |
Permissions
Recommended Responsibilities
|
|
Head of Department |
Permissions
Recommended Responsibilities
|
|
Educator |
Permissions
Recommended Responsibilities
|
How to Copy and Duplicate Documents
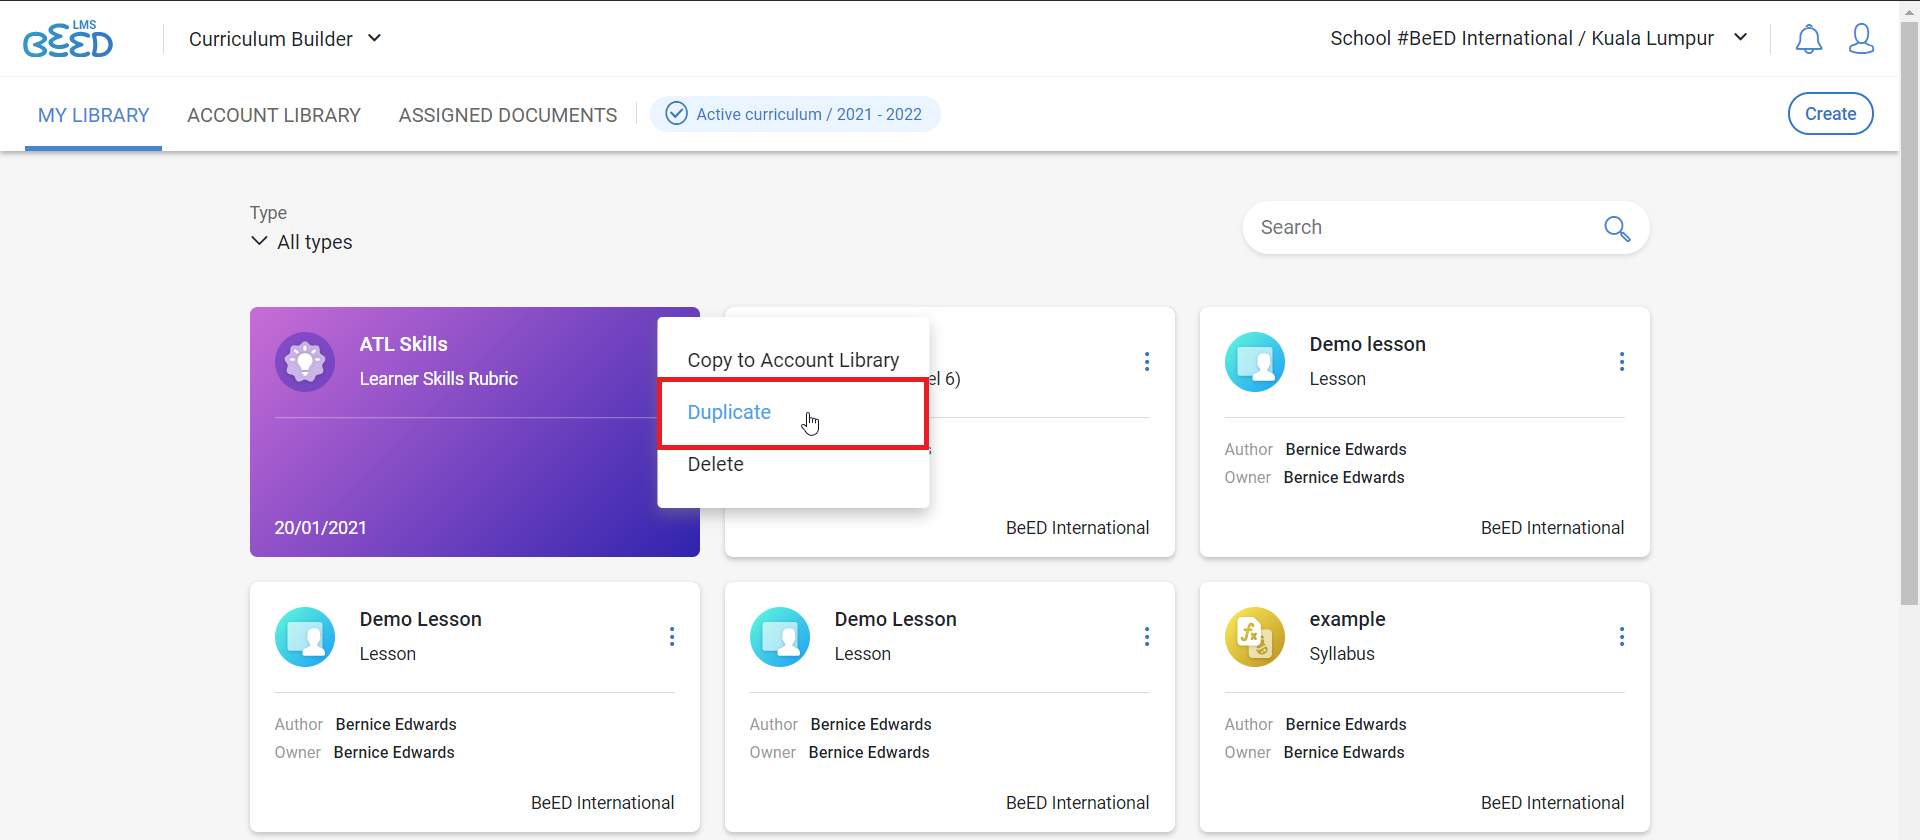
1. Click on the 3 dot icon next to a Document name in My Library. Select Copy to Account Library.
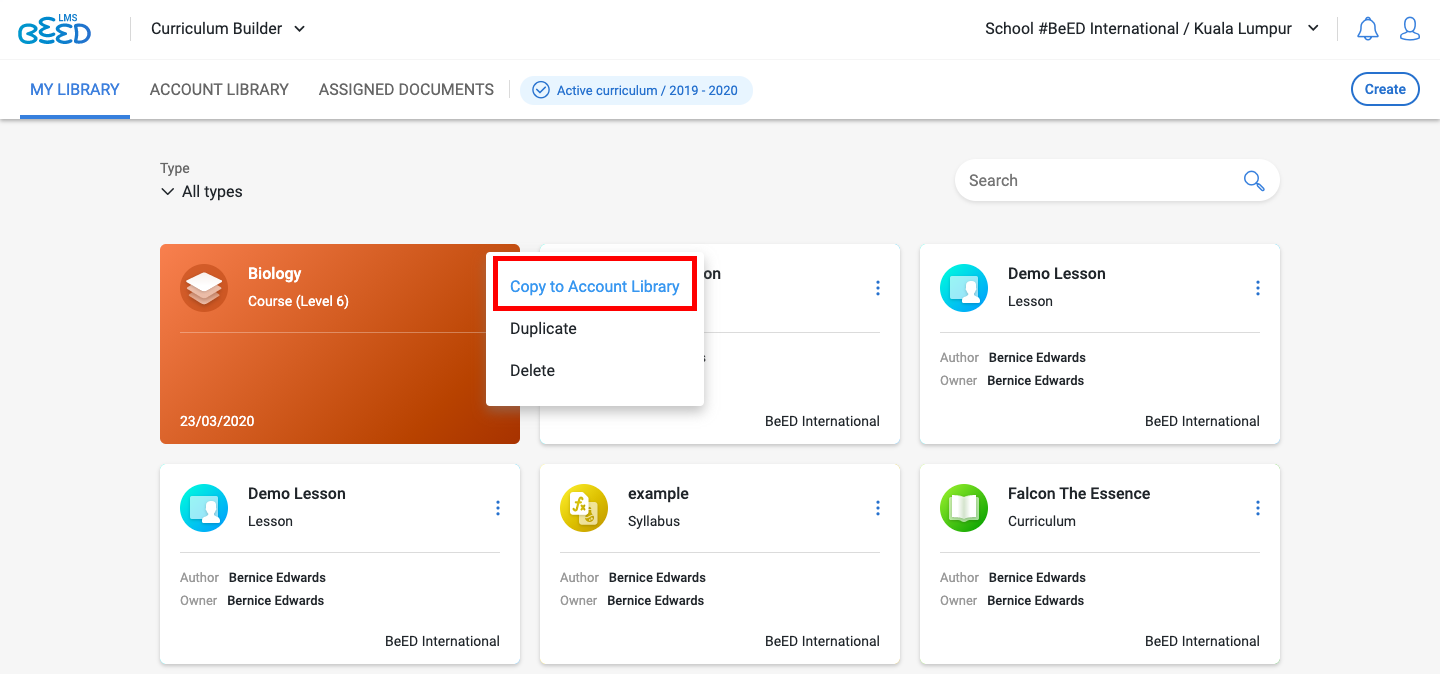
2. There will now be a copy of your document in the Account Library for all users in the institution to view.
3. To duplicate a document, click on the three dot icon next to the document’s name. Then, select Duplicate.
Who can share Documents from My Library to the Account Library?
Any Educator can share Documents from My Library to the Account Library.
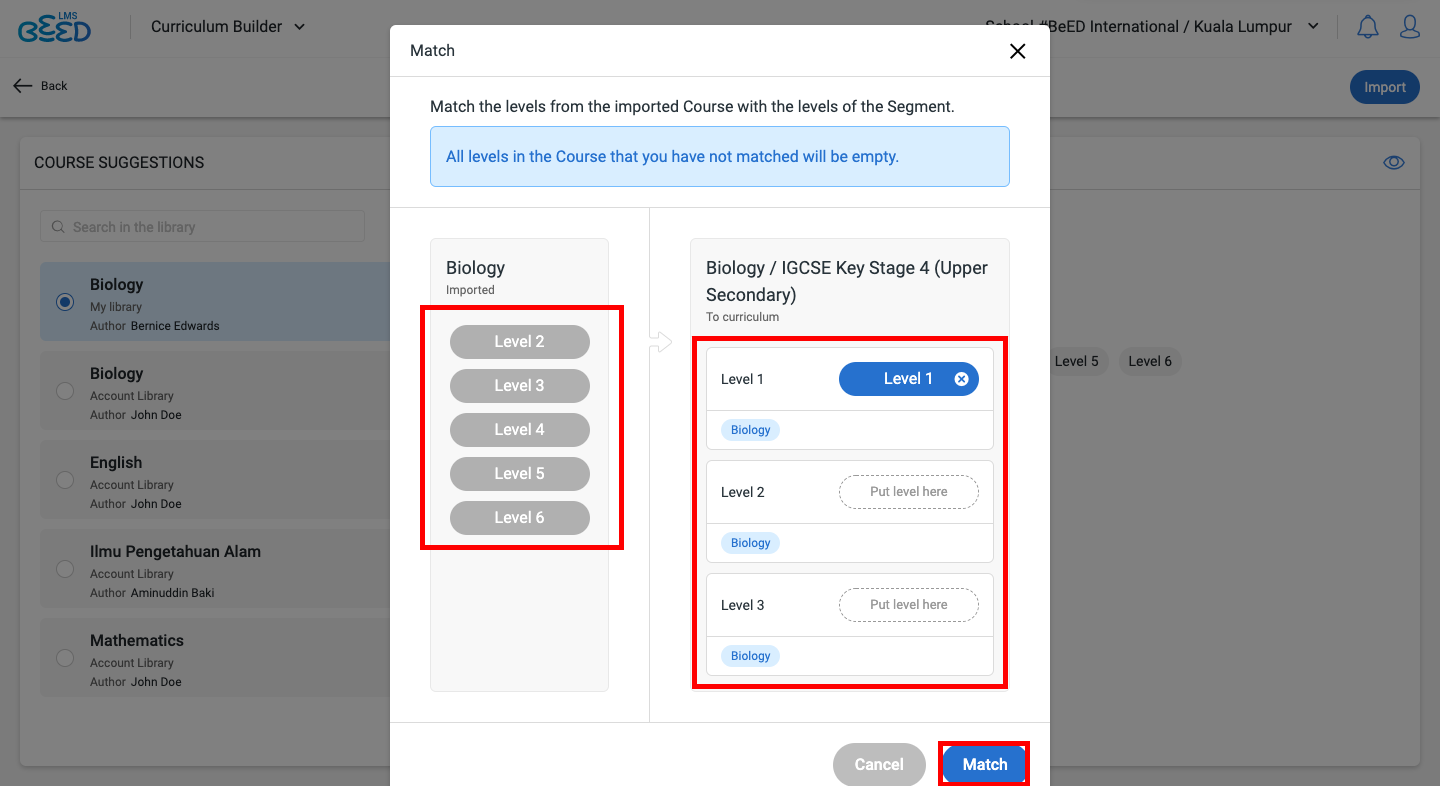
How to Import Documents
Importing Documents
You can import any documents from My Library or Account Library.
1. To get started, click on the import icon.
2. In the left panel, select the document you want to import. You can preview the document by clicking on the eye icon. Click on the Import icon to import.

3. Drag and drop Levels from the left panel to the right panel. This will match up the Levels from the document you are importing and the target document. Click Match to complete your import.
Setting Up Your Curriculum
How to Create a New Curriculum
1. Click on the “Create” button at the top right corner of the Curriculum Builder.
2. In the Pop up, select the green “Curriculum” button.
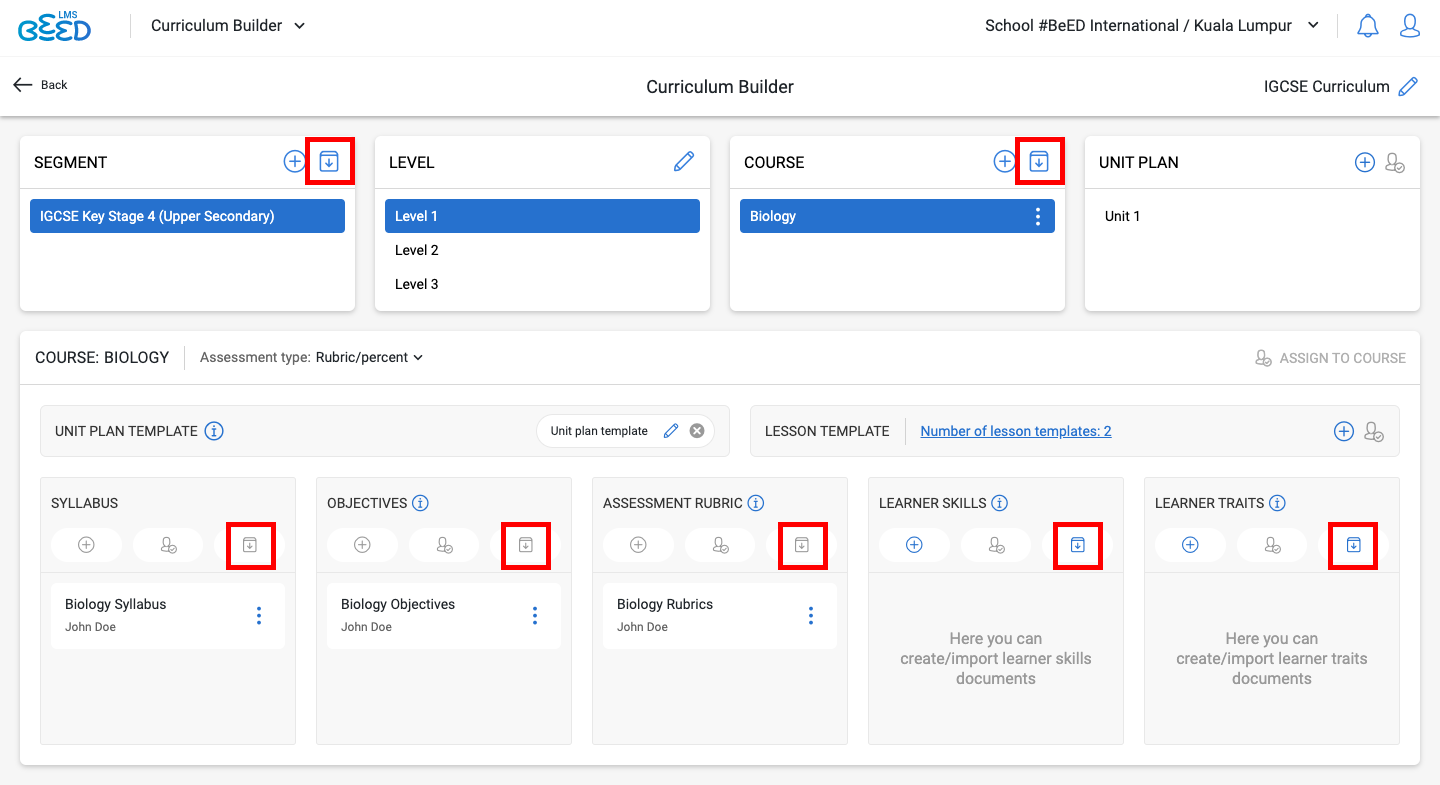
3. Fill in the upper part of the curriculum from left to right: Segment → Level → Course → Unit Plan.
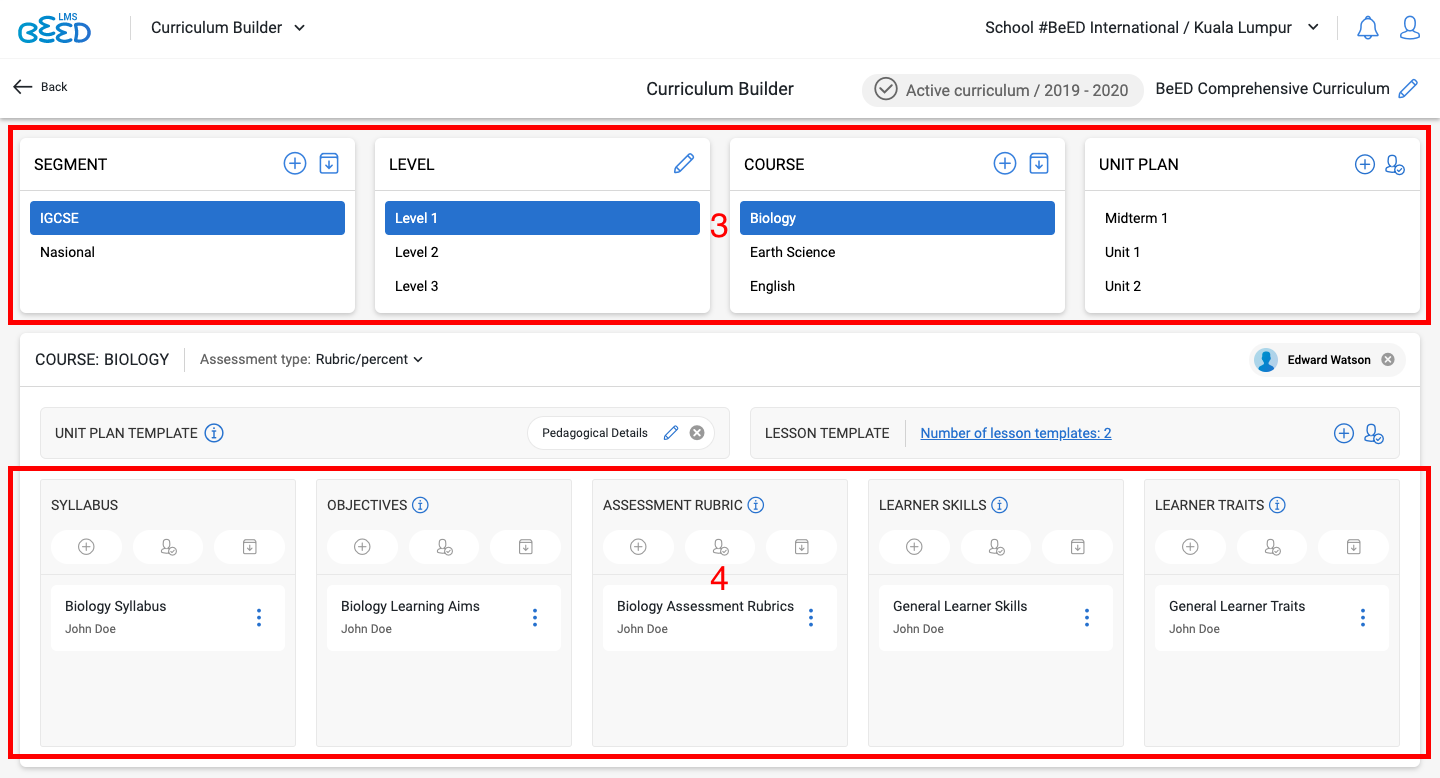
4. Other documents such as Syllabus, Objectives, Assessment, Learning Skills, and Learner Traits can either be:
- created directly within the Curriculum - OR -
- imported from an independent document in “My Library” or “Account Library”.
Who Can Create or Edit an Active Curriculum?
The following table lists out the creation/editing rights for each role:
|
Role |
Creating/Editing a curriculum |
Creating/Editing Course Documents |
Creating/Editing Lessons |
Deleting Documents |
|
Curriculum Director |
✓ |
✓ |
✓ |
✓ |
|
Head of Department |
✓ (only for documents directly assigned) |
✓ (only for assigned courses) |
✓ (only for assigned courses) |
✓ (only for assigned courses) |
|
Educator |
✓ (only for documents directly assigned) |
✓ (only for documents directly assigned) |
✓ (only for assigned courses) |
X |
How Many Active Curriculums Can There Be At One Given Time?
There can only be one active curriculum at any given time. However, each individual institution in your account network can have their own active curriculum.
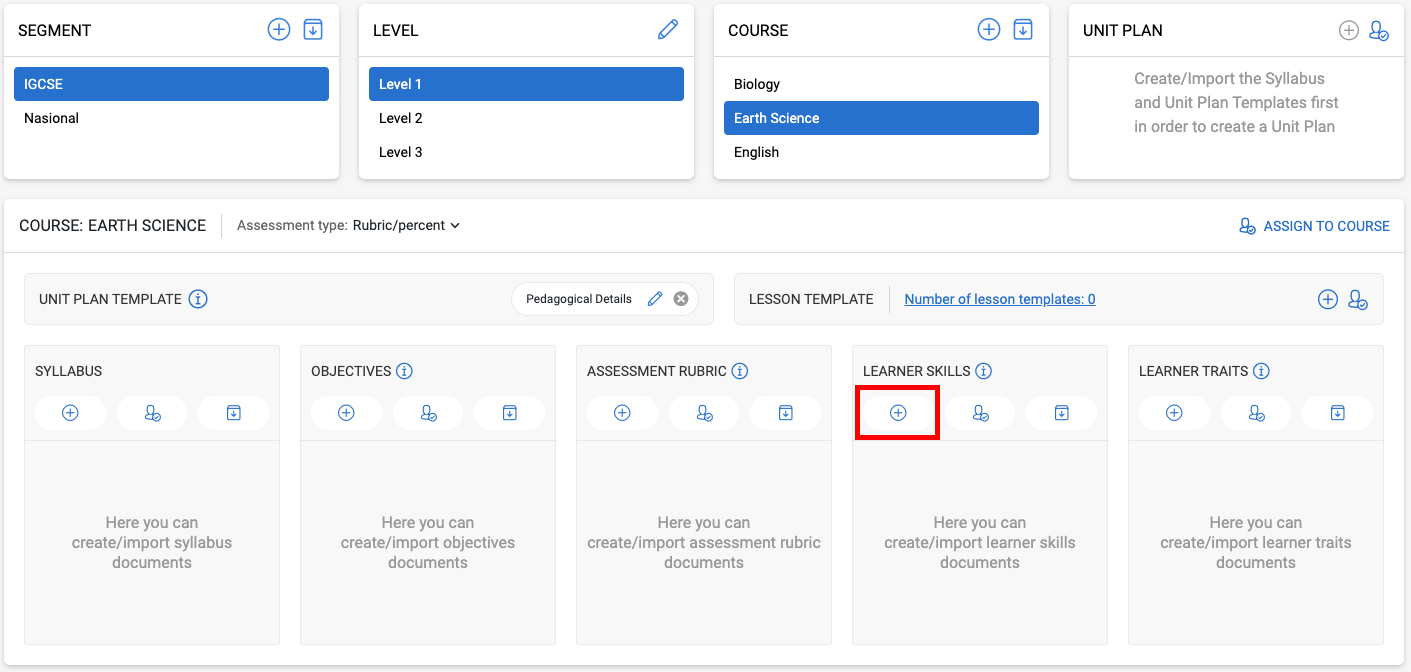
If your institution has multiple curriculums running at the same time, you can manage all of them by creating a different segment for each curriculum within the same Active Curriculum. The image below shows how you can juggle multiple curriculums complete with their own levels and content while using the same Active curriculum.
How to Activate a Curriculum for my Institution
To begin curriculum building, create an Independent Curriculum first by selecting “Create” and then “Curriculum” in My Library or Account Library (Note: if you create the curriculum in My Library, you will have to copy it to the Account Library later before activating it - see How to Copy and Duplicate Documents). Once you have completed the curriculum and are happy with it, you can activate it for your entire institution to use.
To activate your curriculum, click on the 3 dot icon on the right of your selected curriculum. Then, select “Apply to Institution”. Your curriculum is now active and ready for use!
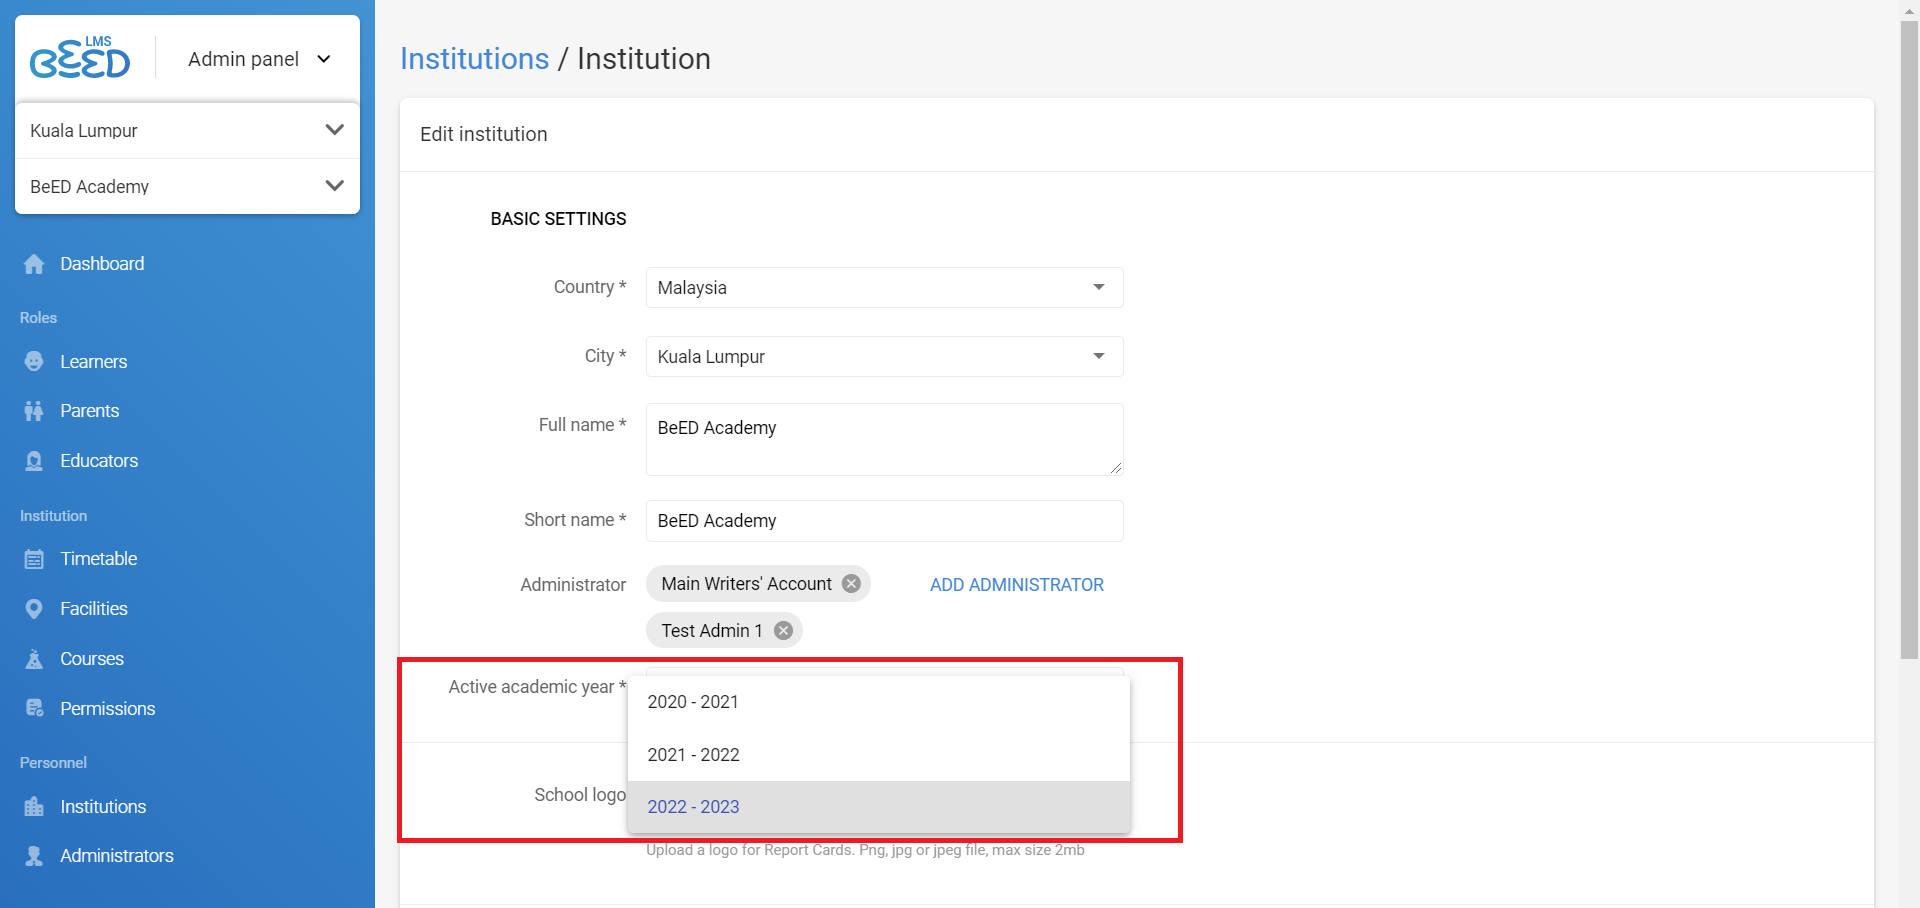
How to Prepare Curriculums for the next Academic Year
1. Prerequisite: Before you begin, it is recommended that Institution Admins first set up the new Academic Year in the Admin Panel.
2. Once that is complete, Curriculum Directors can now follow the instructions in the embedded slides below to set up the Curriculum for the new Academic Year:

3. When all preparations are complete, remind your Institution Admin to go to the Admin Panel’s Institutions page and update the new Active Academic Year from the dropdown menu. Once saved, the new Academic Year will be made active.
If you have trouble preparing your Curriculum for the new year, please refer to this troubleshooting guide.
How to View Past Curriculums
In the Curriculum Builder, go to the Account Library.
All the Active Curriculums for past, present and future years will be found there, with the year indicated in the blue tag. Click on the Curriculum to view its contents.
Troubleshooting - Why Can't I Link a Curriculum to my Institution?
If you are having trouble linking a curriculum to your institution, it may be because of any one of the following reasons:
1. The academic year has not been set up yet by your Institution Admin (see “What can I do with the Schedule Settings?”).
Please contact your Institution Admin to set up an academic year before proceeding to the next step.
2. You do not have the role of a Curriculum Director (only CDs have the right to link a curriculum to your institution).
Please notify your Curriculum Director to link the curriculum to your institution.
3. There is already another curriculum linked to that year.
Please withdraw the existing curriculum first by clicking on the Curriculum that is being used for the Active Curriculum by doing the following:
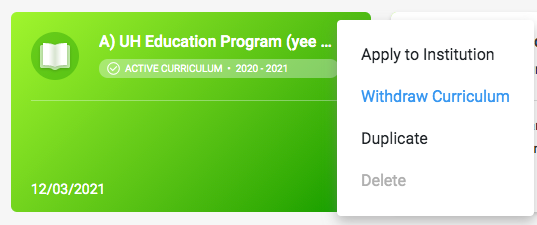
- Clicking on the 3 dot icon next to the Curriculum name in the Account Library.
- Select “Withdraw Curriculum”. (Note: You can no longer withdraw a curriculum if it has already been linked to a timetable and grades have been given to learners).
You can now apply the new curriculum to your Institution.
4. The curriculum is in My Library instead of Account Library.
Make sure to share your curriculum to the Account Library first before linking it by clicking on the 3 dot icon next to the curriculum name and selecting “Copy to Account Library”.
Assigning and Approving
How Do I Assign a Document to Another Educator?
Assigning a Document
1. Click on the “Assign” icon located next to the document you wish to assign.

2. Select the educator that you would like to assign the document to and click “Add”.
3. The document will now appear in the educator’s “Assigned Library” for them to complete. You will be notified once the educator submits the assigned document for your approval.
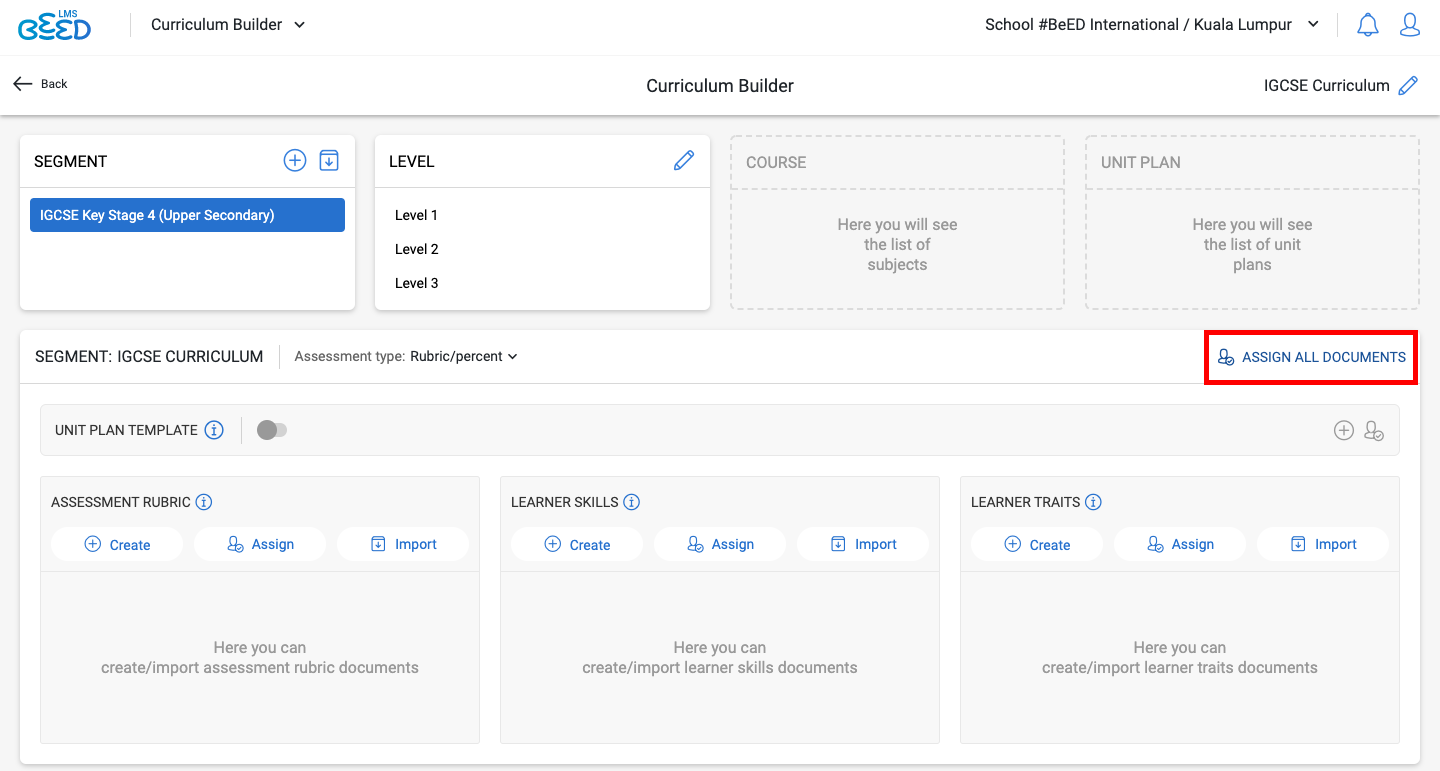
Assigning a Segment
Select your Segment and click on 'Assign All Documents'. The user you assign will be responsible for filling up the Unit Plan Template, Assessment Rubric, Learner Skills and Learner Traits for this Segment.
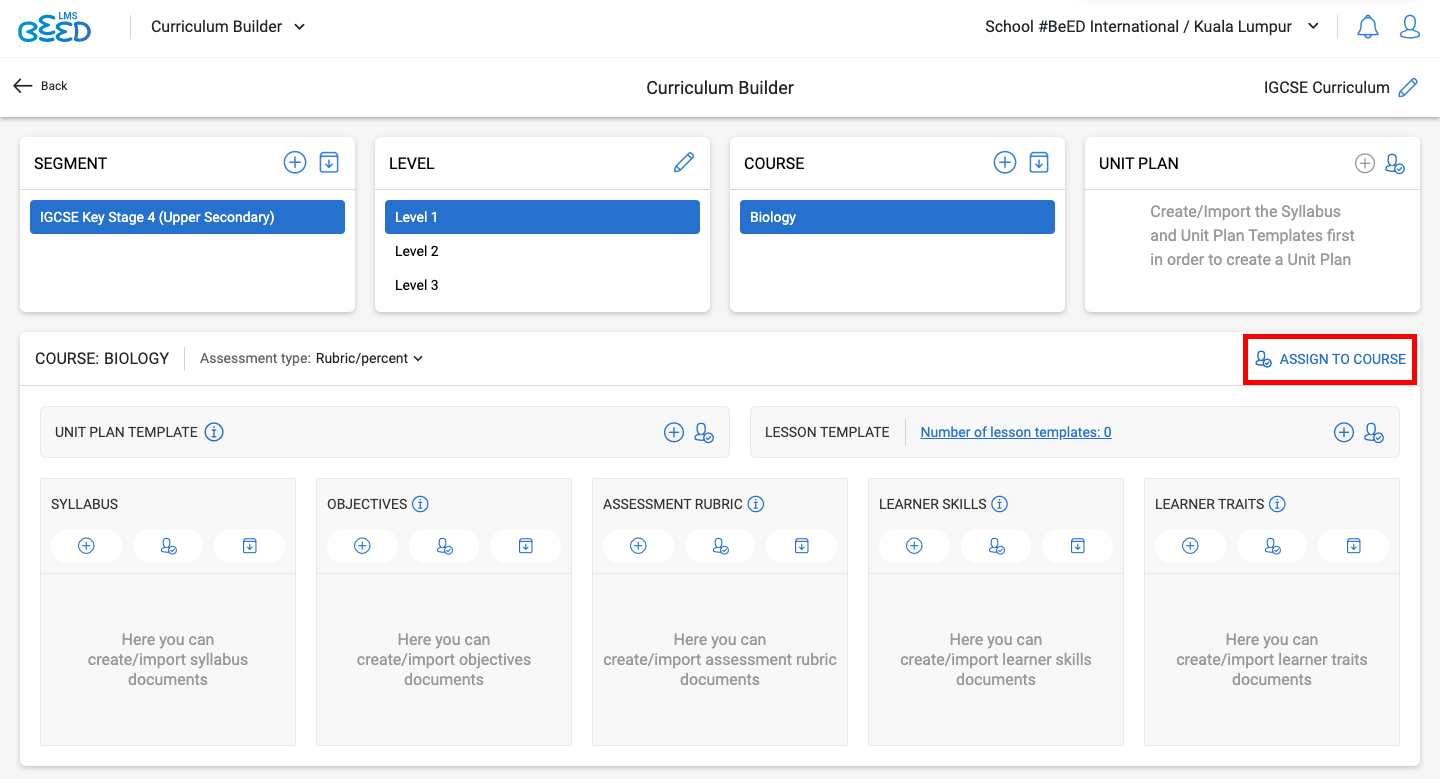
Assigning a Course
Select your Course and click on 'Assign to Course'. The user you assign will be responsible for filling up all documents and Unit Plans for this Course.
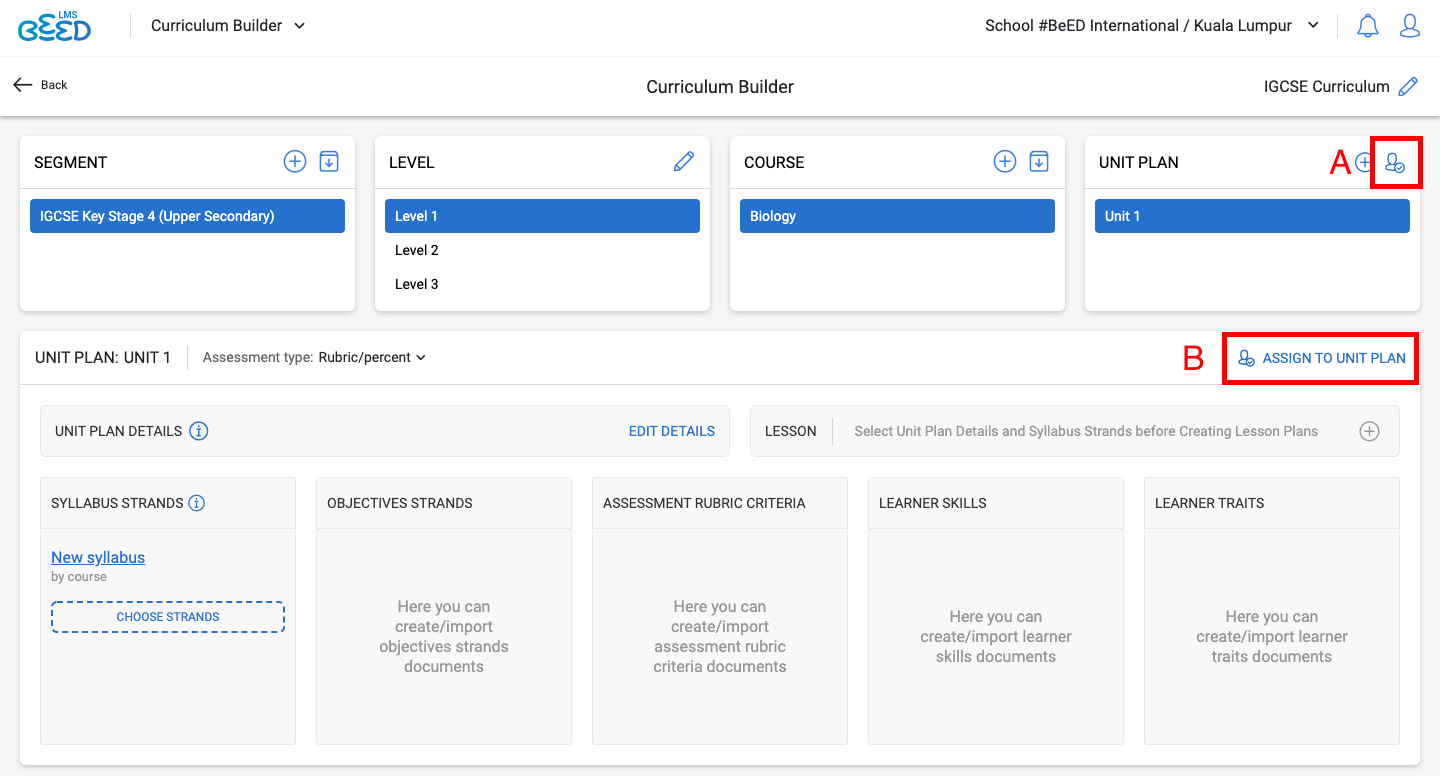
Assigning Unit Plans
You can choose to assign ALL Unit Plans in a Course by clicking on the Assign icon in the top right corner (A). You can also choose to assign only one Unit Plan by selecting it and clicking on the "Assign to Unit Plan" button (B).
What Documents Can I Assign?
The documents that can be assigned within a Curriculum include
- Course
- Syllabus
- Objectives
- Assessment Rubrics
- Learner Skills
- Learner Traits
- Unit Plan Template
- Unit Plans
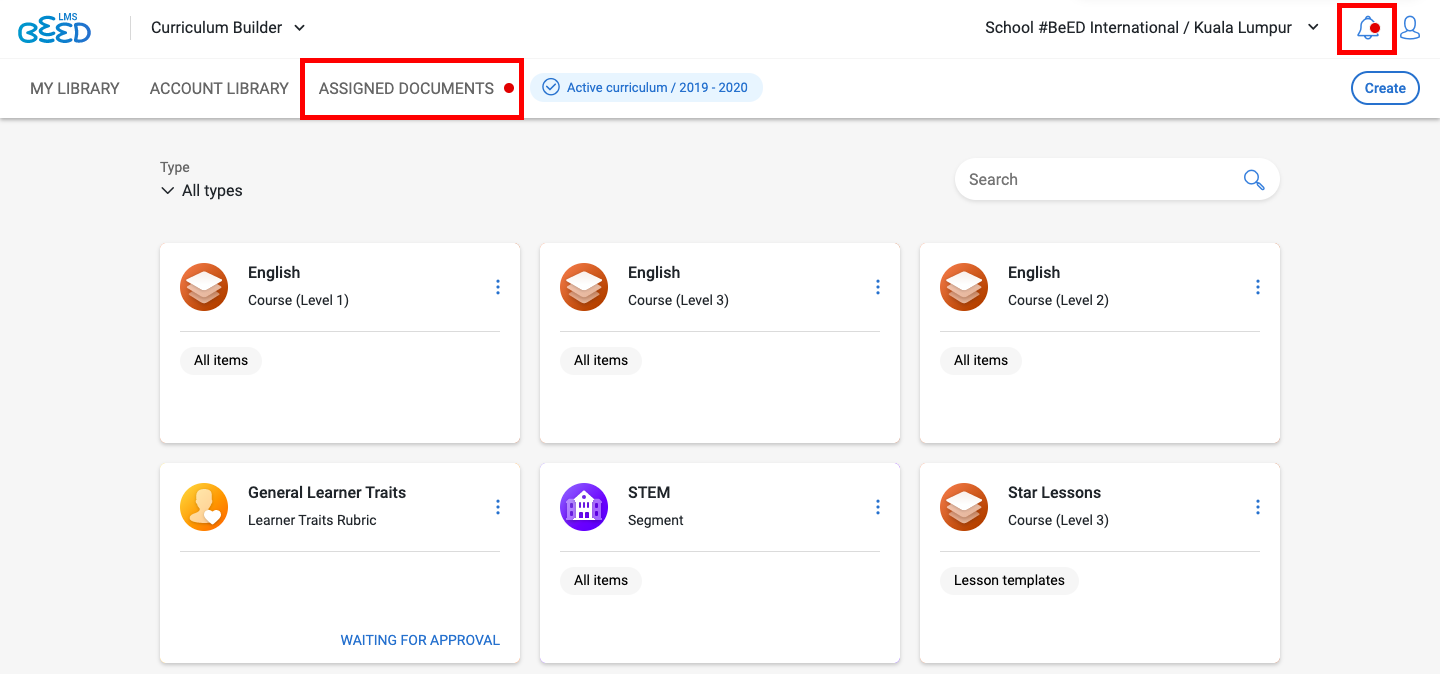
I've Been Assigned a Document. What Should I Do Next?
1. Click on the Assignments tab or the Notifications icon in the top right corner. Select the document that you've been assigned. This will open up the document for you to create, import or reassign.
2. Certain documents will remain in the "Draft" stage until they are complete. These documents include
- Syllabus
- Objectives
- Assessment Rubrics
- Learner Skills
- Learner Traits
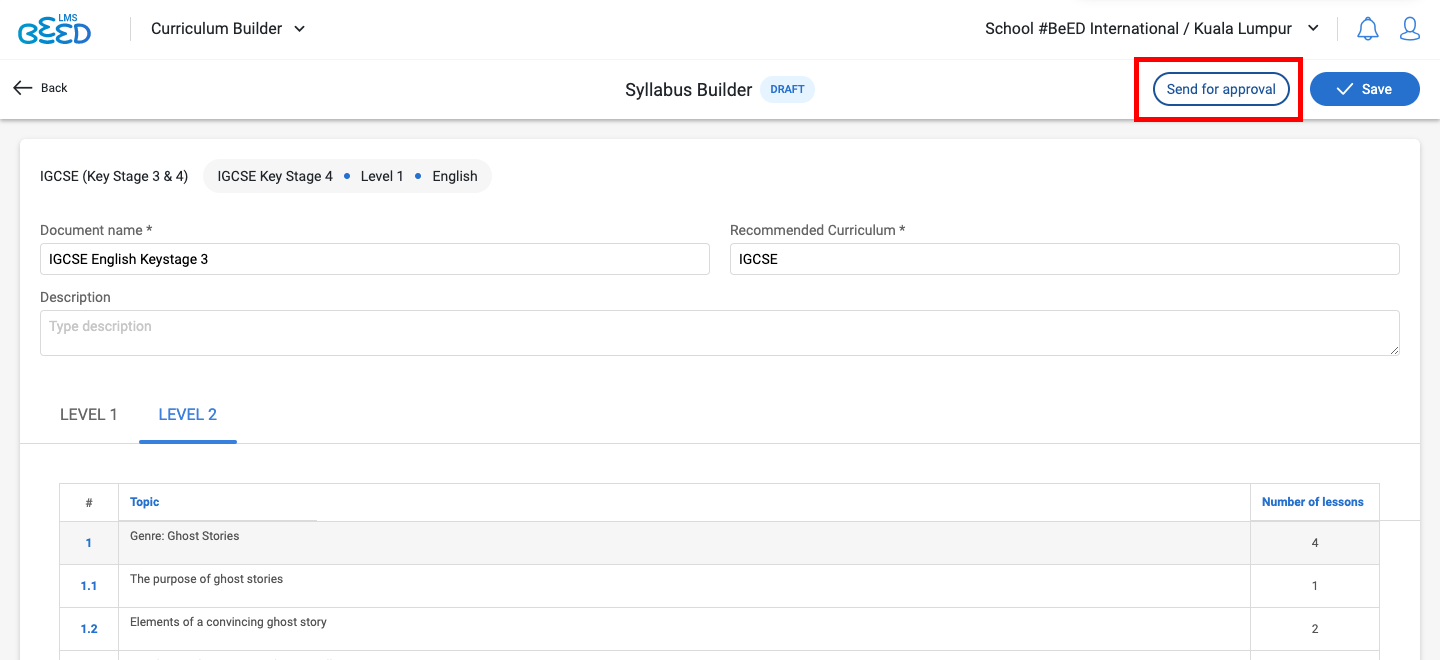
For these documents, click on the "Send for Approval" button once you have completed them. They will then be submitted to the Assigner for approval.
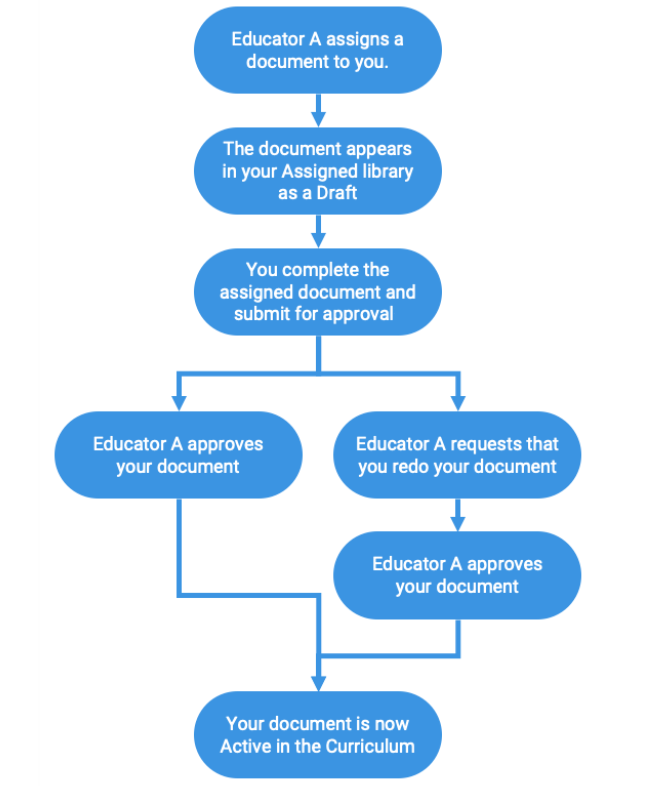
The Assignment and Approval Process
Curriculum Directors
Below is the assignment and approval process flow for Curriculum Directors.
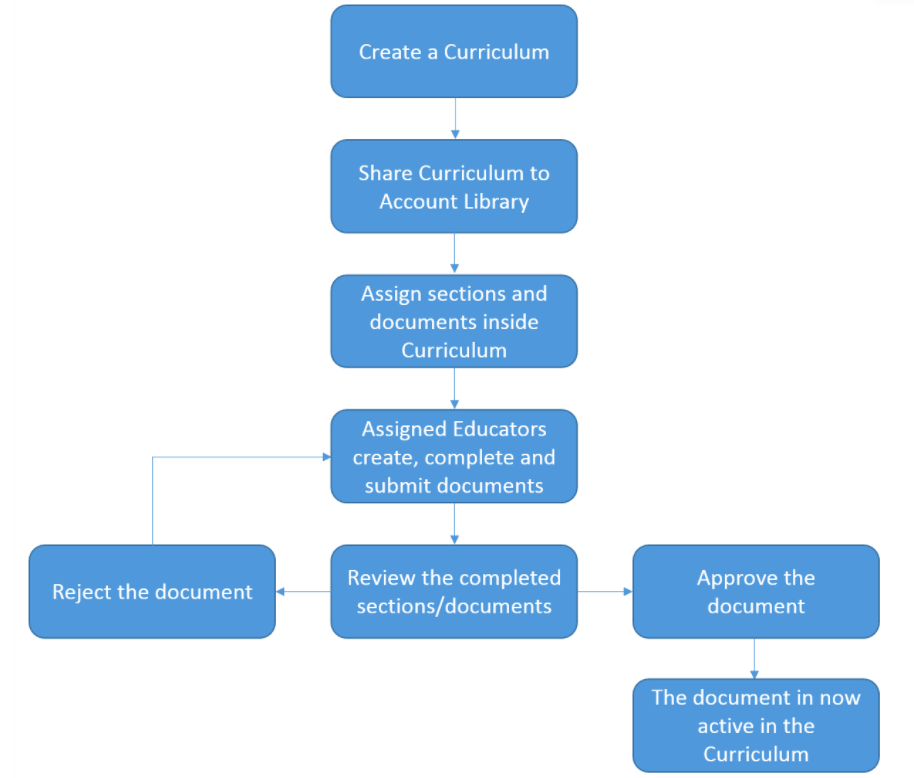
Educators
Below is the assignment and approval process flow for Educators.
Troubleshooting - Why Can't I Assign A Document?
You will be unable to assign a document if
- the document is located in My Library or is not parked within a Curriculum
- you do not have permission to edit the document
- the document has already been created
Troubleshooting - Why Can't I Assign a Particular User to my Document?
For documents that are tied to a Course, you can only assign them to Educators whose roles in the Admin Panel allow them to teach those Classes. For instance, you cannot assign a Math Educator to create an English Syllabus.
Administrators can manage Educator roles in the Admin Panel.
Segments & Levels
Creating Segments and Levels in the Curriculum
A Segment is a collection of levels or years grouped together within your curriculum.
Examples of Segments:
- Upper and Lower Primary
- Art Stream and Science Stream
- IGCSE Key Stage 1, 2 and 3.
Creating a Segment
1. Enter the Curriculum. You can choose to either create a nested Segment (A) or import an existing Segment (B) from My Library or Account Library.
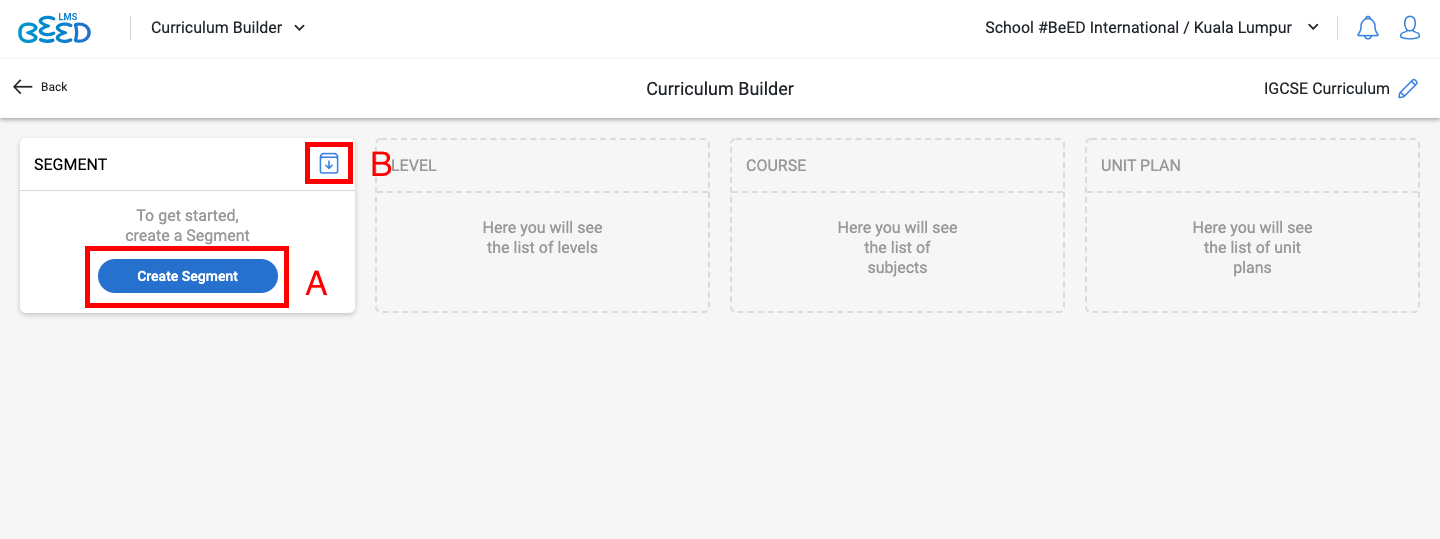
2. If you choose to create a new Segment, fill in the Segment name, assessment type and description in the pop up that appears.
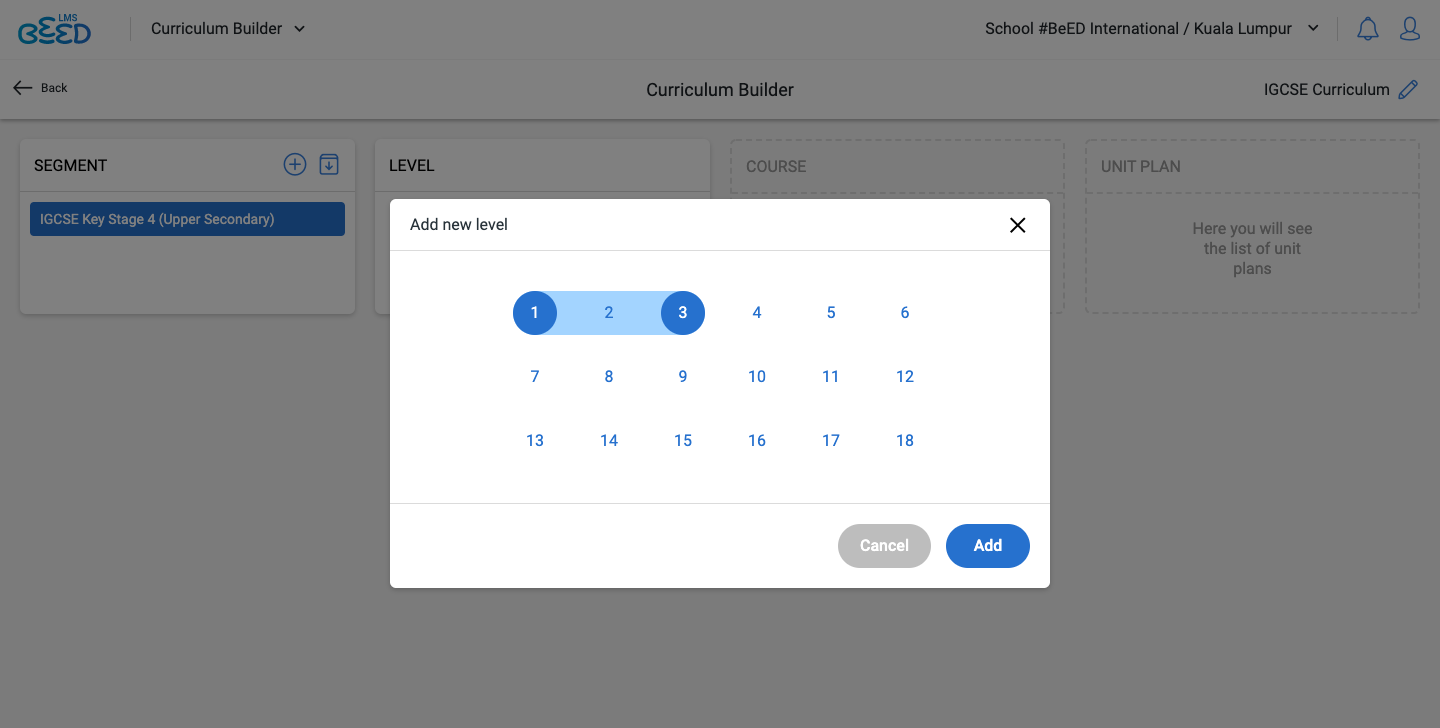
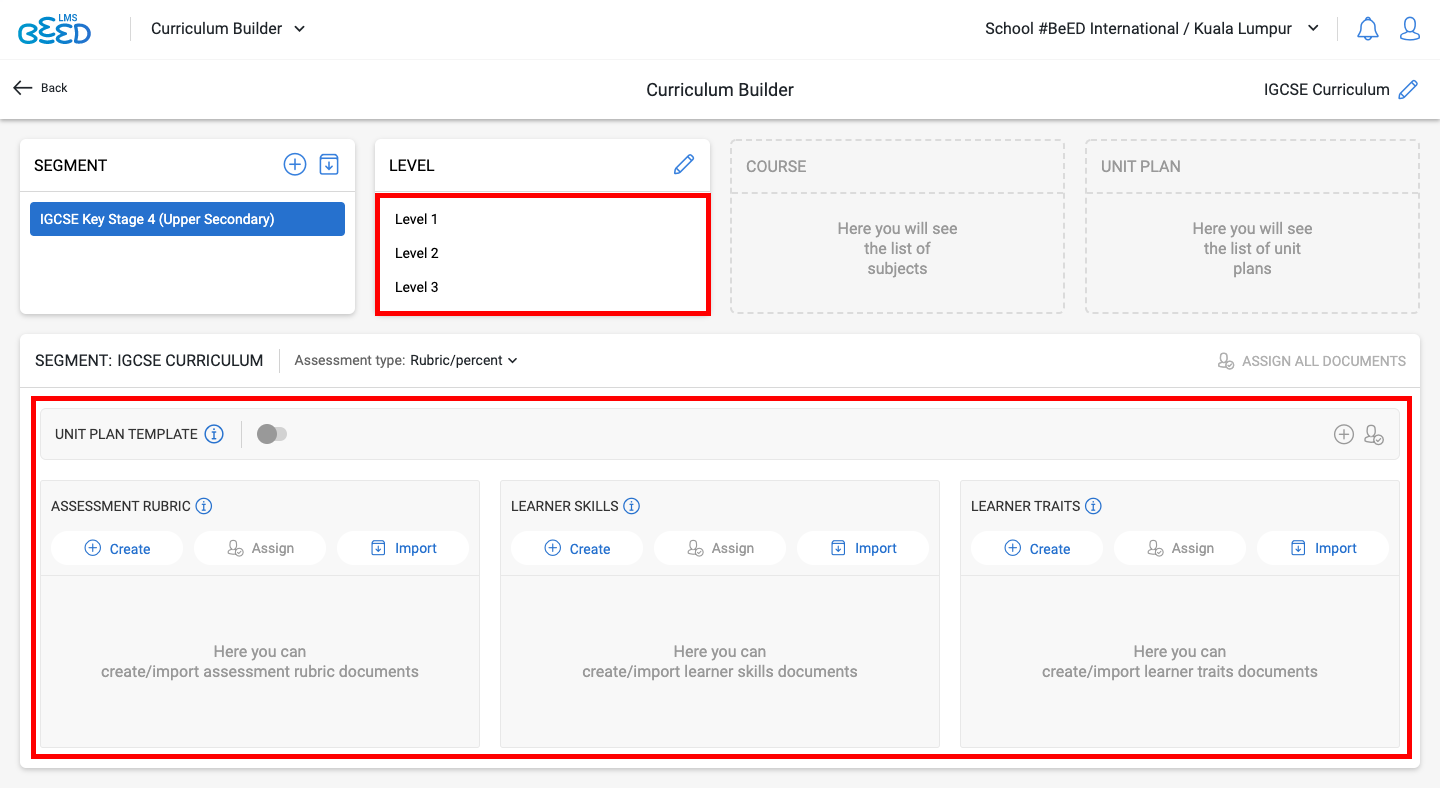
3. Create levels by clicking on “Set up levels”. Choose the number of levels to insert, and click on “Add”. The levels should now appear inside your Segment.
4. You can now select a level to start adding Courses to it. Or you can start populating the Unit Plan Template, Assessment Rubric, Learner Skills or Learner Traits for the Segment.
Creating Independent Segments in My Library
A Segment is a collection of levels or years grouped together within your curriculum.
Examples of Segments:
- Upper and Lower Primary
- Art Stream and Science Stream
- IGCSE Key Stage 1, 2 and 3.
Creating an Independent Segment

1. In My Library, click on the “Create” button in the top right corner. Select “Segment”.
2. Fill in the Segment Name, Recommended Curriculum, Assessment Type and Description. Once you are done, click Save.
3. You will be brought back to My Library. Click on the Segment which you have just created.
4. Create levels by clicking on “Set up levels”. Choose the number of levels you wish to insert, and click on “Add”.
5. The levels should now appear in the Segment Builder.
6. You can now select a level to start adding Courses to it. Or you can start populating the Unit Plan Template, Assessment Rubric, Learner Skills or Learner Traits for the Segment.
Who Can Create and Edit Segments?
Segments inside a Curriculum
Only the following users are allowed to create/edit Segments inside a Curriculum
- The Curriculum owner
- Curriculum Directors
- Educators assigned specifically to that Segment
Segments inside My Library
Only the Curriculum owner is allowed to create/edit independent Segments in My Library.
Segments inside Account Library
Only the following users are allowed to create/edit Segments inside a Curriculum
- The Curriculum owner
- Curriculum Directors
Courses
Creating Courses in the Curriculum
A Course is a specific subject a learner will undertake during their learning career, such as Math, Science or English. You can customize your Course by attaching documents such as
- Syllabus
- Objectives
- Assessment, Learner Skills or Learner Traits Rubrics
- Unit Plan Templates and Unit Plans
- Lesson Templates and Lessons
Creating Courses in the Curriculum
1. Inside the Curriculum, select the relevant Segment and Level.
2. Click Create Course under Course (A). You can also choose to import (B) an existing Course from My Library or Account Library.
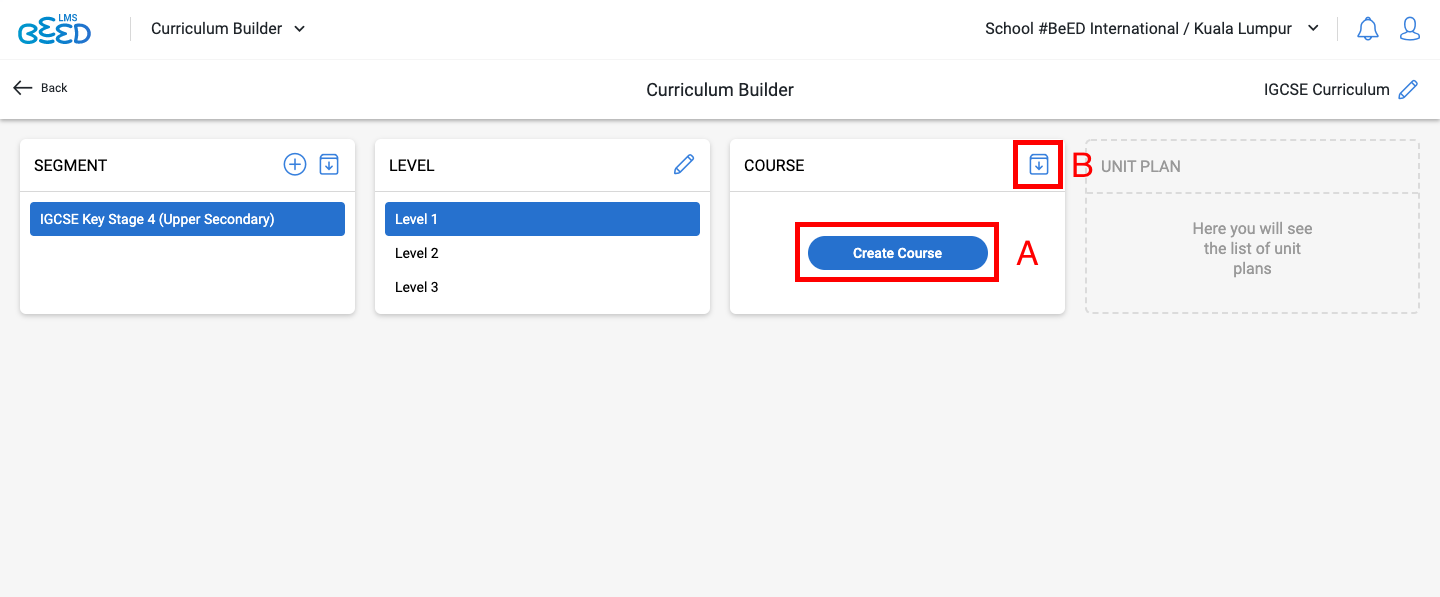
3. When creating a new Course, enter the Course name and select from the drop-down list. Enter the Course description, and click Add.
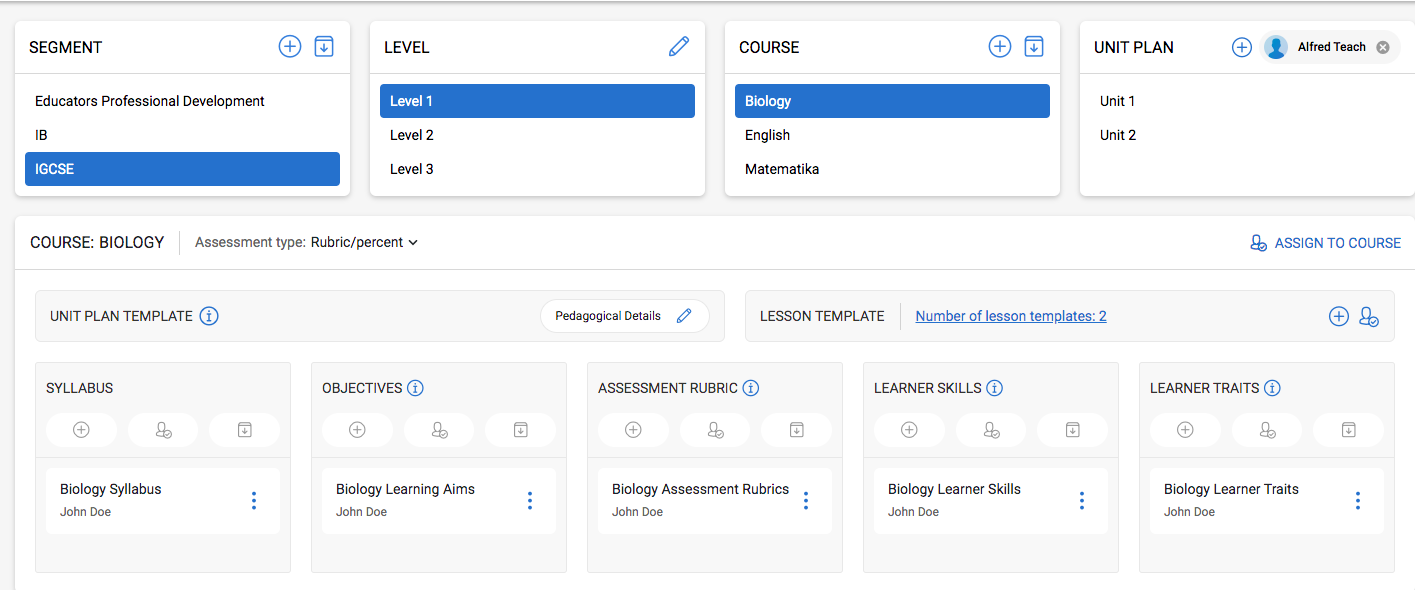
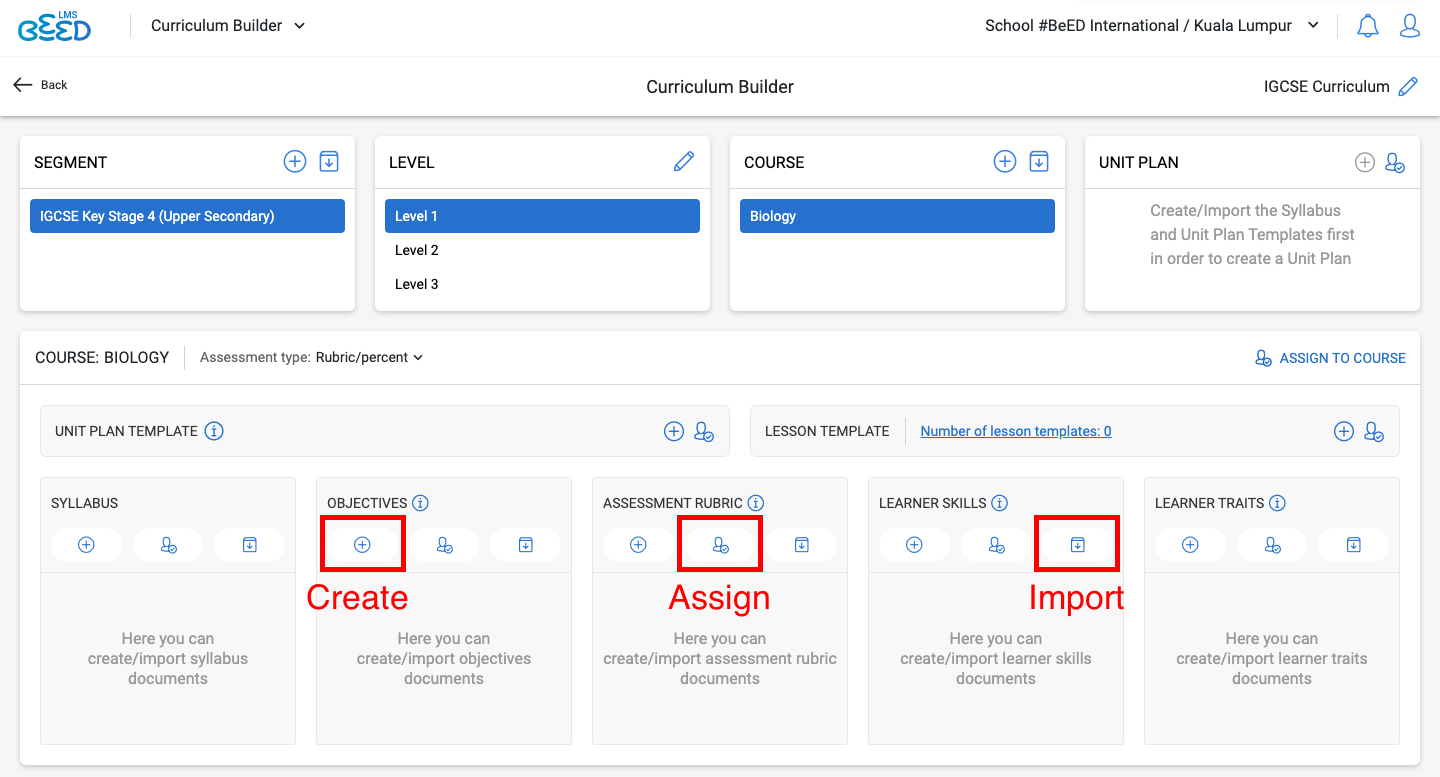
4. You can now start populating the following parts of your Course.
- Unit Plan Templates and Unit Plans
- Syllabus
- Objectives
- Assessment, Learner Skills or Learner Traits Rubrics
You can choose to create, assign or import these documents by clicking on their respective icons.
Creating Independent Courses in My Library
A Course is a specific subject a learner will undertake during their learning career, such as Math, Science or English. You can customize your Course by attaching documents such as
- Syllabus
- Objectives
- Assessment, Learner Skills or Learner Traits Rubrics
- Unit Plan Templates and Unit Plans
- Lesson Templates and Lessons
Creating an Independent Course

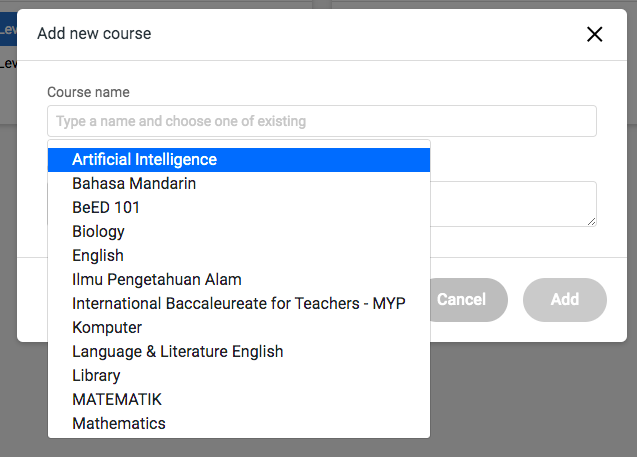
1. In My Library, click the 'Create' button in the top right corner. Select 'Course'.
2. Select Course name from the dropdown and fill in the required fields. Then, click Next.
3. Select the Levels (must begin from Level 1) included in your particular Course. Then, click Save.
4. You will be brought back to My Library. Click on the Course you’ve created.
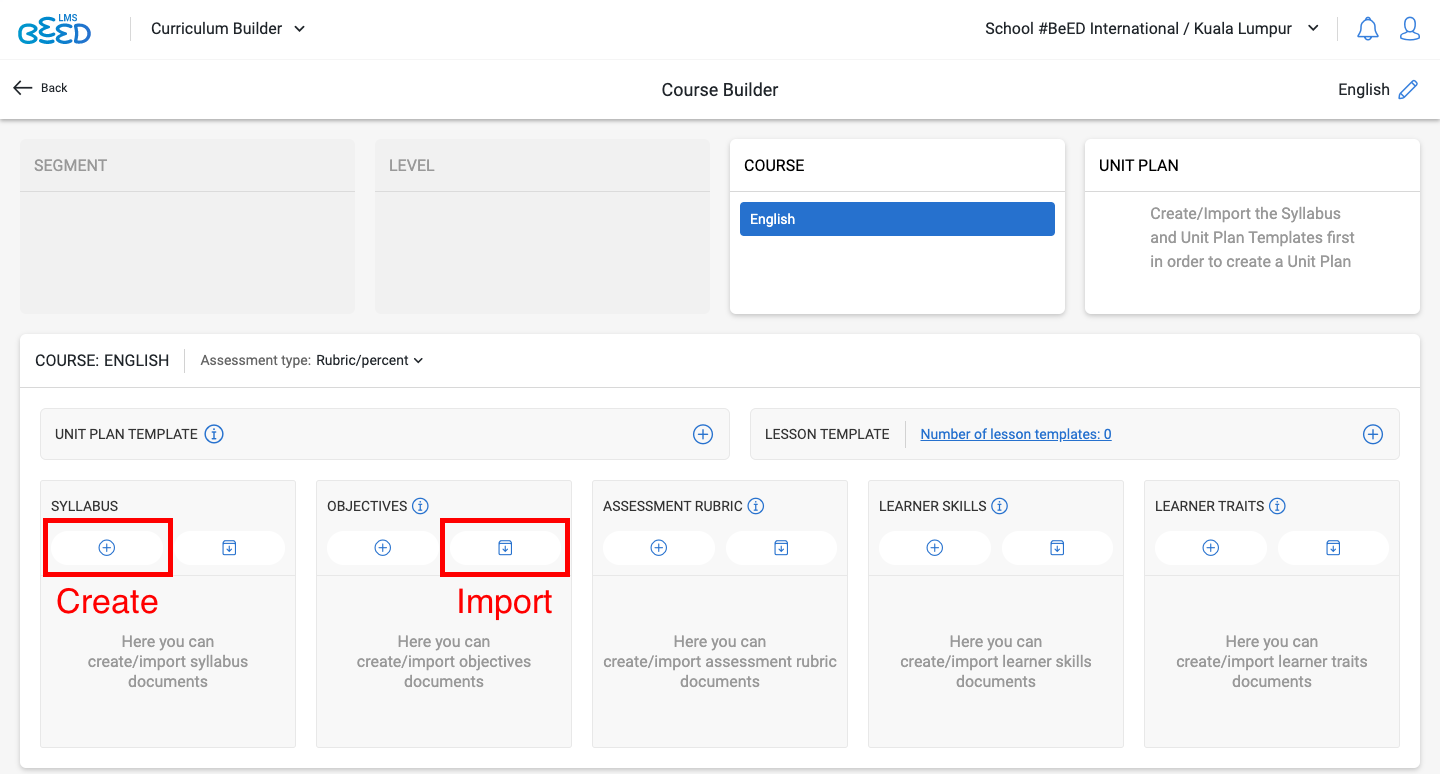
5. You can now start populating the following parts of your Course.
- Unit Plan Templates and Unit Plans
- Syllabus
- Objectives
- Assessment, Learner Skills or Learner Traits Rubrics
You can choose to create or import these documents by clicking on their respective icons.
Why can't I assign documents inside my independent Course?
You can only assign documents if your Course is parked within a Curriculum.
Who can be assigned to a Course in the Curriculum?
Only a Head of Department or an Educator can be assigned to a Course.
However, note that the chosen Head of Department or Educator role must be linked to that Course in the Admin Panel first by an Administrator.
Troubleshooting - Why am I unable to create a Course in the Active Curriculum?
If you cannot create a Course, it may be because of any of the following reasons:
1. You do not have permission to create Courses.
Only Curriculum Directors and Heads of Departments are allowed to create courses for their own departments. Please contact your CD or HOD to create your respective Course.
2. Your Institution Admin has not created it yet in the Admin Panel (see “Creating Courses For Your Institution”).
Please contact your Institution Admin to set up your Course in the Admin Panel first before proceeding to the next step.
3. The Course has already been created.
If the Course has already been previously created, you will be unable to create another Course with the same name. Please select your Course from the drop down list of available Courses when adding to the Active Curriculum.
Unit Plans & Unit Plan Templates
What is a Unit Plan Template?
A Unit Plan Template is designed as a guide for Educators, describing the pedagogical methodologies used when creating unit plans within a Course. When educators create their Unit Plans and Lessons, they will be able to select the pedagogical concepts prescribed in the Unit Plan Template that apply to their content.
Creating Unit Plan Templates
A Unit Plan Template is designed as a guide for Educators, describing the pedagogical methodologies used when creating unit plans within a Course. When educators create their Unit Plans and Lessons, they will be able to select the pedagogical concepts prescribed in the Unit Plan Template that apply to their content.
Note: You can create a Unit Plan Template at the Segment or Course level.
- Segment level: Describes pedagogy used for all Courses within the Segment.
- Course level: Describes pedagogy used for the specific Course only.
Thus, any Unit Plan Templates specified in a Segment will automatically override the ones applied to any Courses within the Segment.
Creating Unit Plan Templates
1. Click on the Curriculum, Segment or Course you want to create a Unit Plan Template for.
2. Click on the plus icon in the Unit Plan Template section.
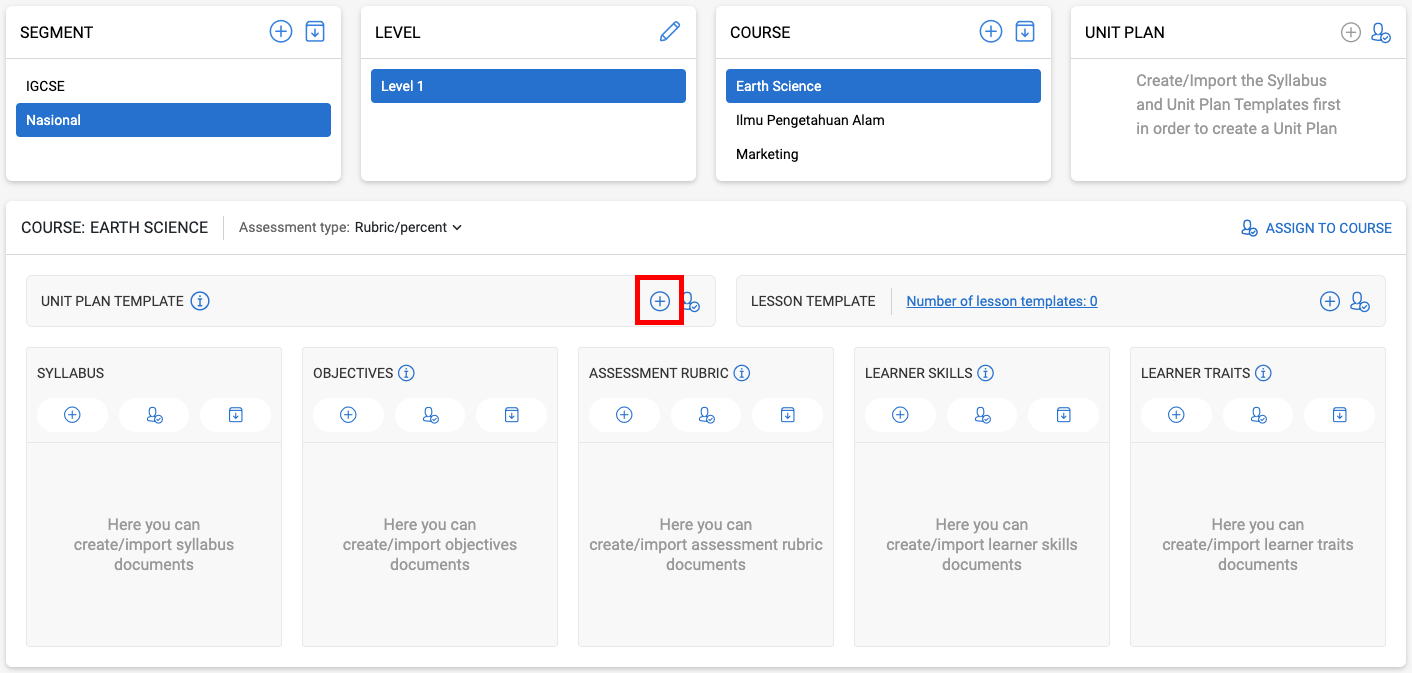
3. Enter the Unit template name and include a Description. You can then specify the following (optional) pedagogical methodologies
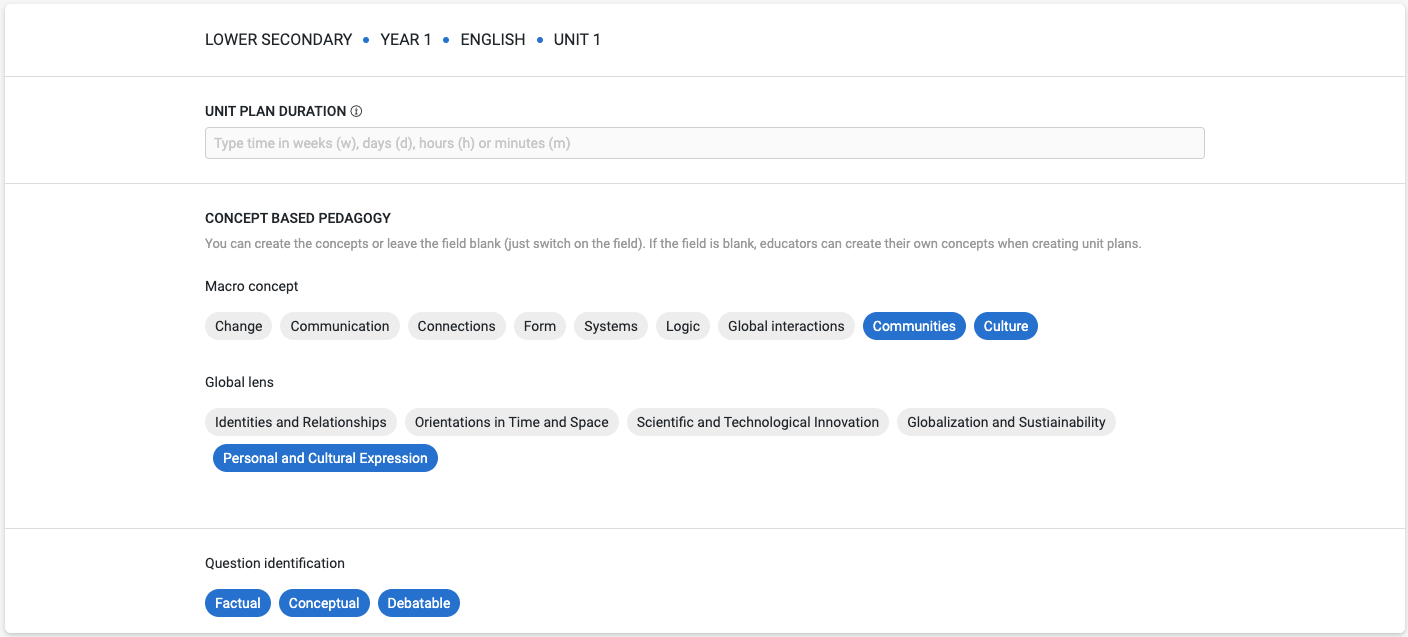
a. Toggle on the relevant details under Concept Based Pedagogy. For every concept you have included in the respective fields, press the Enter key to register it.
b. Toggle on Reflections and select from the options. Educators will then be prompted to write a reflection before, during or after a unit is delivered, or just a general reflection.
c. Toggle on the relevant details under Inquiry Pedagogy. Include the necessary in the respective fields.
When you are done, click Save at the top right corner.
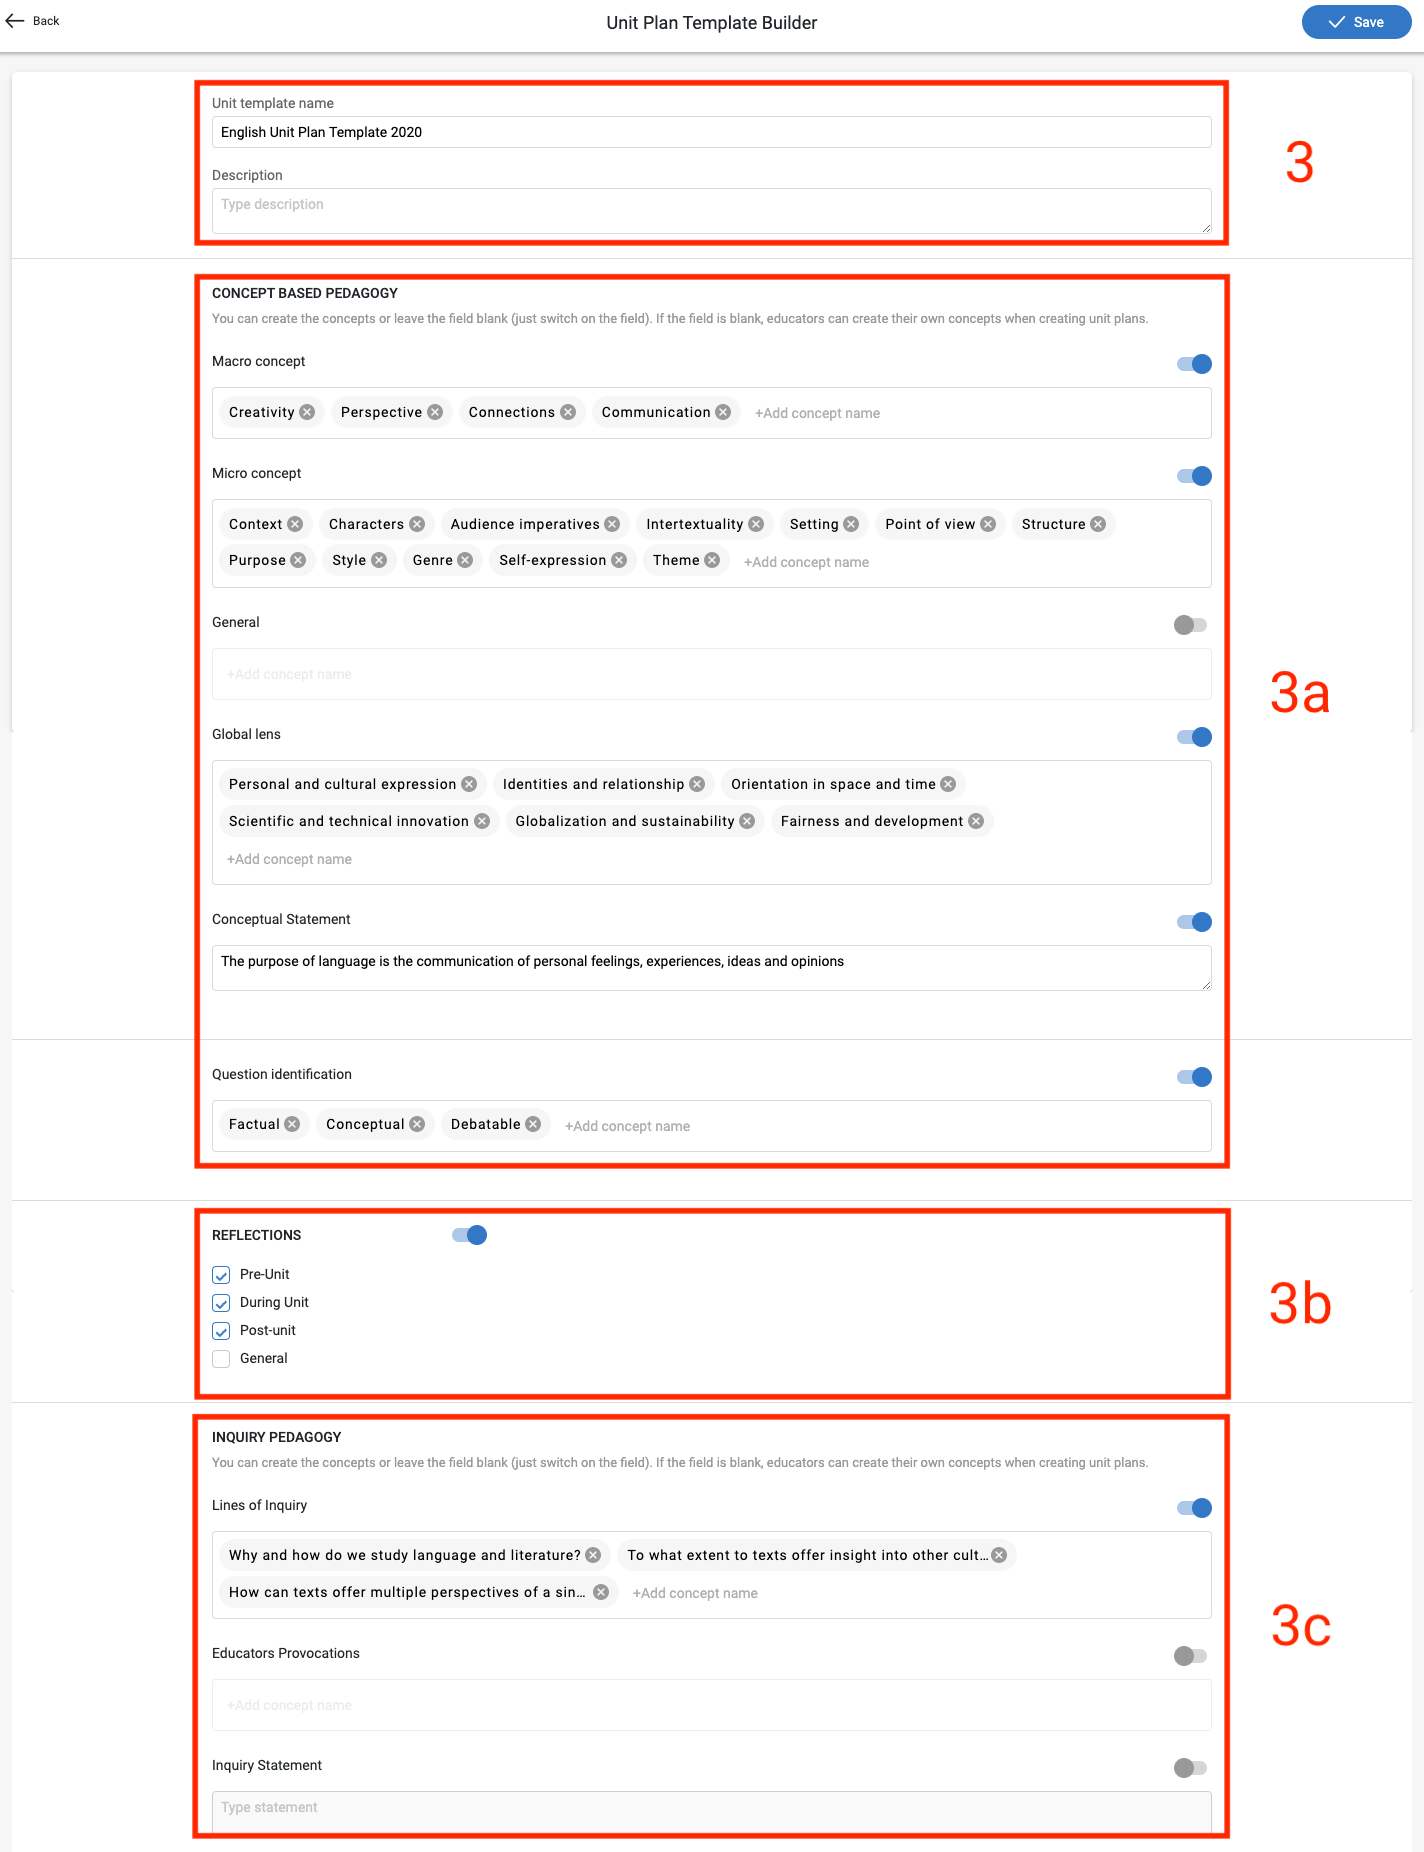
Pedagogical Terms Used in the Unit Plan Template
|
Macro Concept |
Concept that is general and easily transferable to any subject and topic, eg: Change, Patterns. |
|
Micro Concept |
Concept that is more subject-specific and less easily transferable to any subject and topic, eg: Rates, Civilisation. |
|
General Concept |
An organising idea that is timeless, universal, abstract and represented by 1/2 words. |
|
Global Lens |
Broad universal concepts that contextualise learning by identifying specific settings, events or circumstances across the world. |
|
Conceptual Statement |
A statement describing how comprehensive concepts relate to the lesson. |
|
Question Identification |
A list of question types, eg: factual, conceptual and debatable questions. |
|
Inquiry Pedagogy |
A set of teaching and learning strategies that encourage metacognitive thought processes, discussion and collaboration. |
|
Lines of Inquiry |
Questions that encourage learners to think in the template of the Inquiry Pedagogy. |
|
Educators Provocations |
Skills or techniques required by the educator to direct learners towards a specific inquiry. |
|
Inquiry Statement |
A single, central statement for each unit/ lesson that captures and directs what learners will be learning and the importance of the lesson. |
Where Can I Create Unit Plan Templates?
Unit Plan Templates must be nested within Segments or Courses. They cannot be created independently in My Library
What is a Unit Plan?
A Unit Plan consists of concepts and learning goals that are broken down into lessons. Covering many lessons, a Unit Plan thus spans over a period of time, often taking several days to weeks.
Unit Plans allow Educators to select a subset of the course syllabus, objectives and rubrics that apply to a unit, and group together lessons what work together to achieve the desired learning outcomes of a particular unit.
How do I create a Unit Plan within a Curriculum?
Creating Unit Plans in the Curriculum
Note: Unit Plans can only be created once the Syllabus and Unit Plan Template have been created/ imported into the Curriculum
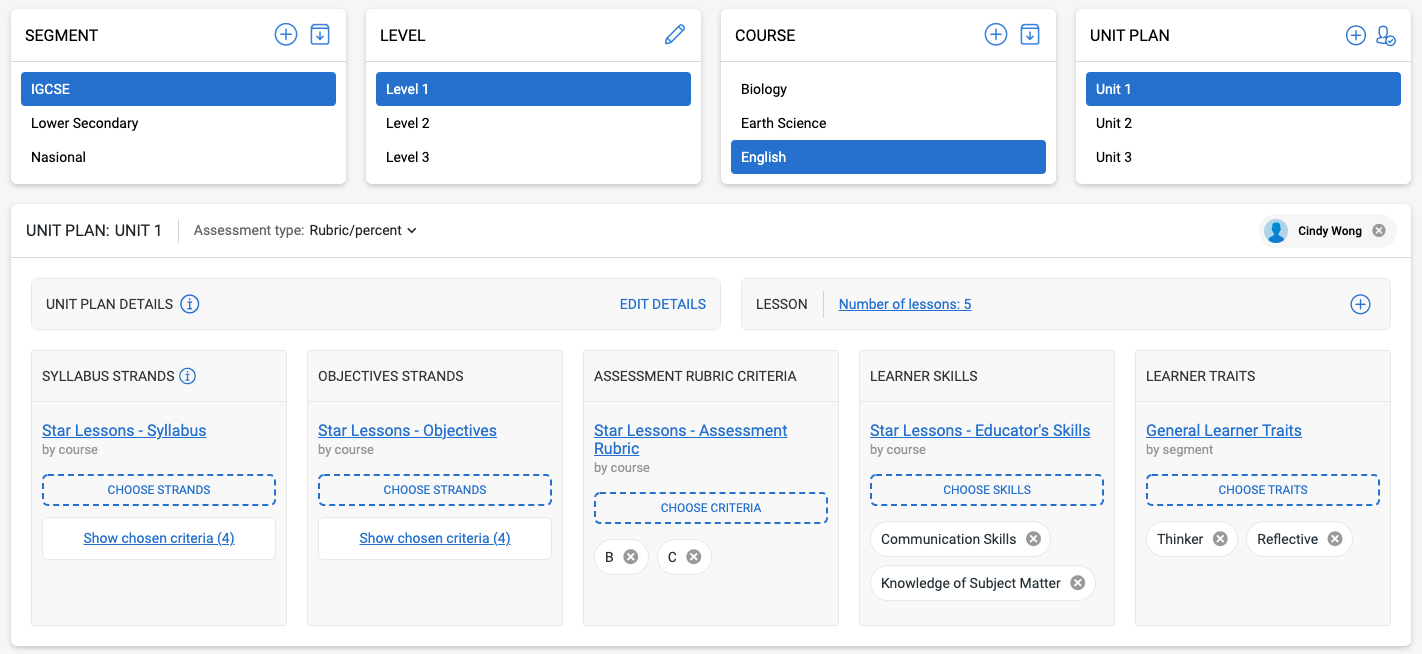
To create a Unit Plan within a Curriculum Builder:
1. Click on the Curriculum document you’ve created.
2. Select the relevant Segment, Level and Course.
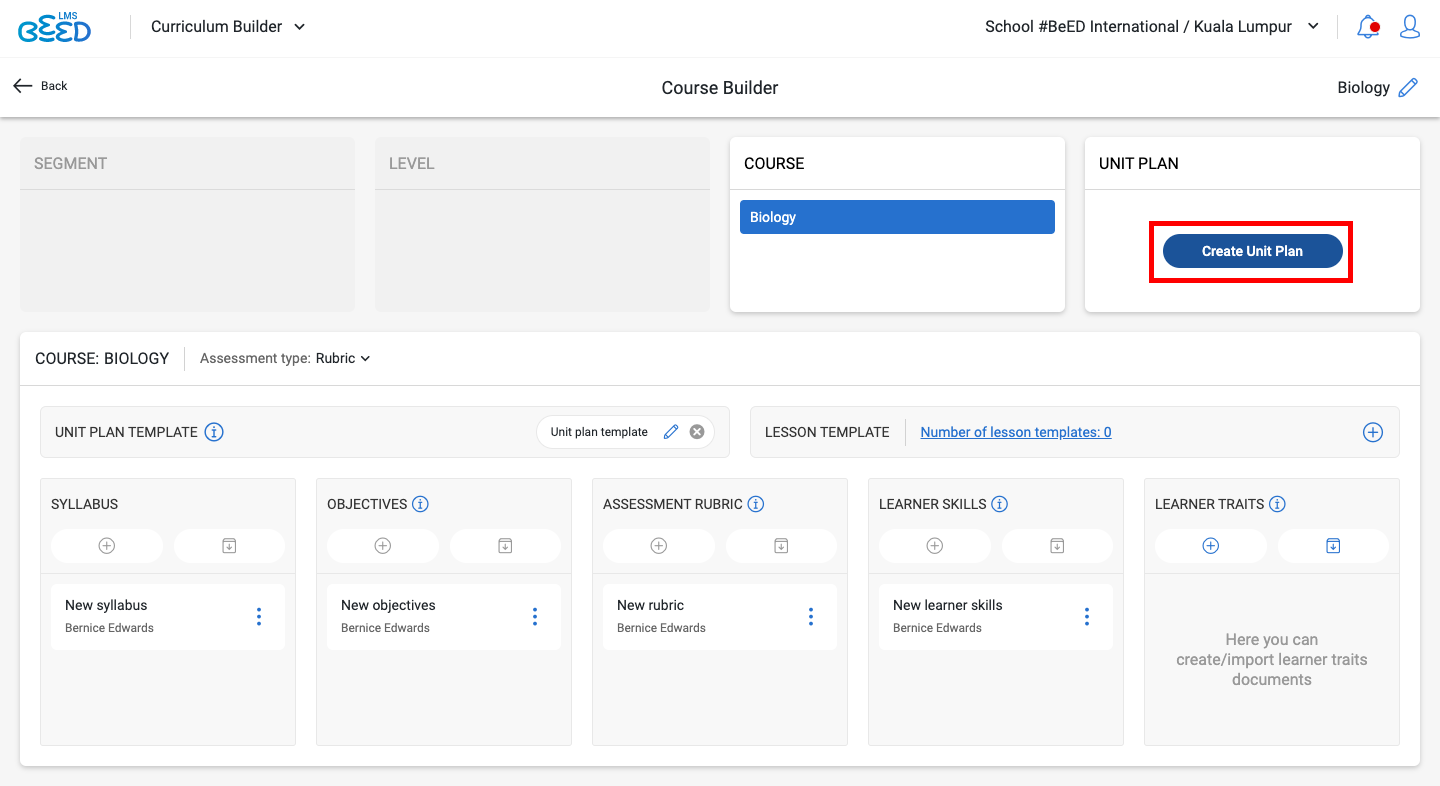
3. Click on Create Unit Plan or the + icon in the Unit Plan section in the top right.

4. Enter the Unit plan name and include a Unit plan description. Then, click Add.
5. Click Edit Details next to the Unit Plan Details in the lower half of the page.
6. Specify your Unit Plan Duration in the space provided. Then, select the pedagogical details that apply to this Unit. Click Save in the top right corner once you are done.
Note: The options in this section will only be available once they have been specified earlier in the Segment or Course Unit Plan Template.*
7. Back in the Curriculum Builder, select the Syllabus Strands, Objective Strands, Assessment Rubric Criteria, Learner Skills and Learner Traits that are relevant to this Unit.

8. Click on "Number of Lessons" to view the list of Lessons within this Unit Plan. You can then create or import Lessons into the Unit.
How do I create a Unit Plan within a Segment/Course document?
Creating Unit Plans in independent Segments/Courses
Note: Unit Plans can only be created once the Syllabus and Unit Plan Template have been created/ imported into the Segment/Course.
1. In My Library or Account Library, click on the Segment/Course document you’ve created.
- If you're creating the Unit Plan inside a Segment, navigate to the Level and Course relevant to your Unit Plan.
2. Click on the Create Unit Plan button in the top right corner.
3. Fill in the relevant fields and click Add.
4. Click Edit Details next to the Unit Plan Details in the lower half of the page.
5. Specify your Unit Plan Duration in the space provided. Then, select the pedagogical details that apply to this Unit. Click Save in the top right corner once you are done.
Note: The options in this section will only be available once they have been specified earlier in the Segment or Course Unit Plan Template.*
6. Back in the Segment/Course Builder, select the Syllabus Strands, Objective Strands, Assessment Rubric Criteria, Learner Skills and Learner Traits that are relevant to this Unit.

7. Click on "Number of Lessons" to view the list of Lessons within this Unit Plan. You can then create or import Lessons into the Unit.
Can I assign someone to create all Unit Plans for a Course?
Yes. To do this:
1. Click on the Curriculum document you’ve created.
2. Select the relevant Segment, Level and Course.
3. Click on the portrait icon under Unit Plan.
4. Select the specific name from the list. Then, click Add.
Note: The names listed are those who have been assigned as an Educator of the specific Course in the Admin Panel by the Account Administrator.
You can also assign an Educator to a specific Unit Plan for a Course.
Can I assign someone to create a specific Unit Plan for a Course?
Yes. To do this:
1. Click Account Library in the top left.
2. Click on the Curriculum document. Then, select the relevant Segment, Level, Course and Unit Plan.
3. In the lower half of the page, click Assign to Unit Plan in the top right.
4. Select the specific name from the list. Then, click Add.
Note: The names listed are those who have been assigned as an Educator of the specific Course in the Admin Panel by the Account Administrator.
You can also assign an Educator to all Unit Plans for a Course.
Syllabus
Creating a Syllabus in the Curriculum
The Syllabus is a guide for Educators that lists the topics and subtopics that should be taught to Learners for a particular subject.
Each Course can only have one Syllabus document attached. However, you can create multiple Levels in your Syllabus document. (E.g. English Level 4 and Level 5)
Please ensure that your Syllabus is detailed enough to cover all topics and subtopics for each level of the Course.
Creating a Syllabus in the Curriculum
1. Select the Course you wish to create a Syllabus for. Then, click on the + button in the Syllabus box to create a new Syllabus. You can also import an existing Syllabus from My Library or Account Library.

2. Start filling in the basic information for your Syllabus:
- Name of this Syllabus document
- Recommended Curriculum -> E.g. IB, IGCSE, SPM etc
- Description
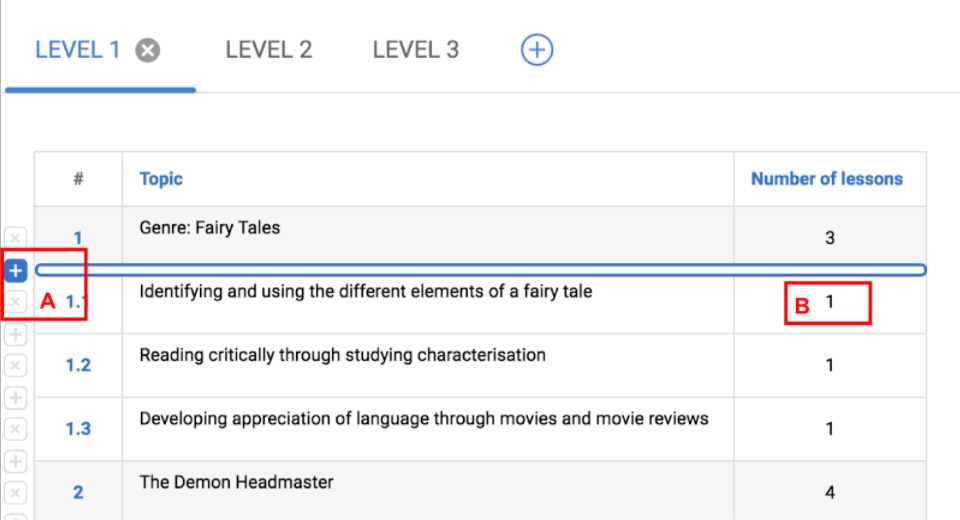
3. Insert the topics and subtopics for your Syllabus:
A) Click the blue + button to add a new topic or subtopic. Click on the x icon to delete a row.
B) Key in the number of lessons that should be used to teach each subtopic (the number of lessons for each topic will be automatically summed up from all of its subtopics).
4. Continue to populate the Syllabus for each Level by selecting another Level and repeating step 3:
5. Once you are satisfied with your changes, click on Save.
Creating an Independent Syllabus in My Library
The Syllabus is a guide for Educators that lists the topics, subtopics and sub subtopics that should be taught to Learners for a particular subject.
Each Course can only have one Syllabus document attached. However, you can create multiple Levels in your Syllabus document. (E.g. English Level 4 and Level 5)
Please ensure that your Syllabus is detailed enough to cover all topics, subtopics and sub subtopics for each level of the Course.
Creating an Independent Syllabus
1. In My Library, click on the 'Create' button in the top right corner. Select Syllabus.
2. Enter the Syllabus name, recommended segment, course and description. Note that for course name, you can only select from the courses initialized in the Admin Panel. Click Save.
3. Key in the Recommended Curriculum and select from the drop-down list.
4. Fill in the table at the bottom of the page with your Syllabus topics and subtopics.
- Click on the + icon to create a new topic, subtopic or sub subtopic.
- Click on the x icon to delete a row
- Key in the number of lessons that should be used to teach each subtopic.
5. To add another Level for the Syllabus, click on the plus icon next to Level 1. Repeat Step 4.
6. Click 'Save' in the top right once you’re done.
Objectives
Creating Objectives in the Curriculum
The Objectives document is used to list the learning aims and goals for a particular:
- Course
- Unit Plan
- Lesson
This helps make sure that all Lessons contribute to achieving the overall objectives of the Curriculum.
Creating Objectives in the Curriculum
1. Select the Course you wish to create Objectives for. Then, click on the + button in the Objectives box to create a new Objectives document. You can also import existing Objectives from My Library or Account Library.

2. Start filling in the basic information for your Objectives:
- Name of this Objectives document
- Recommended Curriculum -> E.g. IB, IGCSE, SPM etc
- Description
3. Insert the topics and subtopics for your Objectives:
A) Click the blue + button to add a new topic or subtopic. Click on the x icon to delete a row.
B) Key in the number of lessons that should be used to teach each subtopic (the number of lessons for each topic will be automatically summed up from all of its subtopics).
4. Continue to populate the Objectives for each Level by selecting another Level and repeating step 3
5. Once you are satisfied with your changes, click on Save.
Creating Independent Objectives in My Library
The Objectives document is used to list the learning aims and goals for a particular:
- Course
- Unit Plan
- Lesson
This helps make sure that all Lessons contribute to achieving the overall objectives of the Curriculum.
Creating Independent Objectives

1. In My Library, click on the 'Create' button in the top right corner. Select Objectives.
2. Enter the Objectives name, recommended segment, course and description. Note that for course name, you can only select from the courses initialized in the Admin Panel. Click Save.
3. Key in the Recommended Curriculum and select from the drop-down list.
4. Fill in the table at the bottom of the page with your Objectives topics, subtopics and sub subtopics.
- Click on the + icon to create a new topic, subtopic or sub subtopic
- Click on the x icon to delete a row
- Key in the number of lessons that should be used to teach each subtopic.
5. To add another Level for the Objectives, click on the plus icon next to Level 1. Repeat Step 4.
6. Click 'Save' in the top right once you’re done.
What's the Difference between Objectives for Courses, Unit Plans and Lessons?
In general, Segment and Course Objectives should be detailed enough down to the individual rubrics for each Lesson.
This is because all objectives need to be spelled out at the Course level first, before you can select the sub-objectives for your Lessons and Unit Plans.
The Objectives differ in the following aspects:
|
Application |
Learning Outcomes |
Attachment/ Selection |
|
|
Course |
Applies to all Unit Plans and Lessons within the Course. |
Usually all objectives for the entire Course are included |
Independent Objectives can be imported to a nested/ independent Course. |
|
Unit Plan |
Applies to all Lessons within the Unit Plan. |
Only a subset of the Course objectives are selected. |
Nested Unit Plan - Select objectives from the Course Objectives that have been applied.* |
|
Lesson |
Applies to the specific Lesson only. |
Only a subset of the Unit objectives are selected. |
Independent Lesson - Objectives can be imported Nested Lesson - Select objectives from the Course Objectives that have been applied.* |
*You can only select the applicable objectives in a Unit Plan or Lesson when an Objectives document has been imported to the associated Course.
Assessment Rubric
Creating Assessment Rubrics in the Curriculum
An Assessment Rubric is a set of grading criteria used to assess assignments. The criteria details what is expected of Learners in order to attain a certain grade on an assignment.
Note: Assessment Rubrics can only be applied to Courses graded using rubrics; not for Courses graded using percentages only.
Creating Assessment Rubrics
1. Select the Segment or Course you wish to create Assessment Rubrics for. Then, click on the + button in the Assessment Rubrics section to create a new document. You can also import existing Assessment Rubrics from My Library or Account Library.

2. Start filling in the basic information for your Assessment Rubric:
- Name of this Assessment Rubric document
- Recommended Curriculum -> E.g. IB, IGCSE, SPM etc
- Description
3. Under Score Settings, toggle on Zero rating if you want to enable a zero score for the rubric and vice versa.
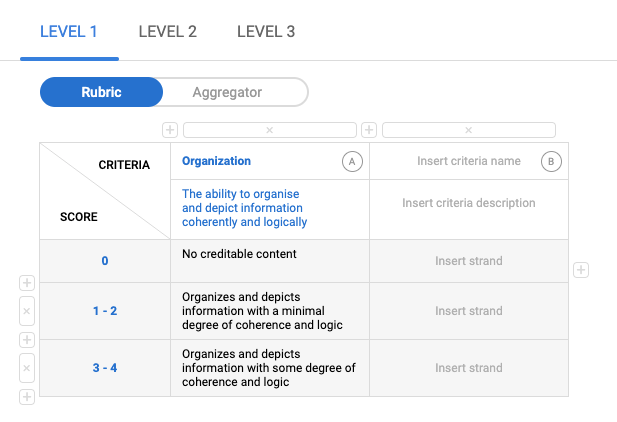
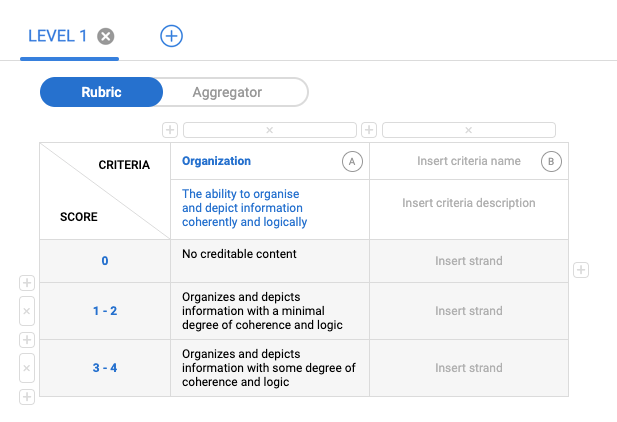
4. In the Rubric tab,
- enter the criteria name and criteria description in the table at the bottom of the page.
- click on the + icon on the left or bottom of the table to create a new row. Select the Row Range, which is the score interval (eg: a score range of 1-3 has a row range of 3).
- click on the x icon on the left side of the table to delete a row.
- click on the plus icon on the right side of the table to add more criteria. To remove a criteria, click on the cross icon above it.
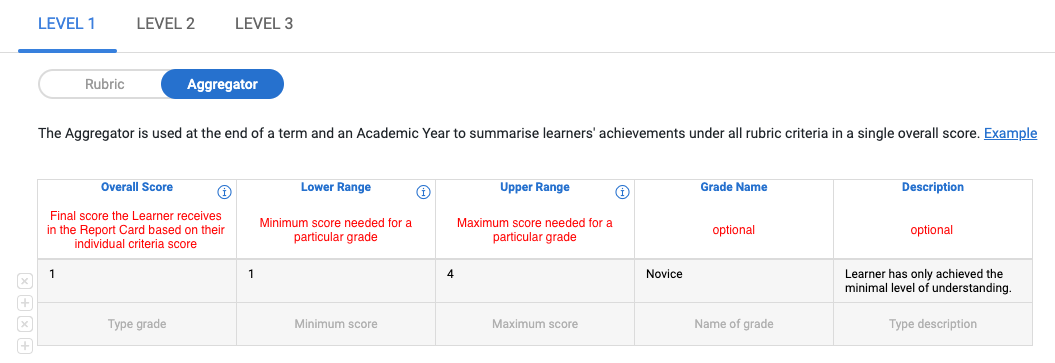
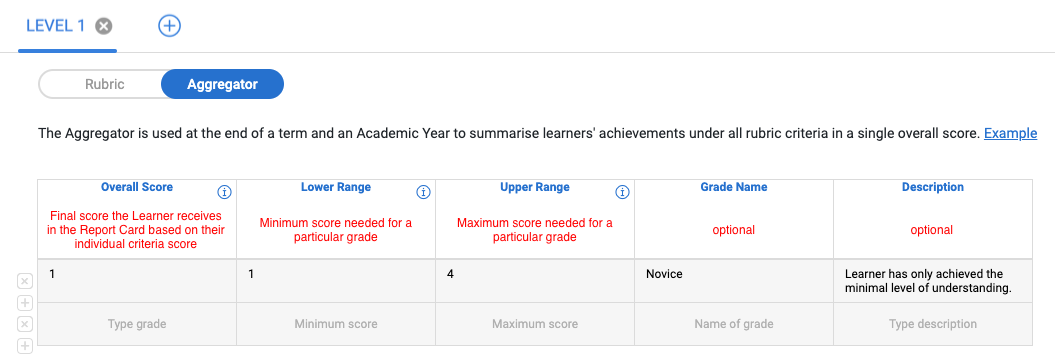
5. In the Aggregator tab, fill in the necessary information in the template provided.
- read the descriptions in the image below or hover over the info icon in the aggregator page to correctly fill up each column.
- on the left of the table, click on the x icon to delete a row, and click on the + icon to add a new row.
6. Continue to populate the rubrics for each Level by selecting another Level and repeating steps 3-5.
7. Once you are satisfied with your changes, click on Save.
Creating Independent Assessment Rubrics in My Library
An Assessment Rubric is a set of grading criteria used to assess assignments. The criteria details what is expected of Learners in order to attain a certain grade on an assignment.
Note: Assessment Rubrics can only be applied to Courses graded using rubrics; not for Courses graded using percentages only.
Creating Independent Assessment Rubrics
1. In My Library, click on the 'Create' button in the top right corner. Select Assessment Rubric.
2. Enter the Assessment Rubric document name, recommended segment, course and description. Note that for course name, you can only select from the courses initialized in the Admin Panel. Click Save. You will then be brought into the rubric document. Fill in the Recommended Curriculum.
3. Under Score Settings, toggle on Zero rating if you want to enable a zero score for the rubric and vice versa.
4. In the Rubric tab,
- enter the criteria name and criteria description in the table at the bottom of the page.
- click on the + icon on the left or bottom of the table to add a new row. Select the Row Range, which is the score interval (eg: a score range of 1-3 has a row range of 3).
- click on the x icon on left of the table to delete a row.
- click on the + icon on the right side of the table to add more criteria. To remove a criteria, click on the cross icon above it.
5. In the Aggregator tab, fill in the necessary information in the template provided.
- read the descriptions in the image below or hover over the info icon in the aggregator page to correctly fill up each column.
- on the left of the table, click on the x icon to delete a row, and click on the + icon to add a new row.
6. To continue populating the rubrics for other Levels, click on the + icon next to the Level 1 tab to add additional levels. Repeat steps steps 3-5 for each level added.
7. Once you are satisfied with your changes, click on Save.
Where Can I Attach Assessment Rubrics to?
You can import/create independent Assessment Rubrics within the following documents.
|
Independent Document |
Nested Document |
|
Independent Segment |
Segment nested within a Curriculum |
|
Independent Course |
Course nested within a Segment or Curriculum |
|
Independent Lesson |
|
Note: When an Assessment Rubric has been attached to a Segment or Course, Unit Plans and Lessons can only select subsets of those Rubric criteria that apply to them.
What's the Difference between Assessment Rubrics for Segments, Courses, Unit Plans and Lessons?
In general, Segment and Course Assessment Rubrics should be detailed enough down to the individual rubrics for each Lesson.
This is because all rubric strands need to be spelled out at the Segment or Course level first, before you can select the strands applicable for each Unit Plan or Lesson.
The Assessment Rubrics differ in the following aspects:
|
Application |
Assessment Criteria |
Attachment/ Selection |
|
|
Segment |
Applies to all Courses, Unit Plans and Lessons within the Segment. |
All criteria are included. |
Independent Assessment Rubrics can be imported to a nested/ independent Segment. |
|
Course |
Applies to all Unit Plans and Lessons within the Course. |
All criteria are included. |
Independent Assessment Rubrics can be imported to a nested/ independent Course. |
|
Unit Plan |
Applies to all Lessons within the Unit Plan. |
Only a subset of the Segment or Course criteria are included. |
Nested Unit Plan - Select criteria from Segment or Course Assessment Rubrics that have been applied.* |
|
Lesson |
Applies to the specific Lesson only. |
Only a subset of the Segment or Course criteria are included. |
Independent Lesson - Assessment Rubrics can be imported Nested Lesson - Select criteria from Segment or Course Assessment Rubrics that have been applied.* |
*You can only select the applicable criteria in a Unit Plan or Lesson when an Assessment Rubric document has been imported to the associated Segment or Course.
I’ve been assigned to create an Assessment Rubric, how should I proceed?
Assigned task(s) will appear in the Assigned Documents page.
To approach an assignment:
1. Click Assigned Documents in the top left. Then, click on the relevant document.
2. You will be brought to the Curriculum Builder page. Right above your name in the Assessment Rubric section, click on the respective icons to create or import the document.
|
To create: |
1. Click on the plus icon. |
|
To import: |
1. Click on the import file icon. Assessment Rubric Suggestions list down all the Assessment Rubric documents you have in your My Library or Account Library. By clicking on the eye icon in the top right of Assessment Rubric Preview, you can have a quick view of the respective Rubric document and its details. 3. Click Import in the top right. This allows correct matching of Rubric Levels with the Levels of the Course, regardless of the number carried by each Level. For example: Rubric Level 1 (to be imported) is to be used with Course Level 2. You can then drag Level 1 on the left to match with Level 2 on the right. 5. Click Match in the bottom right. |
Alternatively, when assigned a task, click on the notification bell icon in the top right. Click on Show Details next to the assigned task and you will be directed to the Curriculum Builder page.
Learner Skills
Creating Learner Skills in the Curriculum
A Learner Skills Rubric is a set of grading criteria used to assess a number of skills that Learners are expected to demonstrate. These skills can be integrated through the Lessons assigned to Learners throughout a Course.
Note: Learner Skills can only be applied to Courses graded using rubrics; not for Courses graded using percentages only.
Creating Learner Skills
1. Select the Segment or Course you wish to create Learner Skills for. Then, click on the + button in the Learner Skills section to create a new document. You can also import existing Learner Skills from My Library or Account Library.
2. Start filling in the basic information for your Learner Skills:
- Name of this Learner Skills document
- Recomended Curriculum -> E.g. IB, IGCSE, SPM etc
- Description
3. Under Score Settings, toggle on Zero rating if you want to enable a zero score for the learner skills rubric and vice versa.
4. In the table:
- enter the criteria name and criteria description in the table at the bottom of the page.
- click on the + icon on the left or bottom of the table to create a new row. Select the Row Range, which is the score interval (eg: a score range of 1-3 has a row range of 3).
- click on the x icon on the left side of the table to delete a row.
- click on the plus icon on the right side of the table to add more criteria. To remove a criteria, click on the cross icon above it.
5. Continue to populate the learner skills for each Level by selecting another Level and repeating steps 3-4.
6. Once you are satisfied with your changes, click on Save.
Where Can I Attach Learner Skills to?
You can import/create independent Learner Skills Rubrics within the following documents.
|
Independent Document |
Nested Document |
|
Independent Segment |
Segment nested within a Curriculum |
|
Independent Course |
Course nested within a Segment or Curriculum |
|
Independent Lesson |
|
Note: When a Learner Skills Rubric has been attached to a Segment or Course, Unit Plans and Lessons can only select subsets of those Learner Skills criteria that apply to them.
Creating Independent Learner Skills in My Library
A Learner Skills Rubric is a set of grading criteria used to assess assignments. The criteria details what is expected of Learners in order to attain a certain grade on an assignment.
Note: Learner Skills can only be applied to Courses graded using rubrics; not for Courses graded using percentages only.
Creating Independent Learner Skills
1. In My Library, click on the 'Create' button in the top right corner. Select Learner Skills Rubric.
2. Enter the Learner Skills Rubric document name, recommended segment, course and description. Note that for course name, you can only select from the courses initialized in the Admin Panel. Click Save. You will then be brought into the Learner Skills document. Fill in the Recommended Curriculum.
3. Under Score Settings, toggle on Zero rating if you want to enable a zero score for the Learner Skills Rubric and vice versa.
4. In the table:
- enter the criteria name and criteria description in the table at the bottom of the page.
- click on the + icon on the left or bottom of the table to add a new row. Select the Row Range, which is the score interval (eg: a score range of 1-3 has a row range of 3).
- click on the x icon on left of the table to delete a row.
- click on the + icon on the right side of the table to add more criteria. To remove a criteria, click on the cross icon above it.
5. To continue populating the rubrics for other Levels, click on the + icon next to the Level 1 tab to add additional levels. Repeat steps steps 3-4 for each level added.
6. Once you are satisfied with your changes, click on Save.
What's the Difference between Learner Skills for Segments, Courses, Unit Plans and Lessons?
In general, Segment and Course Learner Skills Rubrics should be detailed enough down to the individual criteria for each Lesson.
This is because all criteria need to be spelled out at the Segment or Course level first, before you can select the individual criteria applicable for each Unit Plan or Lesson.
The Learner Skills Rubrics differ in the following aspects:
|
Application |
Assessment Criteria |
Attachment/ Selection |
|
|
Segment |
Applies to all Courses, Unit Plans and Lessons within the Segment. |
All criteria are included. |
Independent Learner Skills can be imported to a nested/ independent Segment. |
|
Course |
Applies to all Unit Plans and Lessons within the Course. |
All criteria are included. |
Independent Learner Skills can be imported to a nested/ independent Course. |
|
Unit Plan |
Applies to all Lessons within the Unit Plan. |
Only a subset of the Segment or Course criteria are included. |
Nested Unit Plan - Select criteria from Segment or Course Learner Skills that have been applied.* |
|
Lesson |
Applies to the specific Lesson only. |
Only a subset of the Segment or Course criteria are included. |
Independent Lesson - Learner Skills can be imported Nested Lesson - Select criteria from Segment or Course Learner Skills that have been applied.* |
*You can only select the applicable criteria in a Unit Plan or Lesson when an Learner Skills document has been imported to the associated Segment or Course.
Learner Traits
Creating Learner Traits in the Curriculum
A Learner Traits Rubric is a set of grading criteria used to assess assignments. The criteria details what is expected of Learners in order to attain a certain grade on an assignment.
Note: Learner Traits can only be applied to Courses graded using rubrics; not for Courses graded using percentages only.
Creating Learner Traits
1. Select the Segment or Course you wish to create Learner Traits for. Then, click on the + button in the Learner Traits section to create a new document. You can also import existing Learner Traits from My Library or Account Library.
2. Start filling in the basic information for your Learner Traits:
- Name of this Learner Traits document
- Recommended Curriculum -> E.g. IB, IGCSE, SPM etc
- Description
3. Under Score Settings, toggle on Zero rating if you want to enable a zero score for the learner traits rubric and vice versa.
4. In the table:
- enter the criteria name and criteria description in the table at the bottom of the page.
- click on the + icon on the left or bottom of the table to create a new row. Select the Row Range, which is the score interval (eg: a score range of 1-3 has a row range of 3).
- click on the x icon on the left side of the table to delete a row.
- click on the plus icon on the right side of the table to add more criteria. To remove a criteria, click on the cross icon above it.

5. Continue to populate the learner traits for each Level by selecting another Level and repeating steps 3-4.
6. Once you are satisfied with your changes, click on Save.
Creating Independent Learner Traits in My Library
A Learner Traits Rubric is a set of grading criteria used to assess assignments. The criteria details what is expected of Learners in order to attain a certain grade on an assignment.
Note: Learner Traits can only be applied to Courses graded using rubrics; not for Courses graded using percentages only.
Creating Independent Learner Traits
1. In My Library, click on the 'Create' button in the top right corner. Select Learner Skills Rubric.
2. Enter the Learner Skills Rubric document name, recommended segment, course and description. Note that for course name, you can only select from the courses initialized in the Admin Panel. Click Save. You will then be brought into the Learner Skills document. Fill in the Recommended Curriculum.
3. Under Score Settings, toggle on Zero rating if you want to enable a zero score for the Learner Skills Rubric and vice versa.
4. In the table:
- enter the criteria name and criteria description in the table at the bottom of the page.
- click on the + icon on the left or bottom of the table to add a new row. Select the Row Range, which is the score interval (eg: a score range of 1-3 has a row range of 3).
- click on the x icon on left of the table to delete a row.
- click on the + icon on the right side of the table to add more criteria. To remove a criteria, click on the cross icon above it.

5. To continue populating the rubrics for other Levels, click on the + icon next to the Level 1 tab to add additional levels. Repeat steps steps 3-4 for each level added.
6. Once you are satisfied with your changes, click on Save.
Where Can I Attach Learner Traits to?
You can import/create independent Learner Traits Rubrics within the following documents.
|
Independent Document |
Nested Document |
|
Independent Segment |
Segment nested within a Curriculum |
|
Independent Course |
Course nested within a Segment or Curriculum |
|
Independent Lesson |
|
Note: When a Learner Traits Rubric has been attached to a Segment or Course, Unit Plans and Lessons can only select subsets of those Learner Traits criteria that apply to them.
What's the Difference between Learner Traits for Segments, Courses, Unit Plans and Lessons?
In general, Segment and Course Learner Traits Rubrics should be detailed enough down to the individual criteria for each Lesson.
This is because all criteria need to be spelled out at the Segment or Course level first, before you can select the individual criteria applicable for each Unit Plan or Lesson.
The Learner Traits Rubrics differ in the following aspects:
|
Application |
Assessment Criteria |
Attachment/ Selection |
|
|
Segment |
Applies to all Courses, Unit Plans and Lessons within the Segment. |
All criteria are included. |
Independent Learner Traits can be imported to a nested/ independent Segment. |
|
Course |
Applies to all Unit Plans and Lessons within the Course. |
All criteria are included. |
Independent Learner Traits can be imported to a nested/ independent Course. |
|
Unit Plan |
Applies to all Lessons within the Unit Plan. |
Only a subset of the Segment or Course criteria are included. |
Nested Unit Plan - Select criteria from Segment or Course Learner Traits that have been applied.* |
|
Lesson |
Applies to the specific Lesson only. |
Only a subset of the Segment or Course criteria are included. |
Independent Lesson - Learner Traits can be imported Nested Lesson - Select criteria from Segment or Course Learner Traits that have been applied.* |
*You can only select the applicable criteria in a Unit Plan or Lesson when an Learner Traits document has been imported to the associated Segment or Course.
Lessons & Lesson Templates
Troubleshoot - Dates not showing on link lesson module
For certain months, there are instances that the calendar would not show the last dates within that month.
To continue with the dates selection, click on the next month, select the greyed-out dates, and confirm your selection.
What is a Lesson Template?
A Lesson Template provides a basic structure for Educators when creating future Lessons within a particular Course. Curriculum Directors and Heads of Department can create this Template to apply certain pedagogical methodologies in their Lessons.
How do I create a Lesson Template?
To create a Lesson Template:
1. Click on the Curriculum document you’ve created.
2. Select the relevant Segment, Level and Course.
3. Click on the plus icon in the top right of Lesson Template to create one. To assign someone to create this Lesson Template, click on the portrait icon.

4. Enter the Lesson Template name and include a Description.
5. Toggle on the Add a Map to the Lesson section if you want your Educators to include learning roadmaps in their Lessons (especially useful for outdoor lessons).
6. Click on the plus button next to Add How Many Stages You Need to start adding a stage. Click on the pencil icon to rename the stage and the trash bin icon to delete one. Click on the plus icon again to add more stages.
7. Click Save once you’re done.
To view and edit your Lesson Template(s), click on the Number of lesson templates next to Lesson Template in the main page.
What can I do with the Lesson document?
The Lesson is an e-lesson created for Learners to use, complete with all the information and resources they will need to master a topic. It can include supplementary materials, in-class materials/ worksheets, assessment/ quizzes and mobile learning activities for the outdoors.
Where can I attach a Lesson document to?
You can attach a Lesson document to any Unit Plans within the same Course.
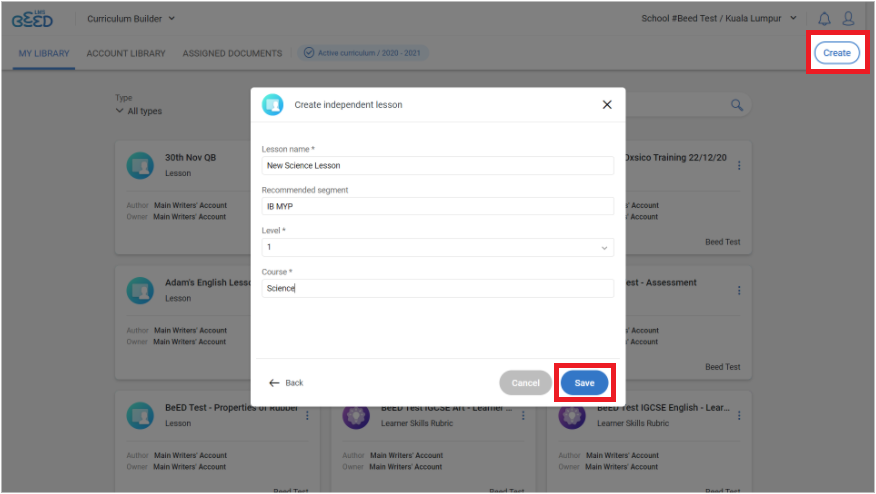
How do I create an independent Lesson?
To create an independent Lesson:
1. In My Library, click Create in the top right corner.
2. Select Lesson from the listed document types. Fill in the required fields and click Save.
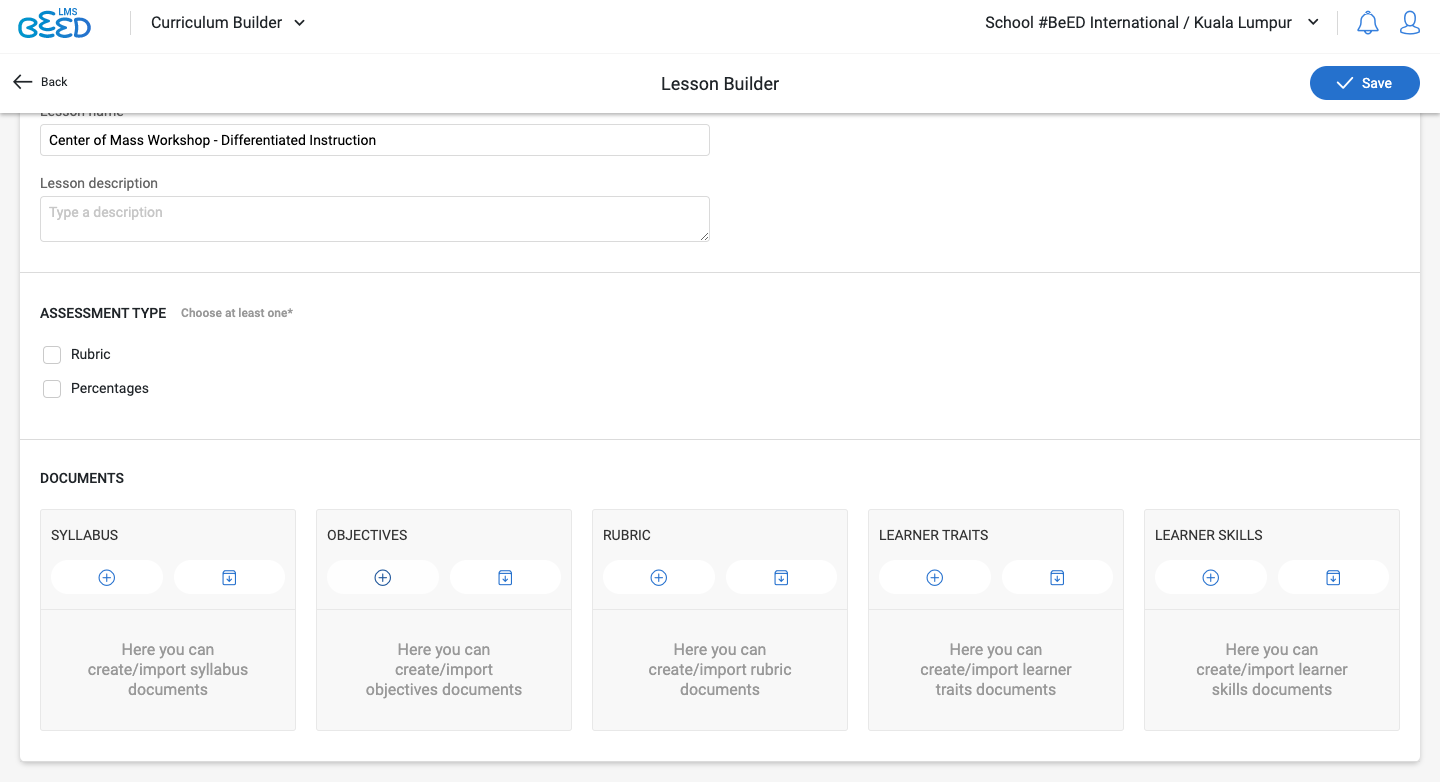
Under the Basic Info tab:
3. Insert the Lesson description and Assessment Type.
4. (Optional) Import or create the Syllabus, Objectives, Assessment Rubric, Learner Traits and Learner Skills for this Lesson by clicking on the plus or import icon for each document.
Under the Concepts tab:
5. (Optional) Toggle on the relevant pedagogical methodologies and insert information in the respective fields. For concepts, press the Enter key every time you input in a new concept.

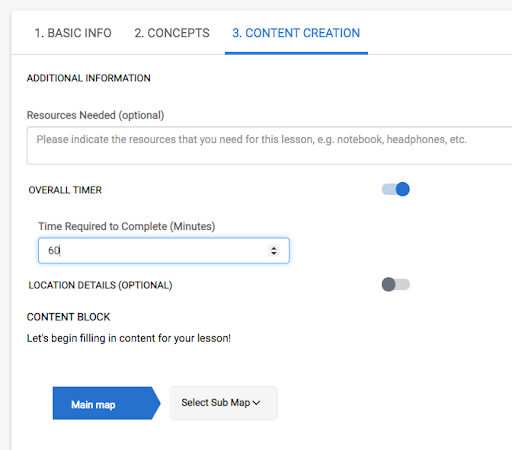
Under the Content Creation tab:
6. Fill up the necessary fields in the upper half of the page.
7.

Insert a learning roadmap by clicking on the pencil icon in the top right of the Main map section and inserting an image. The image can be a map for outdoor learning, or a mind map listing out the topics covered in this lesson. Click here to download some map templates, or look for ideas on how to use maps creatively.
8. Click on the first icon on the left of the map to Add New Point. Drag the new Point to your desired position on the map.
9. Click on the + icon below the map. This creates new stages for this Point. Enter your Stage Name and fill in the required fields. Then, click Create Stage in the bottom left. You can click on the pencil or trash icon respectively to edit or delete the stage.
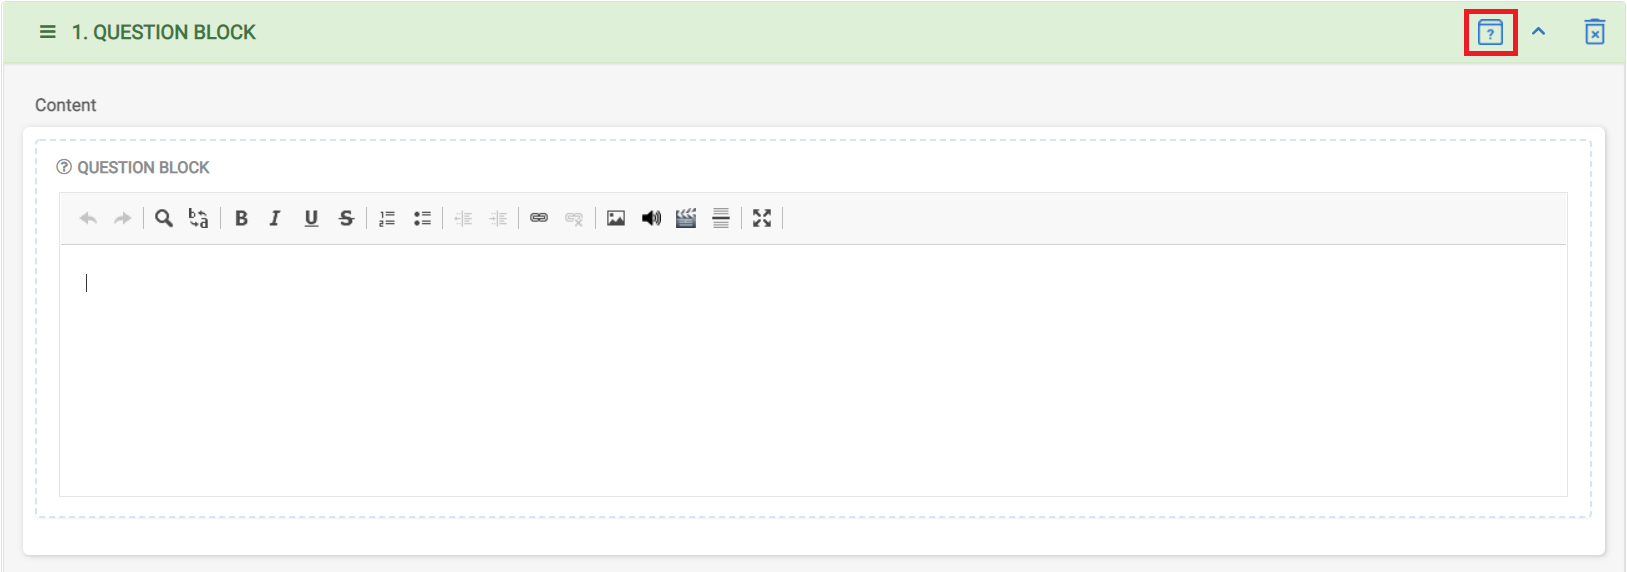
10. Click on + Lesson Block or + Question Block to structure your Lesson. You can drag these blocks forward or back to rearrange their order. To delete a block, click on the trash bin icon in the top right of the block. Watch the videos below for more details on how to create Lesson blocks, Open Response blocks and MCQ blocks.


11. Click Save in the top right once you’re done.
Other related links
- How do I import questions from the Question Bank?
- How do I insert equations into my Lesson?
- How do I integrate Zoom or other conferencing tools into my Lesson?
- How do I add plagiarism checking into my Lesson?
How do I create a Timed Assessment?
Educators can create timed lessons that act as quizzes or assessments for learners. In these lessons, learners will only have a specified amount of time to complete their questions. Once the timer is up, they will no longer be able to edit their answers.
To create a timed lesson, toggle on the overall timer that’s located at the top part of the Lesson Content Creation page, and specify the time allocation.
For remote assessments, you can also schedule release dates and deadlines to ensure that assessments are only available exactly when you want them to be.
Can I save my questions to be shared/used later?
Yes you can. Questions are saved into a Question Bank that’s shared across your entire network of institutions. Currently, only Open Response or Multiple Choice Questions (MCQs) can be saved into the Question Bank. To do this:
1. In your Lesson, click on + Question Block button and choose either Open Response or Multiple Choice Question. Then, create a new Question Block.
2. Click on the Add to Question Bank icon on the top right corner of the Question Block. This will then add the question into the Question Bank, which can be used by any other educator in your entire network of Institutions.
How do I import a question from the Question Bank into my Lesson/LE?
To import a Question Block from the Question Bank:
1. In your Lesson, click on the Question Bank button.
2. Click on the checkboxes to select the questions to import. Then, click on Import.
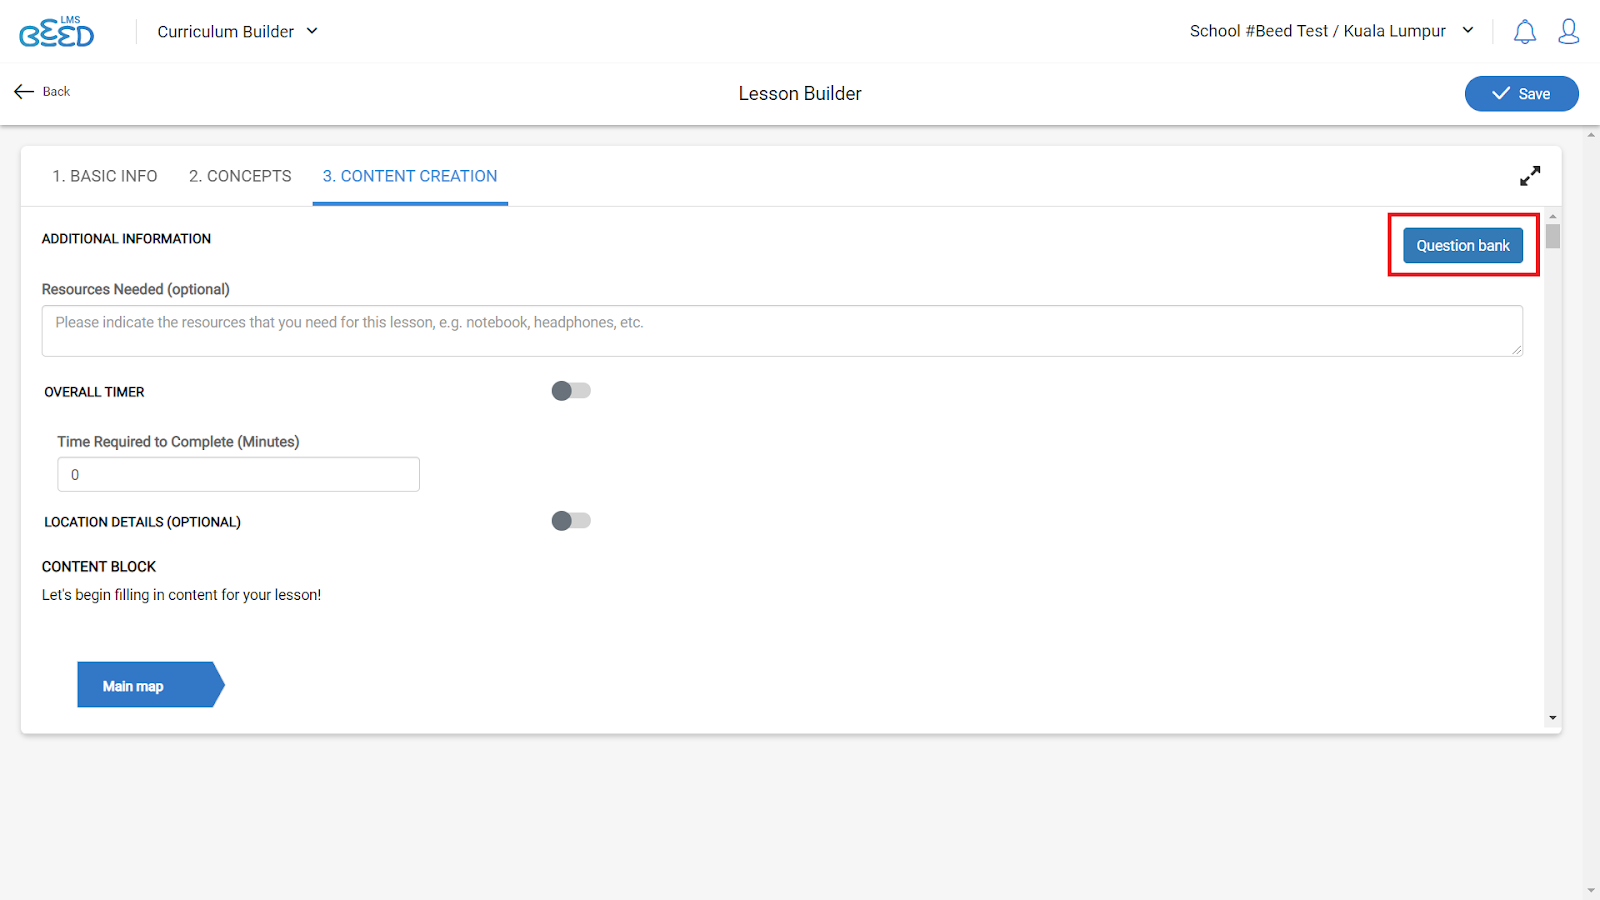
How do I access the Question Bank?
1. In the Curriculum Builder, open your Lesson. Go to the ‘Content Creation' tab and click on Question Bank in the top right corner.
2. You can click here to import new questions using an Excel Template, or create new questions in the Question Bank.
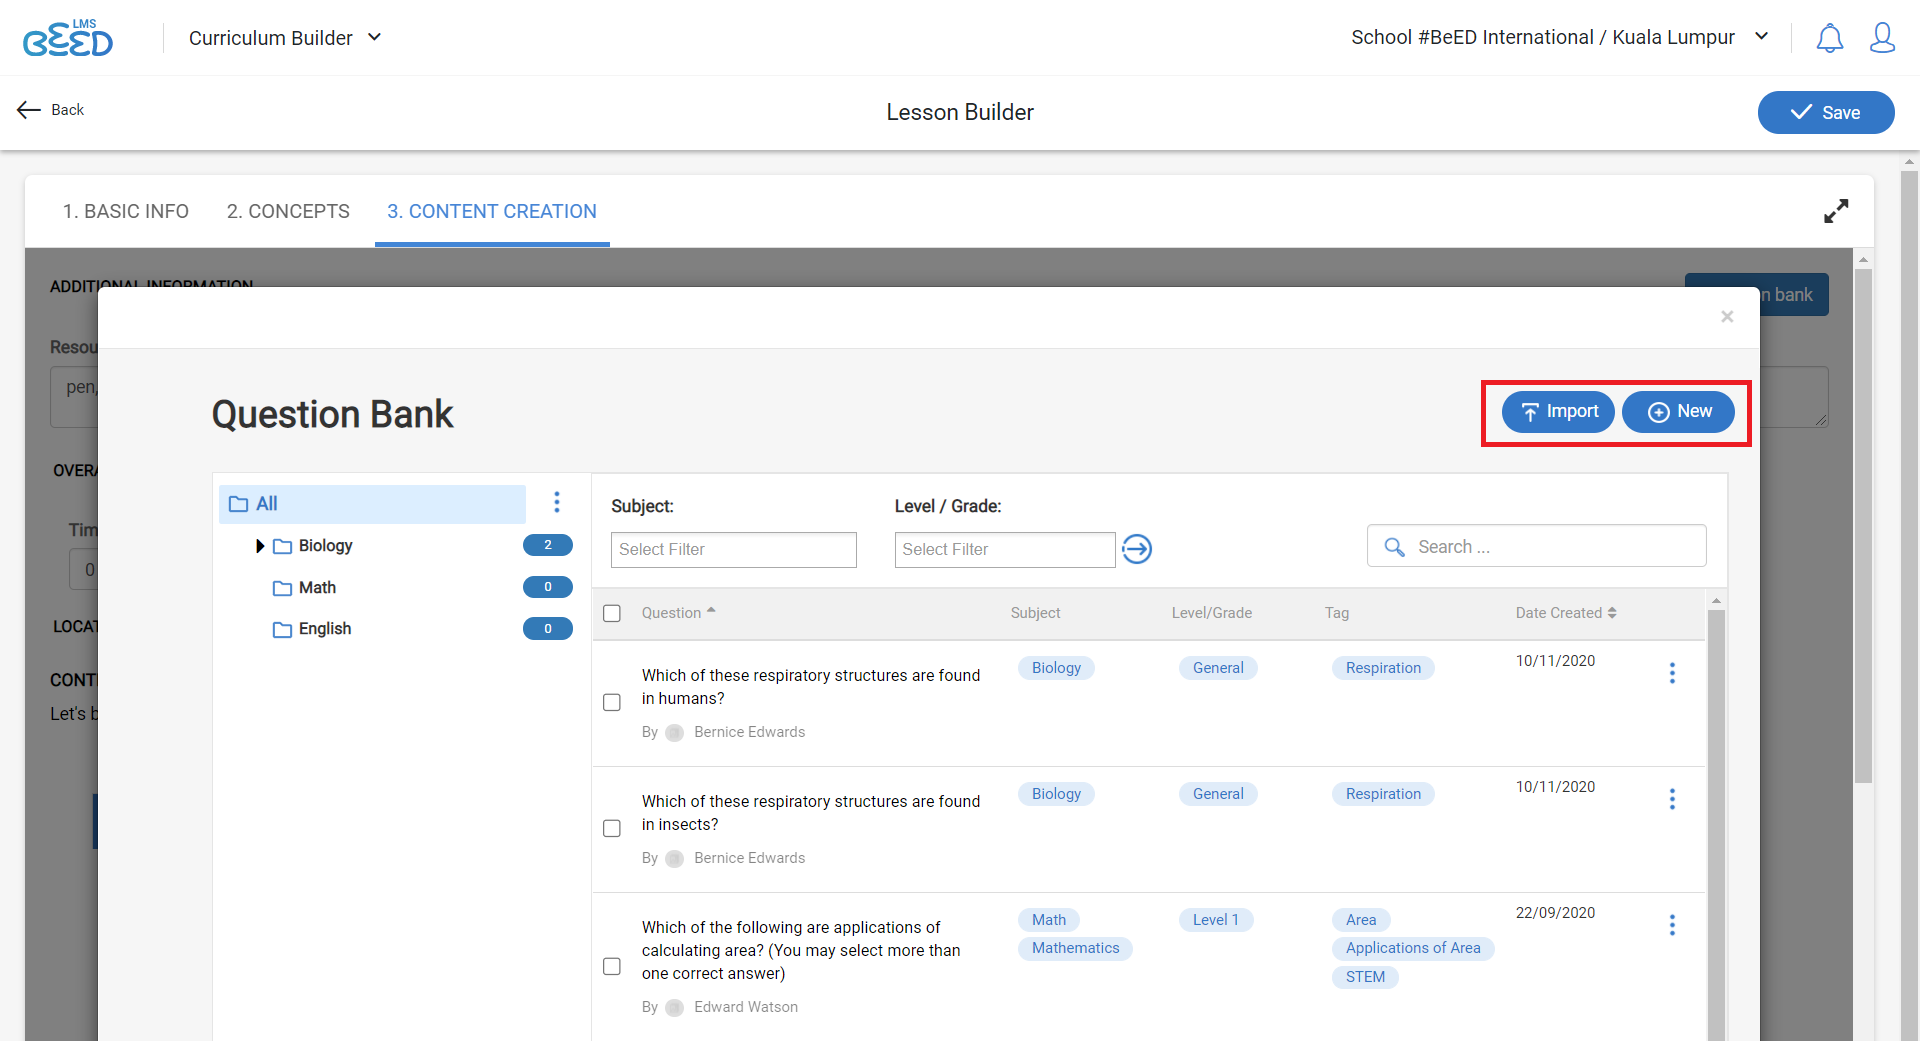
(a) To import questions in bulk,
- Click on "Import" button and select "Download Template” to download a csv template.
- Fill in the csv template according to the example given and save.
- In the Question Bank, click on “Choose File” and select your csv template. Finally, click on “Import”.
(b) To add questions directly into the Question Bank,
- Click on the “+ New” button. Fill in the required fields and save.
You might also be interested in:
- How do I organise my question bank?
- How do I import a question from the Question Bank into my Lesson?
How do I organise my Question Bank?
You can organise your questions in the Question Bank by making folders:
1. In the Question Bank, click on the three-dot icon next to an existing folder. You will then have the option to
a. create new subfolders
b. rename the selected folder
c. delete the selected folders
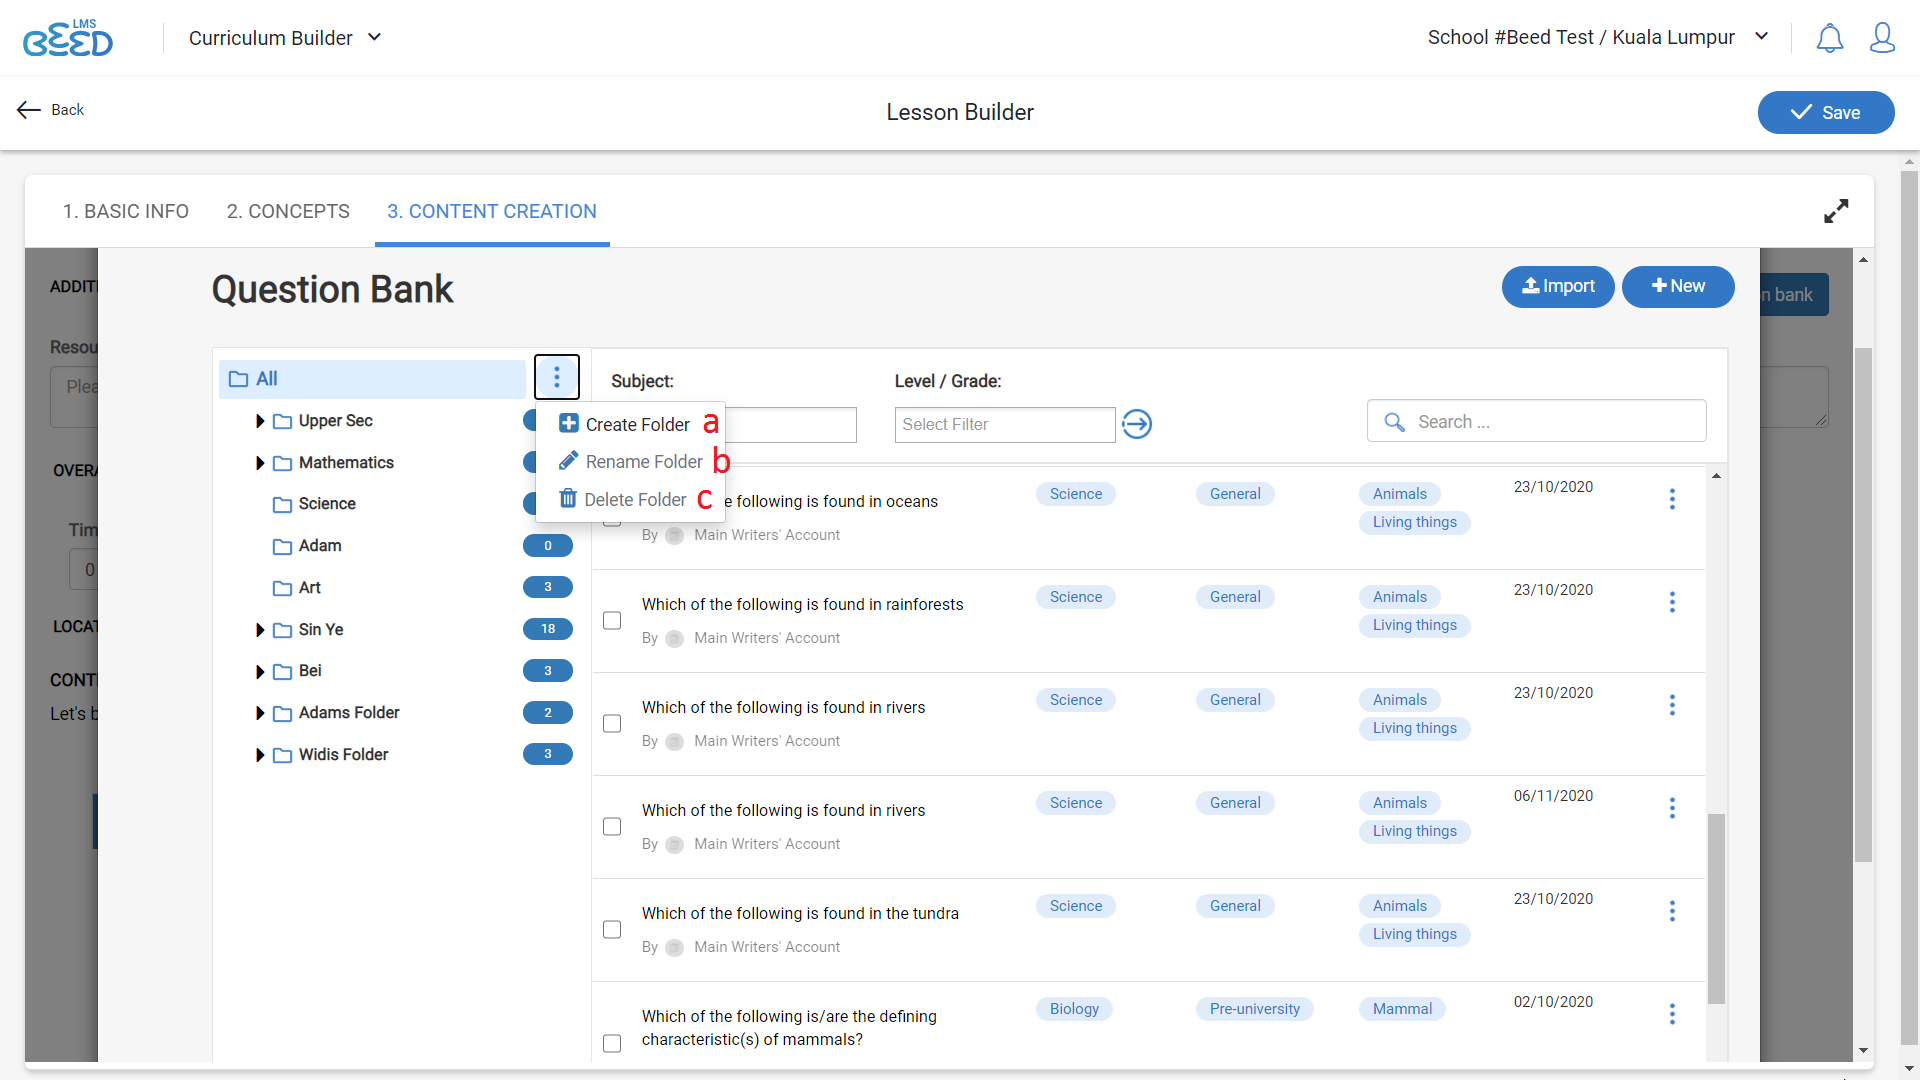
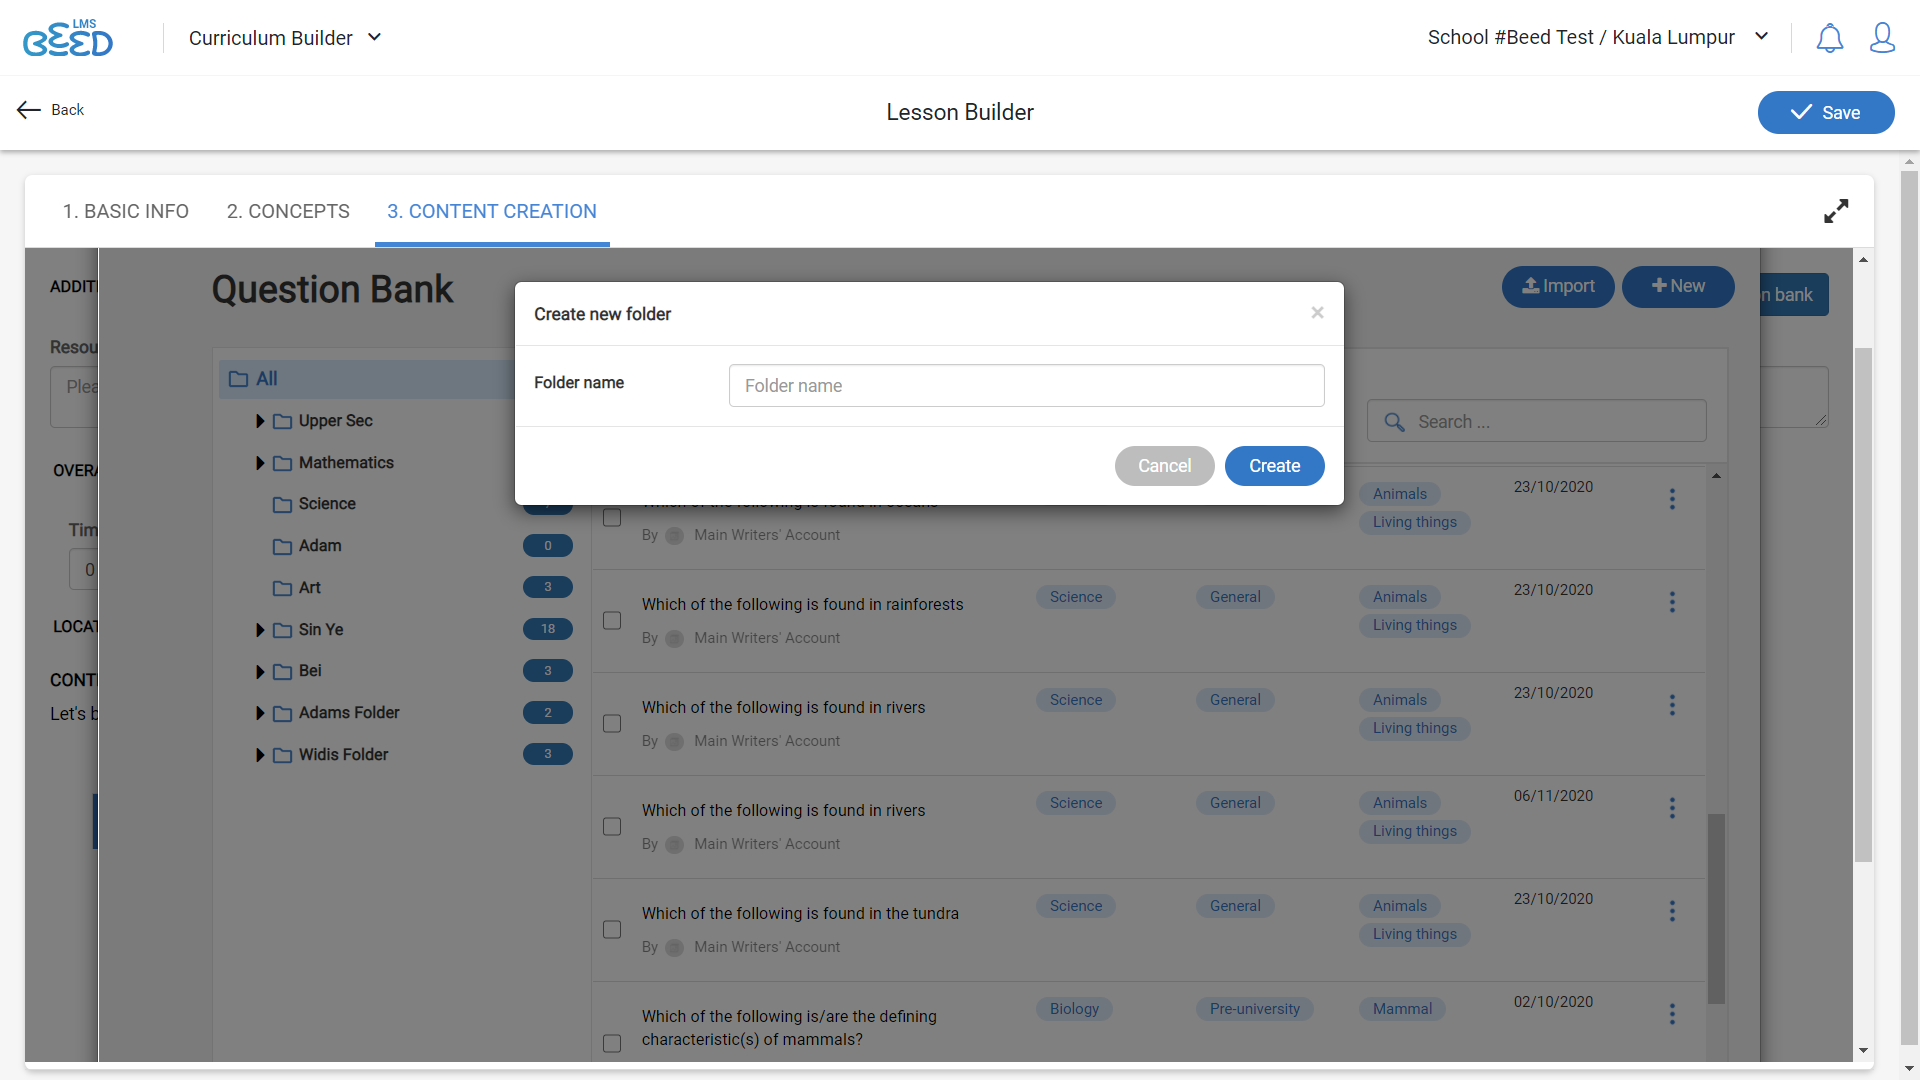
2. Click on Create Folder.
3. In the pop-up menu, insert your folder name and click on Create.
4. To move questions into a folder, click on the checkmark next to the questions. Then, drag and drop them into a folder in the left panel.
What documents can I attach or apply to a Lesson?
You can apply the topics/ subtopics from the following independent documents:
Can I create a nested Lesson?
Yes. However, you will have to be assigned to create a Lesson for a Course within a Curriculum.
To proceed, see I’ve been assigned to create a Lesson under a Unit Plan, how should I proceed?
What is the difference between a nested and an independent Lesson?
A nested Lesson differs from an independent Lesson in the following aspects:
|
Nested Lesson |
Independent Lesson |
|
Parked within an existing Unit Plan. |
Not parked within a Unit Plan. |
|
Certain information is pre-filled such as Curriculum, Segment, Level, Course and Unit Plan. |
Information is not pre-filled. Lessons can be created for any Curriculum, Segment, Level, Course and Unit Plan. |
|
Contents attached under Syllabus, Objectives, Assessment Rubric, Learner Skills and Learner Traits documents to the Unit Plan may be constrained. However, you can click on Choose Strands to select the criteria or sub-criteria for each Document. |
Documents are not constrained. Independent Syllabus, Objectives, Assessment Rubric, Learner Skills and Learner Traits documents can be imported, or created as nested documents within the Lesson under a Unit Plan. Click on Choose Strands to select the criteria or sub-criteria for each filled Document. |
|
Cannot be imported into other Unit Plans. |
Can be imported into other Unit Plans. Note: Nested Documents within an independent Lesson can be overridden by those under the Unit Plan. |
Can I assign someone to create a Lesson under a Unit Plan?
Yes. To do this:
Note: You can only assign a Unit Plan to Educators who teach the Course.
1. Click on the Curriculum document you’ve created.
2. Select the relevant Segment, Level, Course and Unit Plan.
3. In the lower half of the page, click Assign to Unit Plan in the top right.
4. Select the specific name from the list. Then, click Add.
Note: The names listed are those who have been assigned as an Educator of the specific Course in the Admin Panel by the Account Administrator.
I’ve been assigned to create a Lesson under a Unit Plan, how should I proceed?
Assigned task(s) will appear in the Assigned Documents page.
To approach an assignment:
1. Click Assigned Documents in the top left. Then, click on the relevant document.
2. You will be brought to the Curriculum Builder page. In the lower half of the page, click on Number of lessons next to Lesson.
3. Click on the respective icons to create or import the document.
|
To create: |
1. Click on + Create Lesson. |
|
To import: |
1. Click on + Import Lesson. Lesson Suggestions list down all the Lesson documents you have in your My Library or Account Library. By clicking on the eye icon in the top right of Lesson Preview, you can have a quick view of the respective Lesson document and its details. 3. Click Import in the top right. This allows correct matching of Lesson Levels with the Levels of the Course, regardless of the number carried by each Level. For example: Lesson Level 1 (to be imported) is to be used with Course Level 2. You can then drag Level 1 on the left to match with Level 2 on the right. 5. Click Match in the bottom right. |
Alternatively, when assigned a task, click on the notification bell icon in the top right. Click on Show Details next to the assigned task and you will be directed to the Curriculum Builder page.
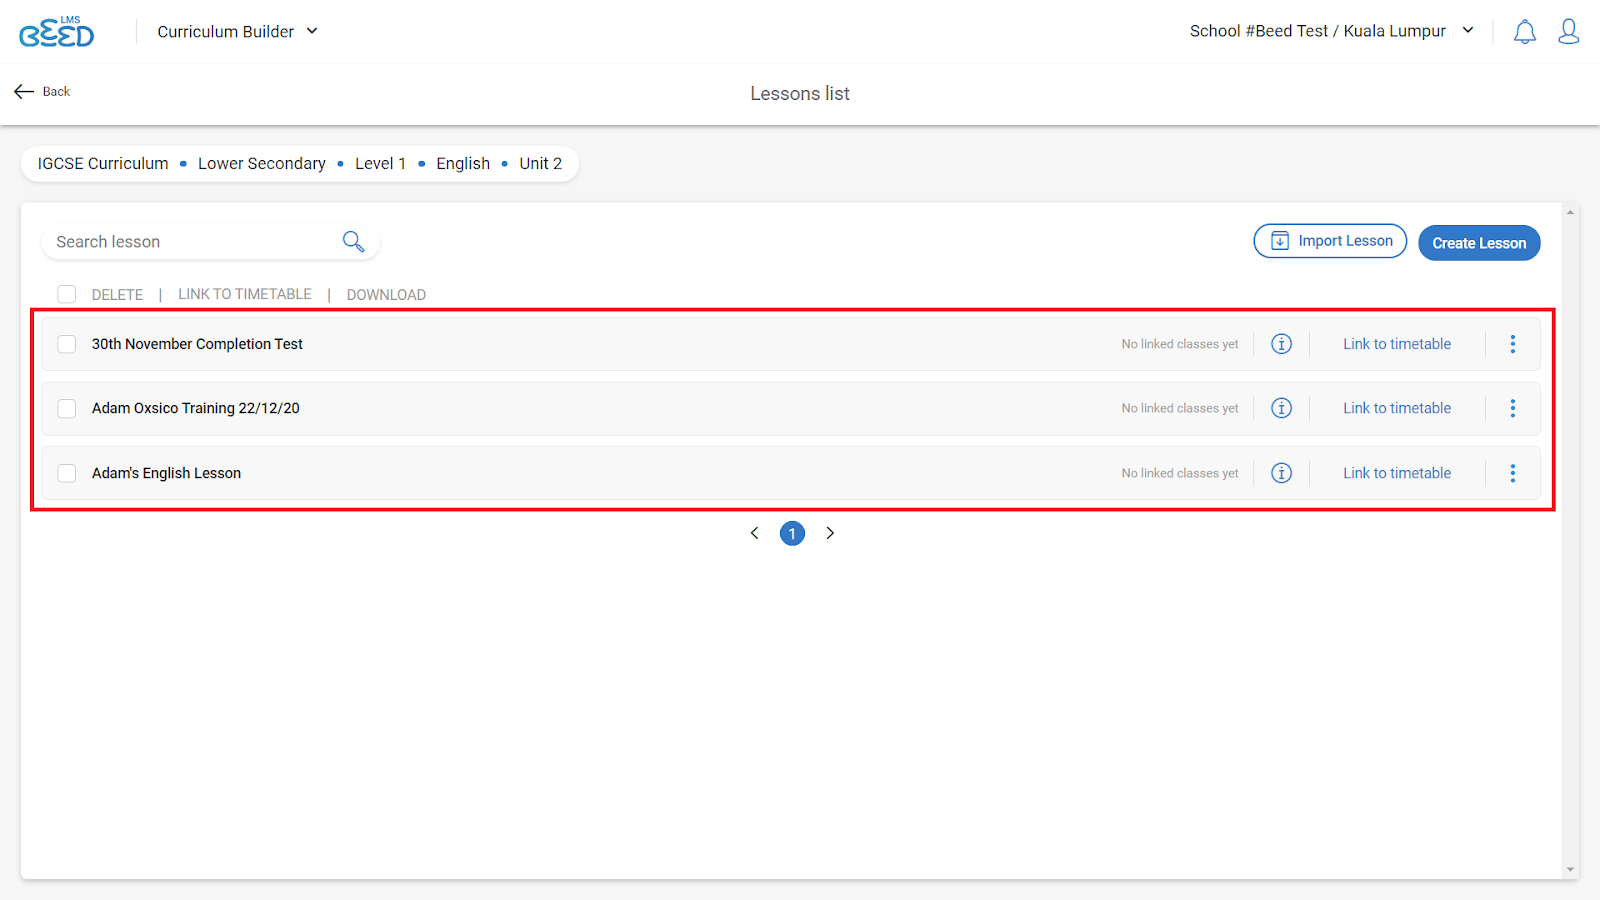
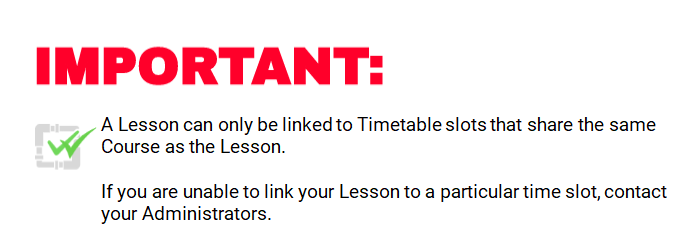
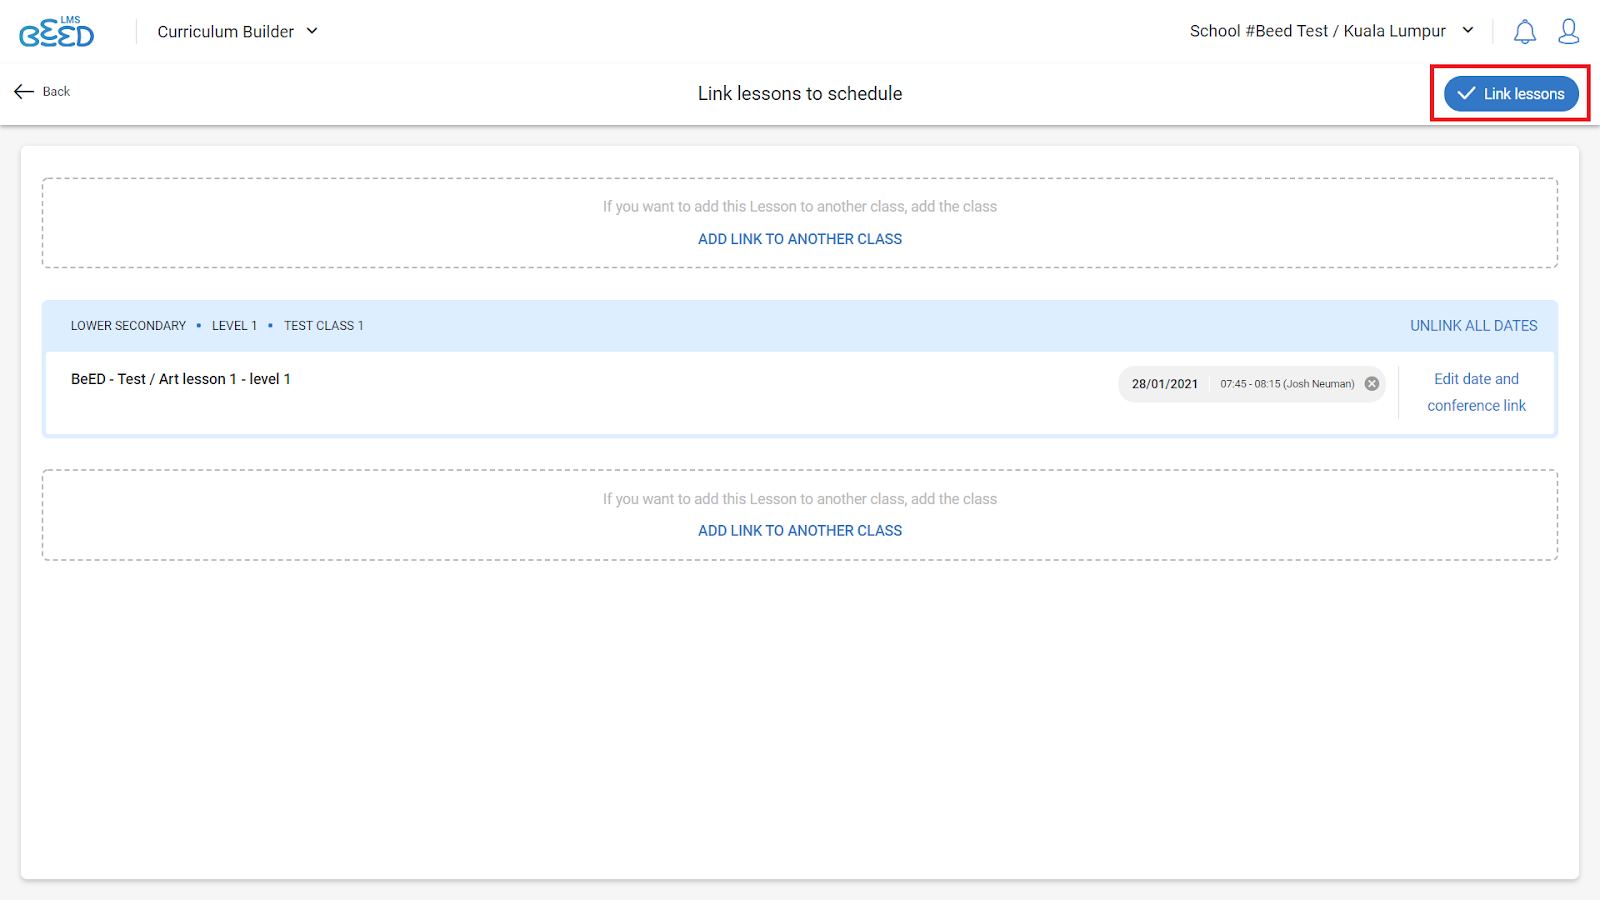
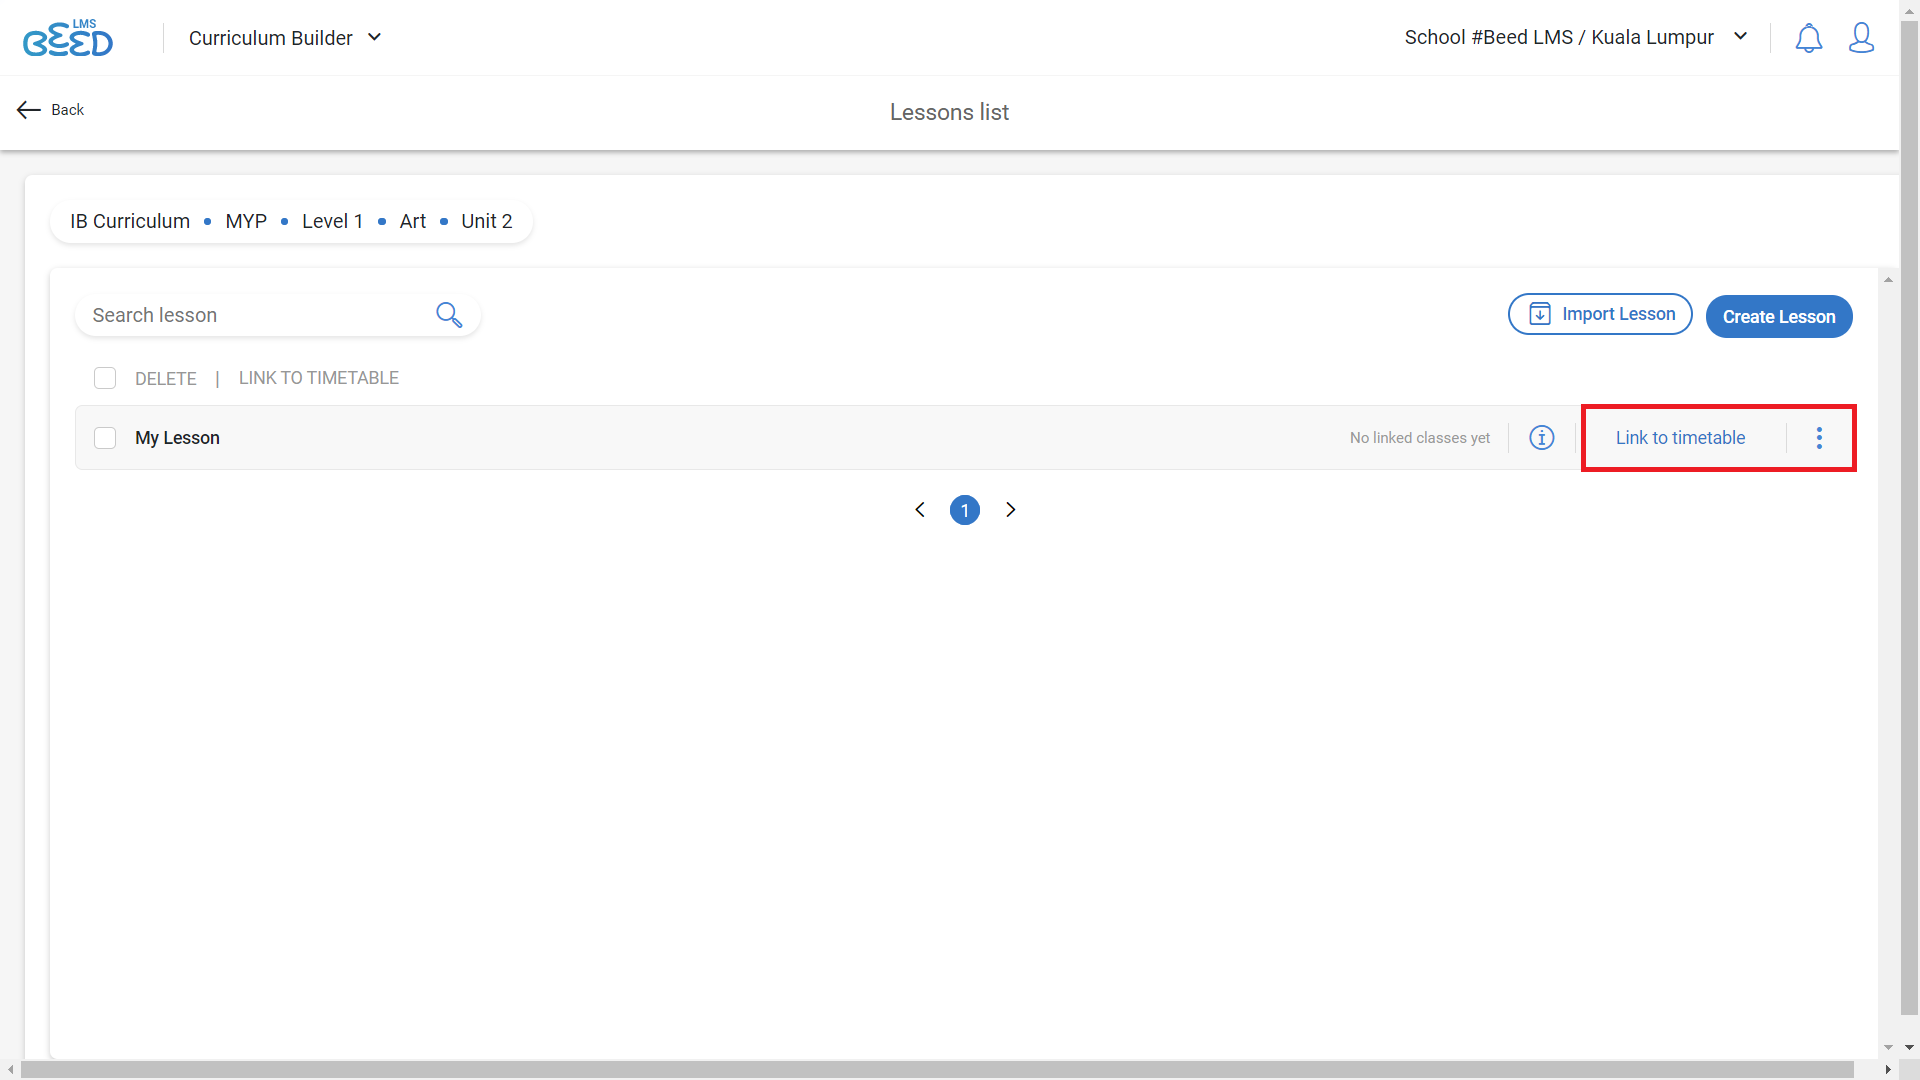
How do I link Lessons to a Timetable?
Note: A Lesson can only be linked if the associated Course has been added to the Timetable in the Admin Panel, and when the Curriculum is made active.

To link Lessons to a Timetable:
1. Click on the Curriculum document you’ve created.
2. Select the relevant Segment, Level, Course and Unit Plan.
3. In the lower half of the page, click on Number of lessons next to Lesson.
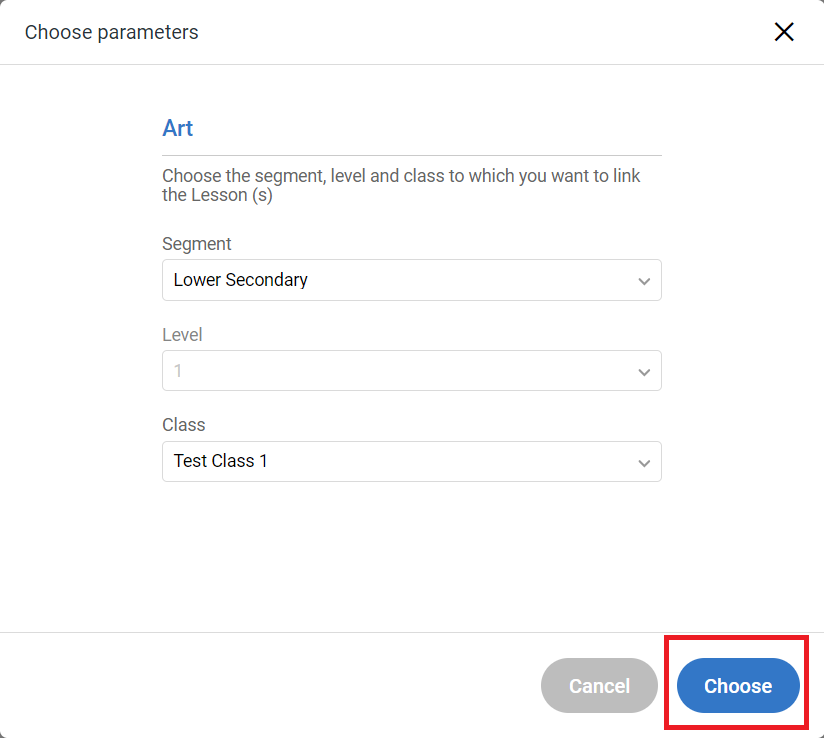
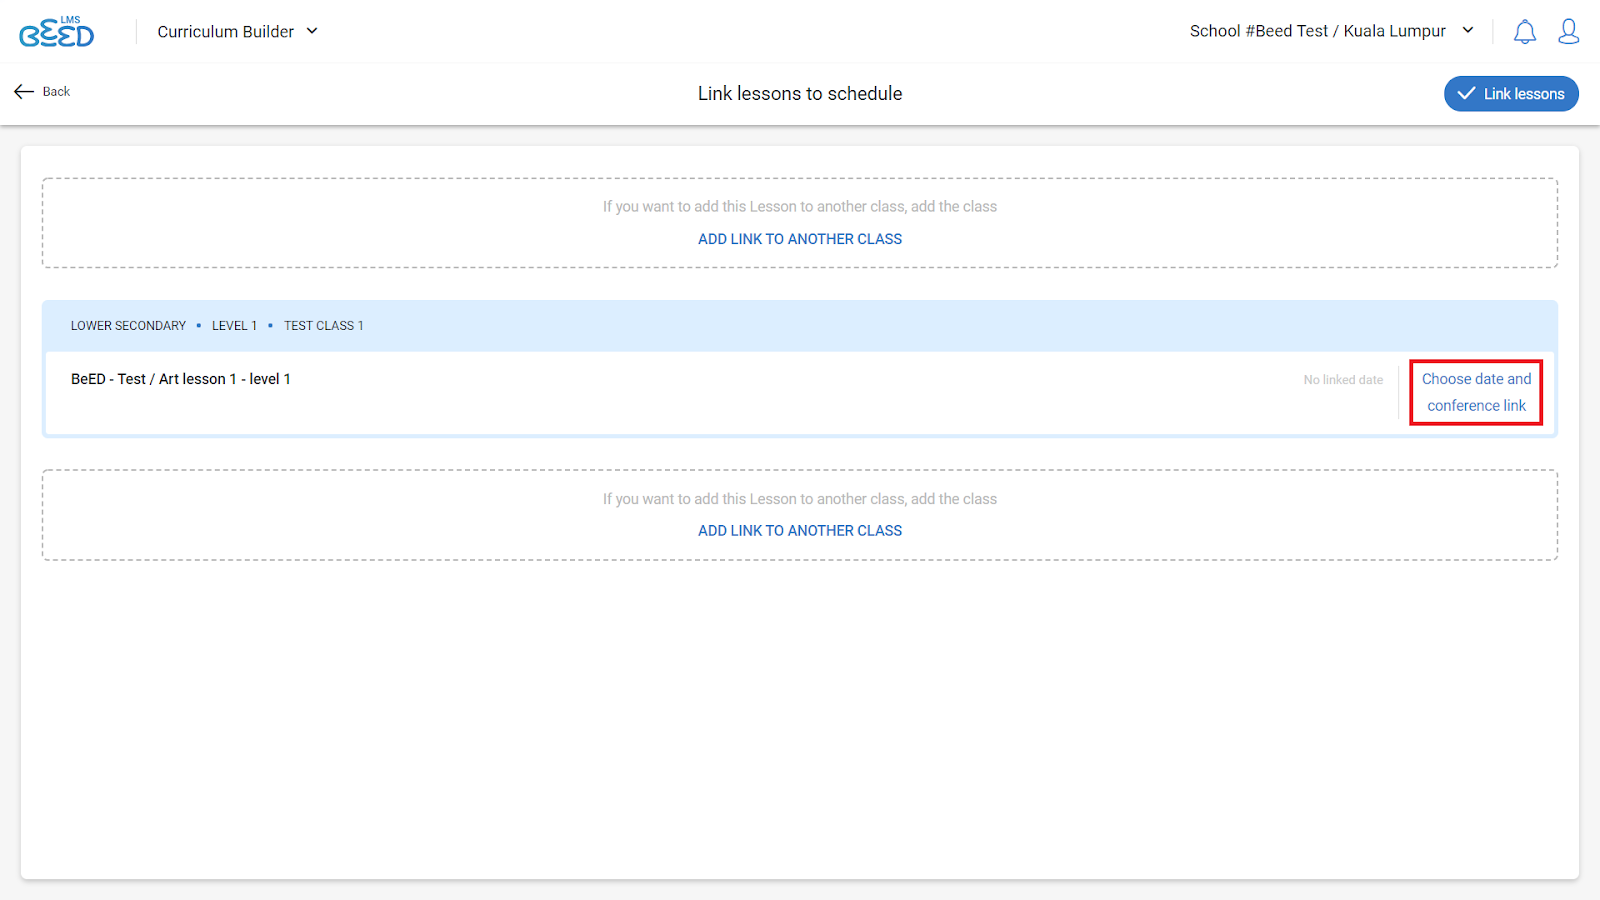
4. Select Lesson(s) you want to link. Then, click on Link to timetable.
5. Click on Choose parameters. Select the relevant Segment, Level and Class from the drop-down menus. Then, click Choose in the bottom right.
6. Click on Choose Date on the right of the Lesson name.
7. Select the date for when the Lesson is held. Then, click Next.
8. Click Link lessons in the top right.
How do I import multiple Lessons at a time?
1. Select the name of the Unit Plan where you want to import the Lesson into. Then, click on the link showing the Number of Lessons.
2. Click on Import Lesson.

3. Select the lessons that you wish to import in bulk, then click on the Import button.
4. The lessons that you have selected should now be imported.
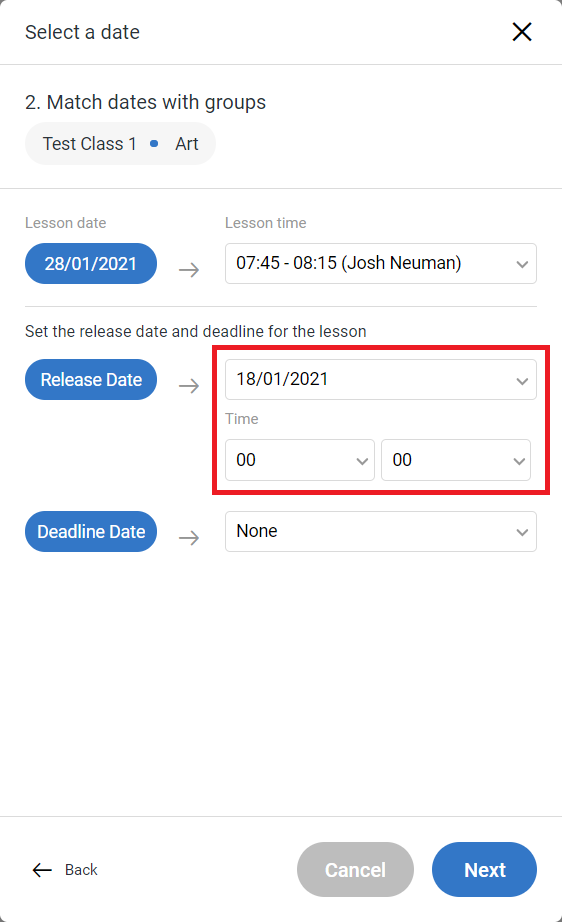
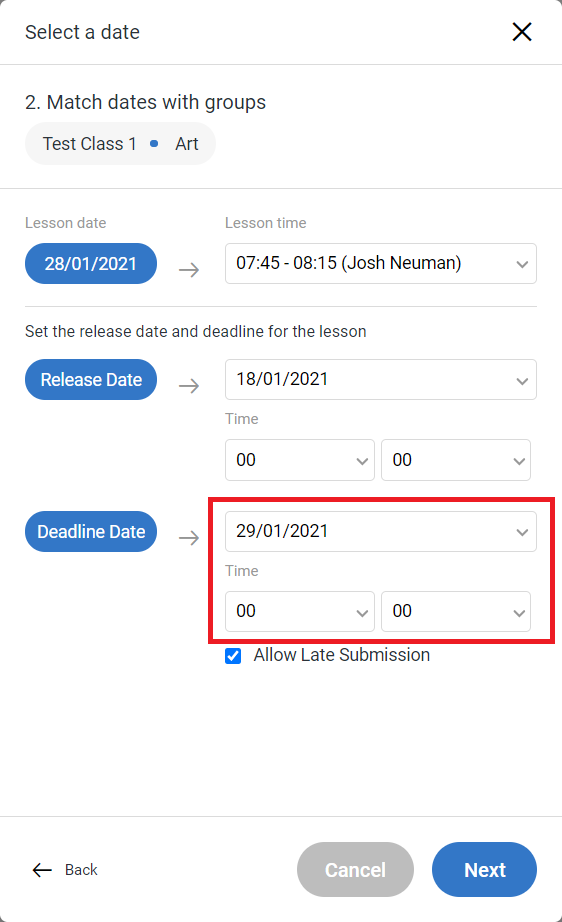
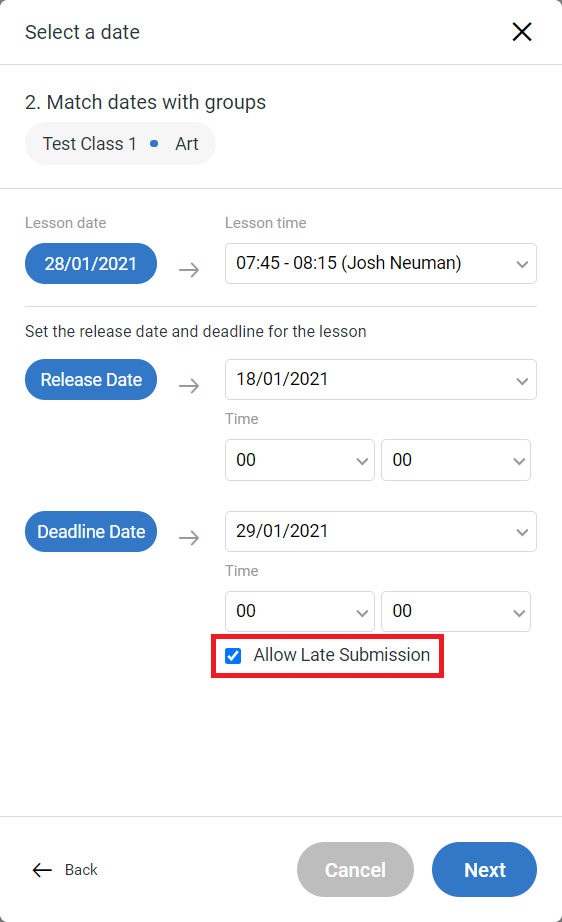
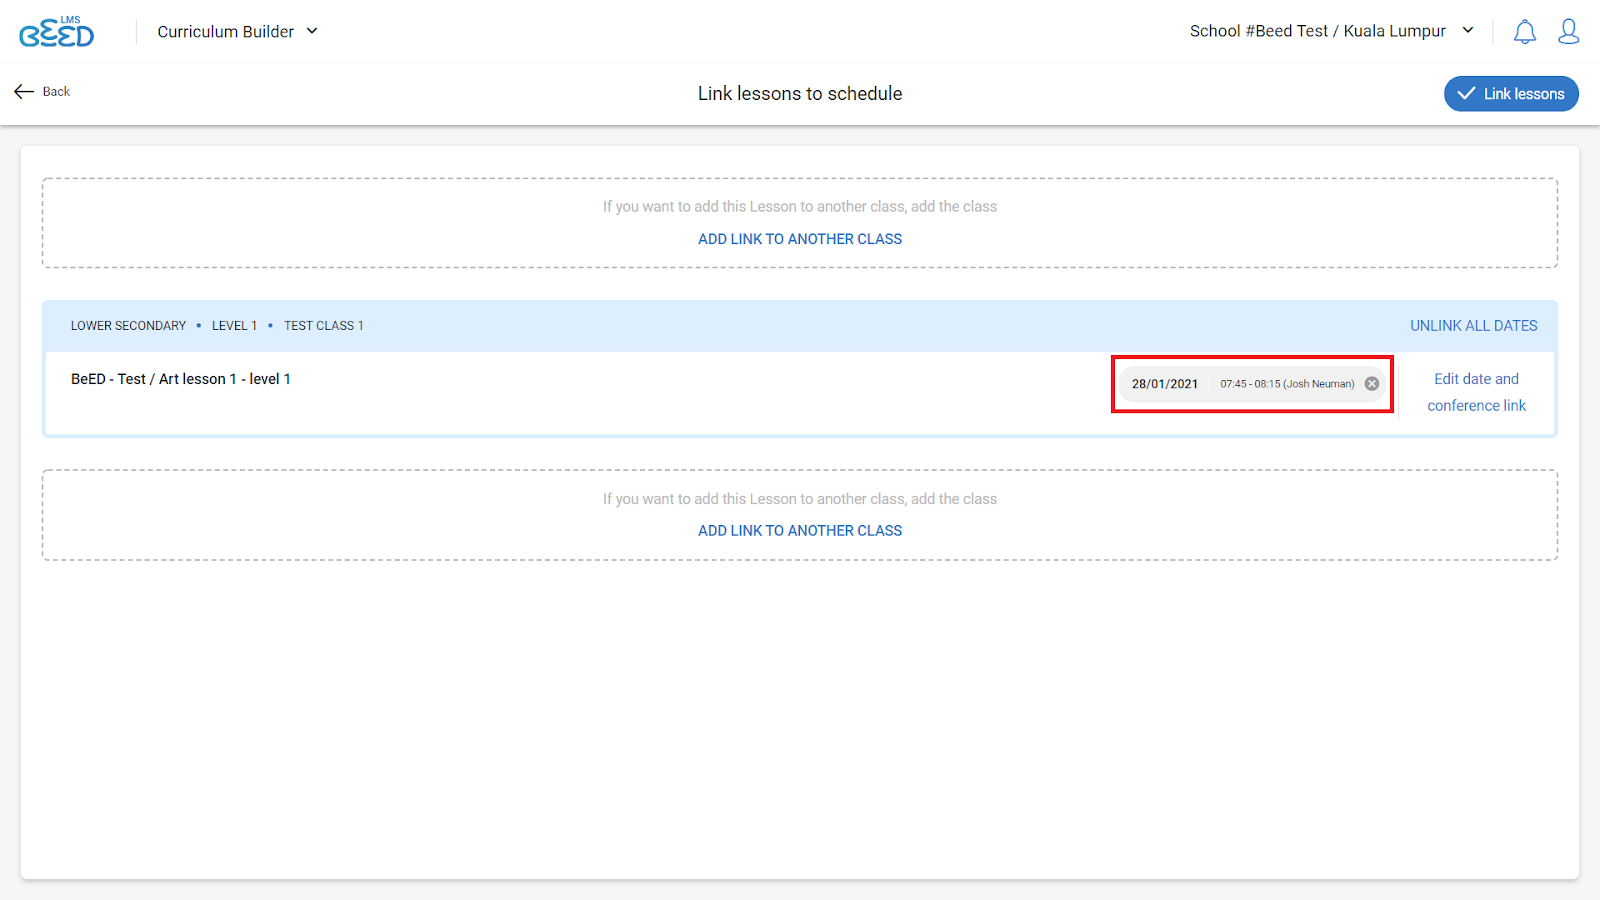
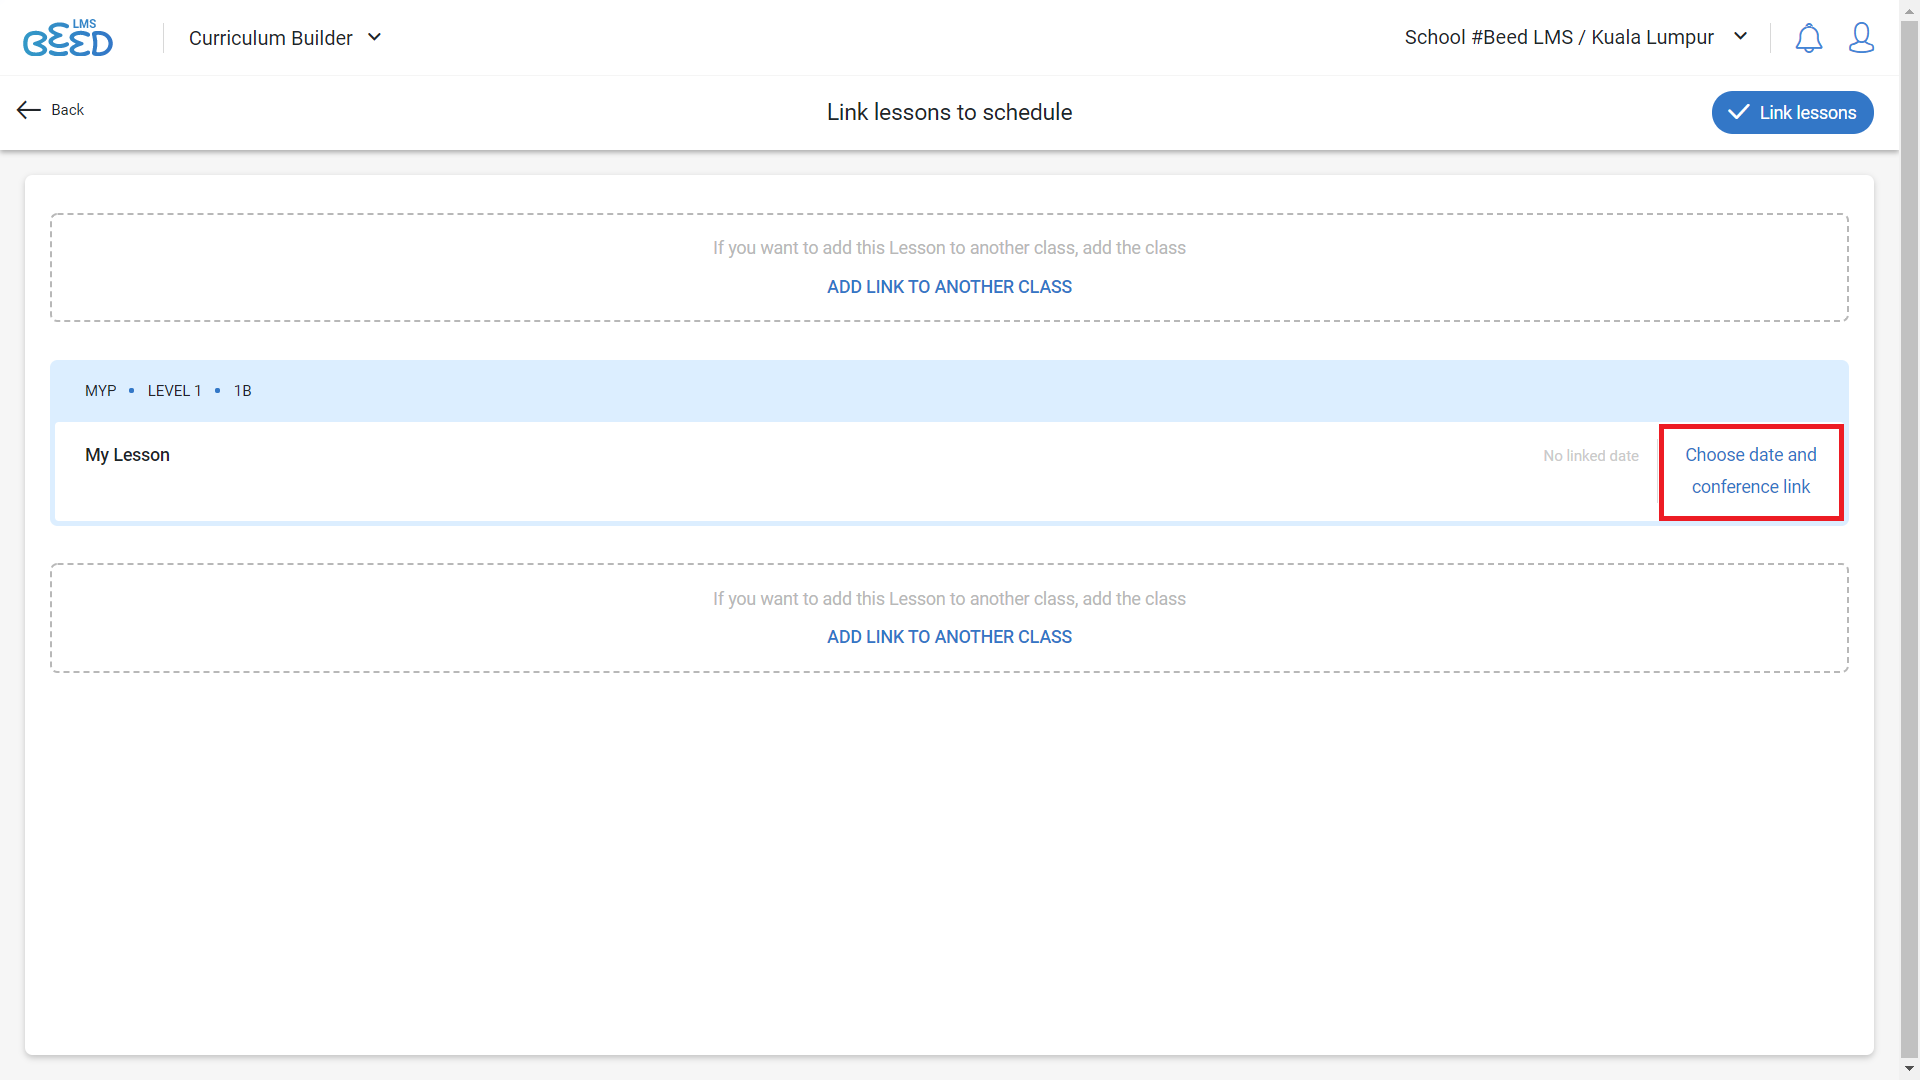
How do I set a lesson release date and deadline?
1. After selecting the Segment, Level and Class that you would like to link this Lesson to, click on Choose to continue.
2. Click Choose date and conference link to select a lesson date.
3. Select a Lesson date and time to link the lessons to.
*You can also select today’s date to link your lesson to.
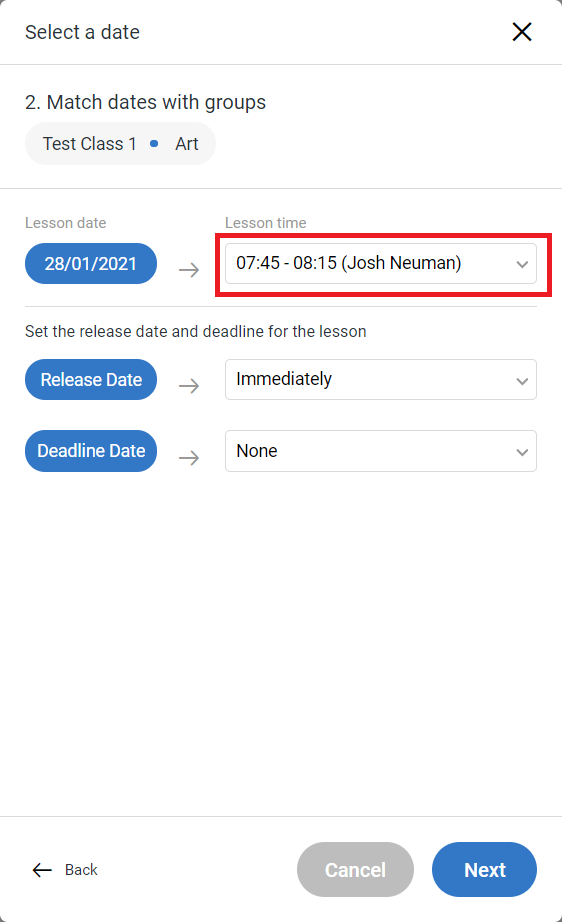
4. (Optional) In the Select a date option, you can also set a date and time to release your Lesson. Learners will only see the Lesson on your set release date. Choose a date and time you would like to release your Lesson.
5. (Optional) You can also set a deadline date for your learners. Learners can only view but cannot answer your Lesson after your selected date and time.
6. Tick Allow Late Submission if you want to allow your learners to respond even after the lesson deadline. Click on “Save”.
7. Click on Link Lesson to complete linking your Lesson.
8. A linked lesson will display the date last modified, as well as the author’s name.
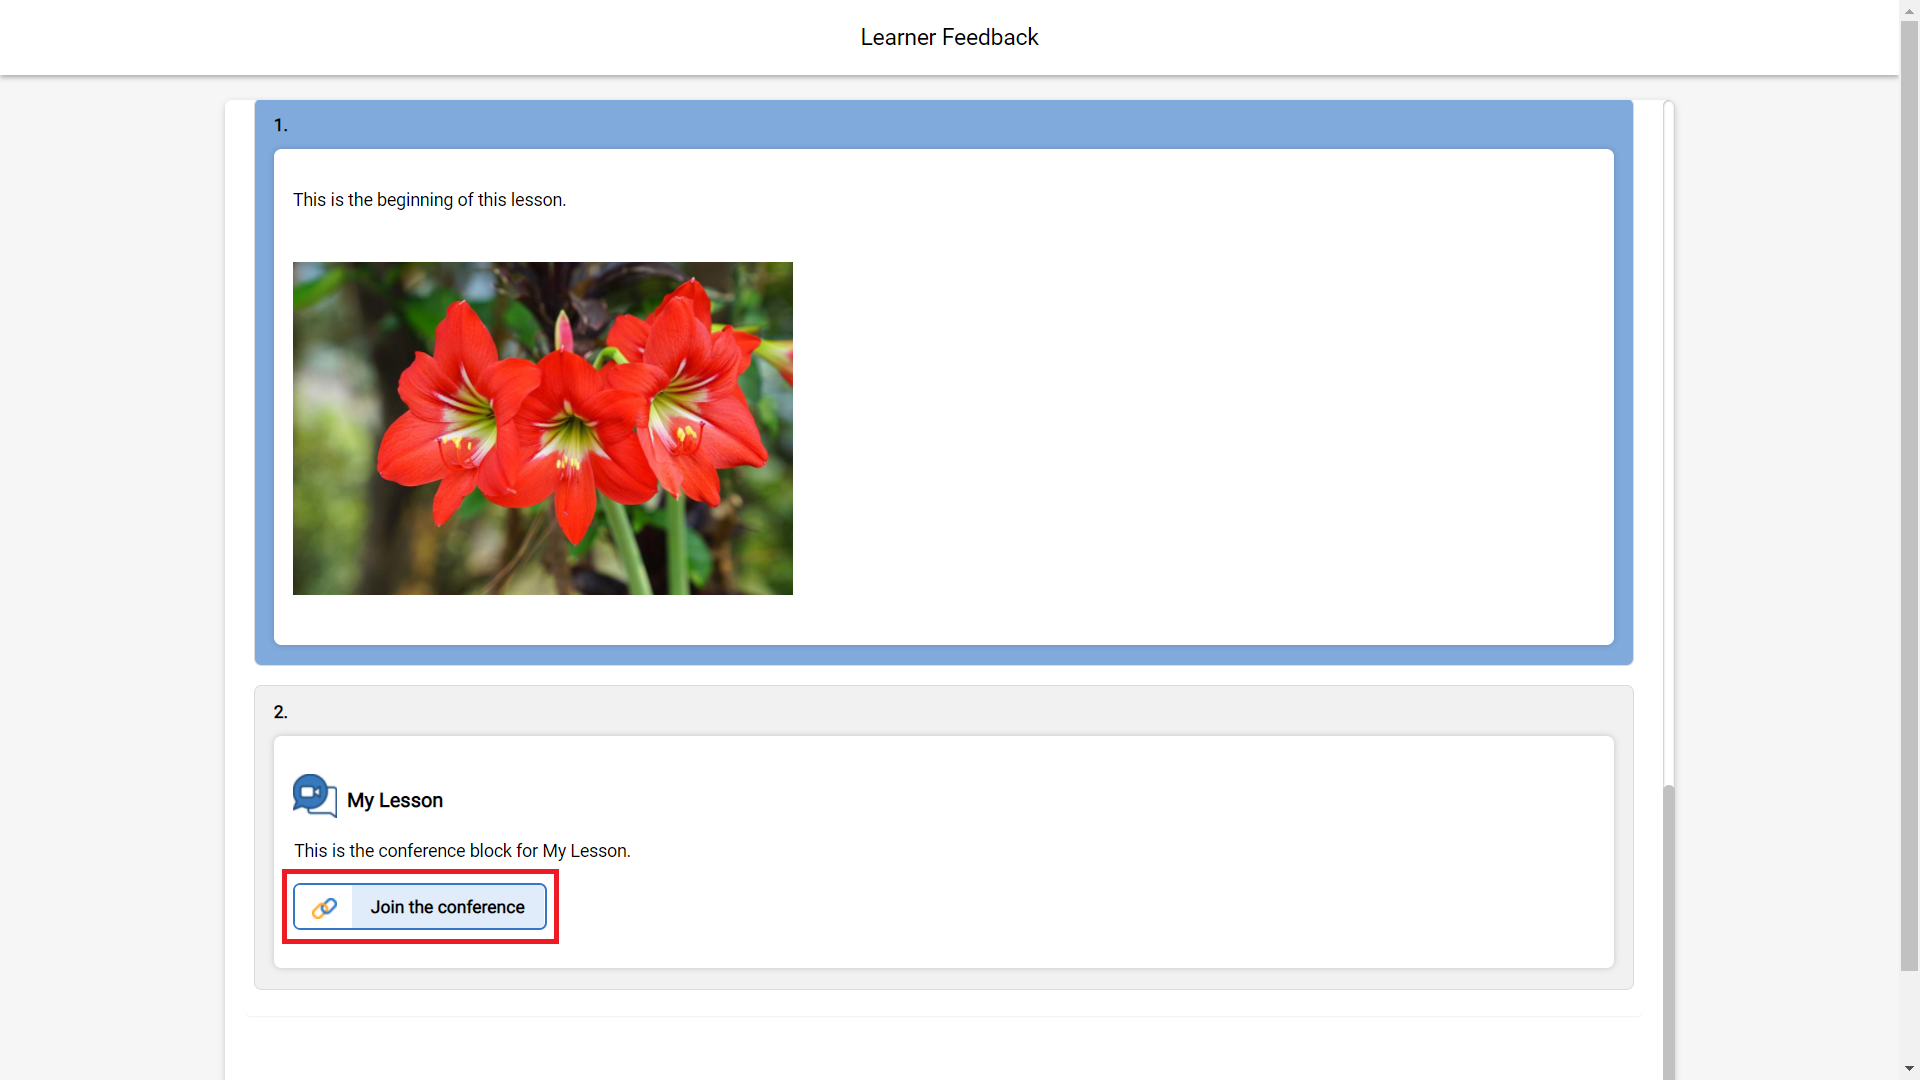
How do I integrate Zoom or other conferencing tools into my Lesson?
Conference Blocks
With Conference Blocks, you can set specific conference links for different classes and institutions, even if they use the same Lesson.
To add a Conference Block into your Lesson:
1. Click on the Conference Block button to begin creating your conference link. This will add a conference block into your lesson.

2. Add a title and description for your conference block. Once you're done, click Save.
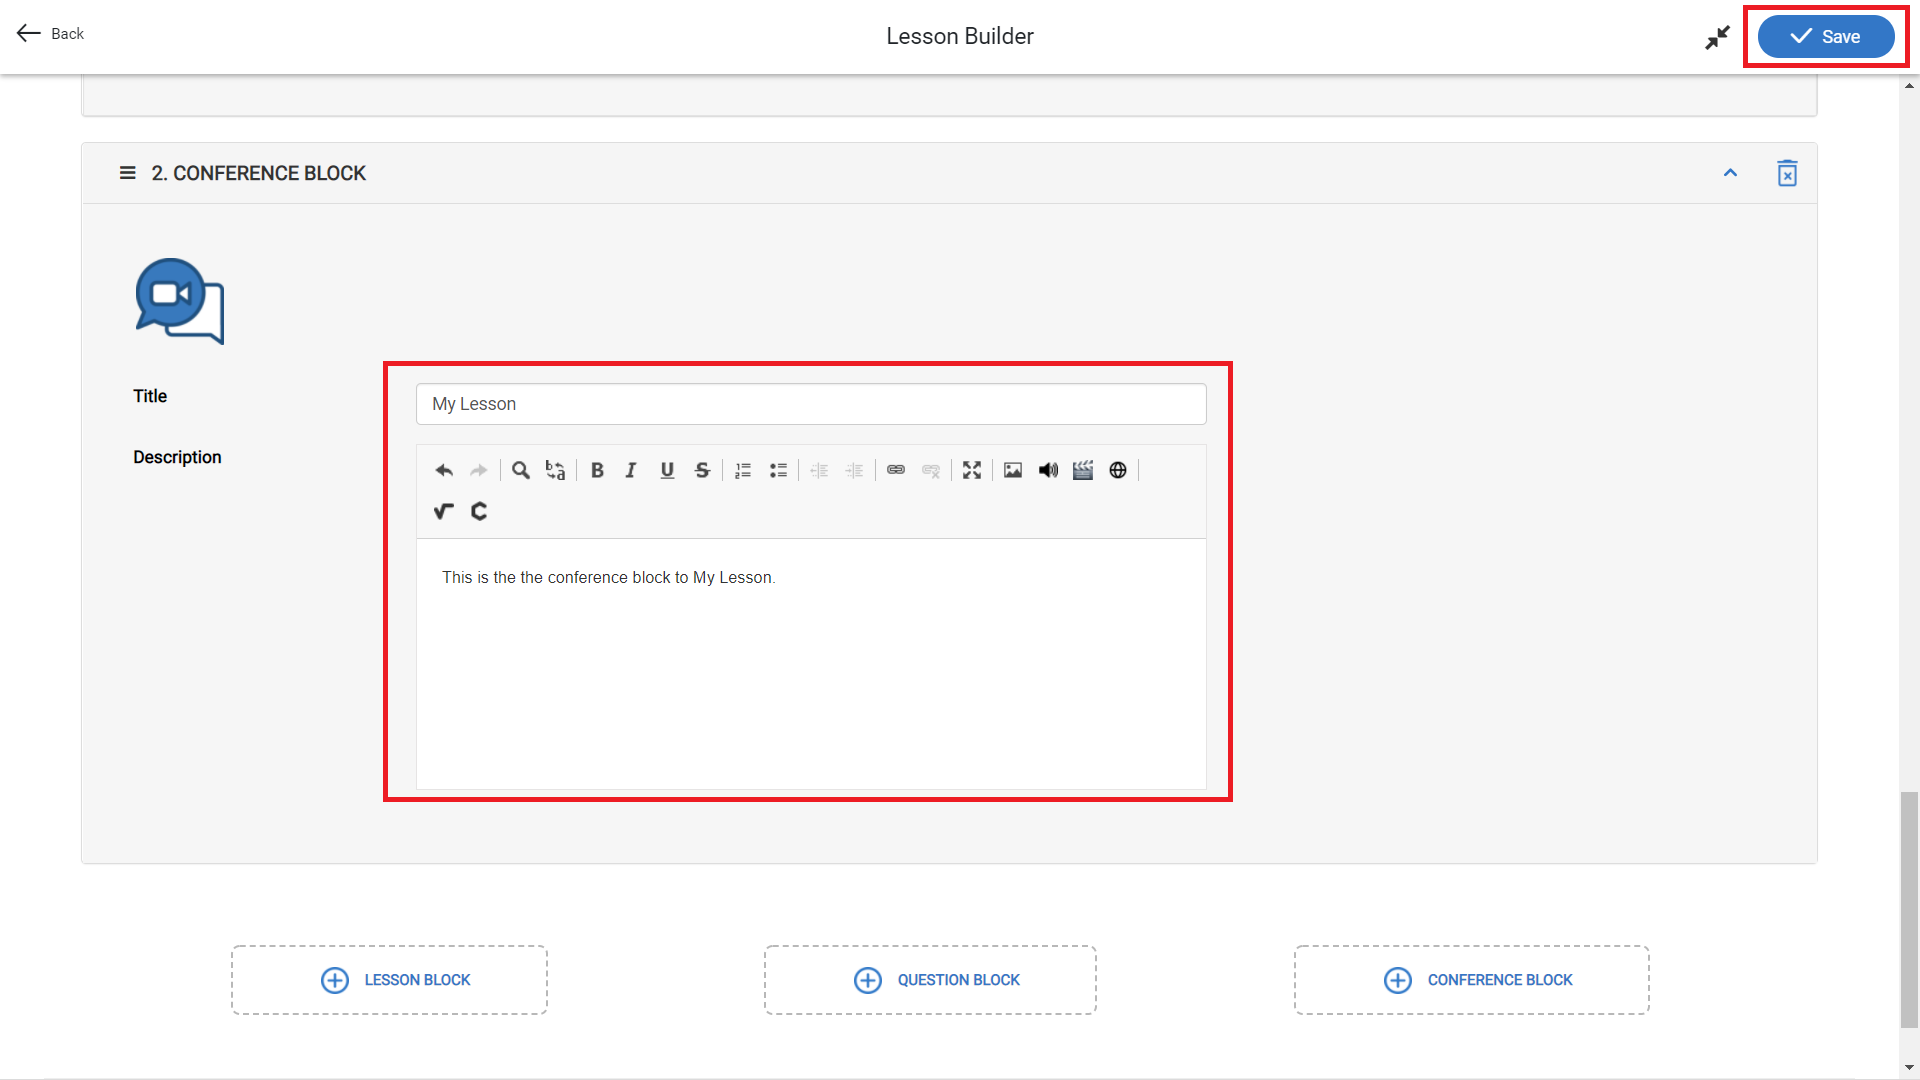
3. Once your Lesson is complete, make sure it's in the Active Curriculum. Click on Link to Timetable. Choose the appropriate class to link your lesson to.
4. Once you have selected a class, click on Choose date and conference link.
5. On the "Set Conference Link" page, click on the Zoom icon to auto-generate a Zoom URL for the conference block (only available for BeED-Zoom subscribers). You can also insert URLs for other online conferencing tools of your choice! Once you're done, click on Save.

6. To start your conference call, go to your Gradebook Schedule, enter the lesson, and click Start the Conference. Teachers can now join the call as Hosts. Students clicking on this link will join as participants.
Troubleshooting - Why can’t I create Lessons?
Occasionally, you may find that the Create Lesson and Import Lesson icons do not appear in a Unit Plan’s Lessons List.
This is because your role does not allow you to add Lessons into this Unit Plan. Only the following users can add or import Lessons into Unit Plans.
- Curriculum Directors can add/import any Lessons
- Heads of Departments can add/import Lessons for their Courses
- Educators can add/import Lessons for Courses they teach
Please contact your Administrator to give you the appropriate role to allow you to add or import your Lessons.
Troubleshooting - Why can’t I link Lessons to the Timetable?
If you find yourself unable to link Lessons to the Timetable, it may be due to one of the following reasons:

1. The Curriculum is not active
Make sure the lesson you are trying to link is part of the Active Curriculum for your Institution.
2. The Class you are teaching has not been created in the Admin Panel yet.
Please contact your Administrator to create the Class.
3. The Timetable for your Class has not been set up in the Admin Panel yet.
Please contact your Administrator to set up the Timetable for your Class. Make sure that the Course you are trying to link is added to the Class’ Timetable.
4. Your role does not allow you to link Lessons to the Timetable.
Only the following roles are allowed to link Lessons to the Timetable
- Curriculum Directors can link any Lessons.
- Heads of Departments can link any Lessons for their Course
- Educators can link Lessons to any Timetable slots they teach.
Please contact your Administrator to give you the appropriate role, or set up Timetable slots to you.
Plagiarism Checker
Can I check learner responses for plagiarism?
Yes. You can run a plagiarism check on learner-submitted documents (PDF and Word document).
This is an add-on paid feature. Email us at contact@beed.world to get the plagiarism checker for your institution.
How do I create questions that auto-check my learner’s responses for plagiarism?
To do this:
1. In the Curriculum Builder, navigate to your Lesson and create an Open Response Question Block.
2. At the bottom of the question block, toggle on the Plagiarism Check for that question.
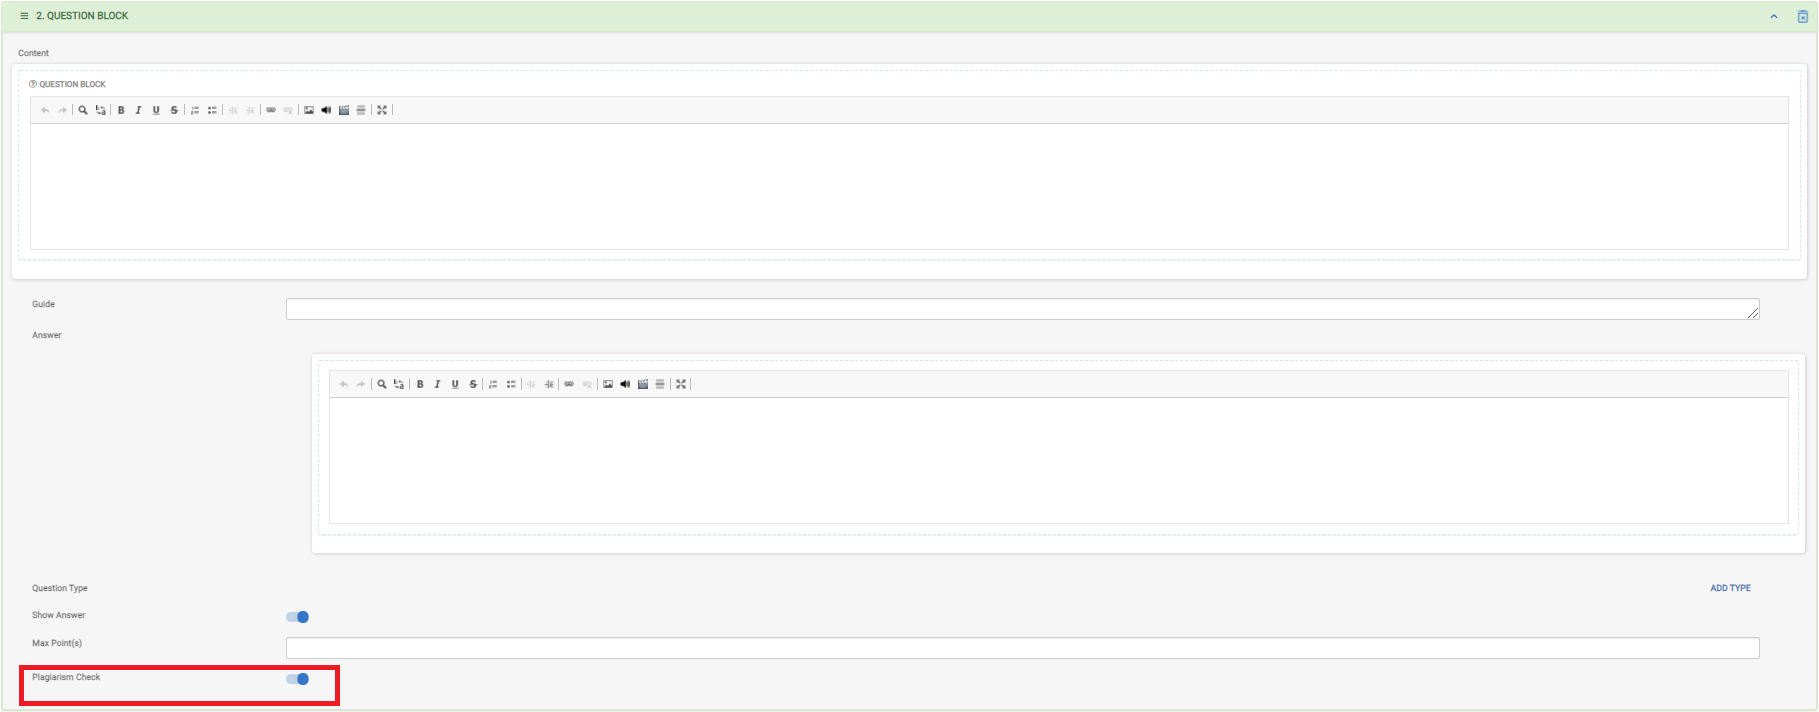
3. You can then link the Lesson to your classes as usual.
4. All documents submitted by your learners as a response to this question will then be automatically checked for plagiarism.
How do I view my learner’s plagiarism report?
You can only view plagiarism reports if the plagiarism checker is turned on for a particular question.
To view your learner’s plagiarism report:
1. Navigate to the Learner Feedback section of your lesson.
2. Locate the question and the learner you’d like to check.
3. When your Learner submits a response with a Word or PDF document, you will see a bar displaying the amount plagiarised with a three dot icon.
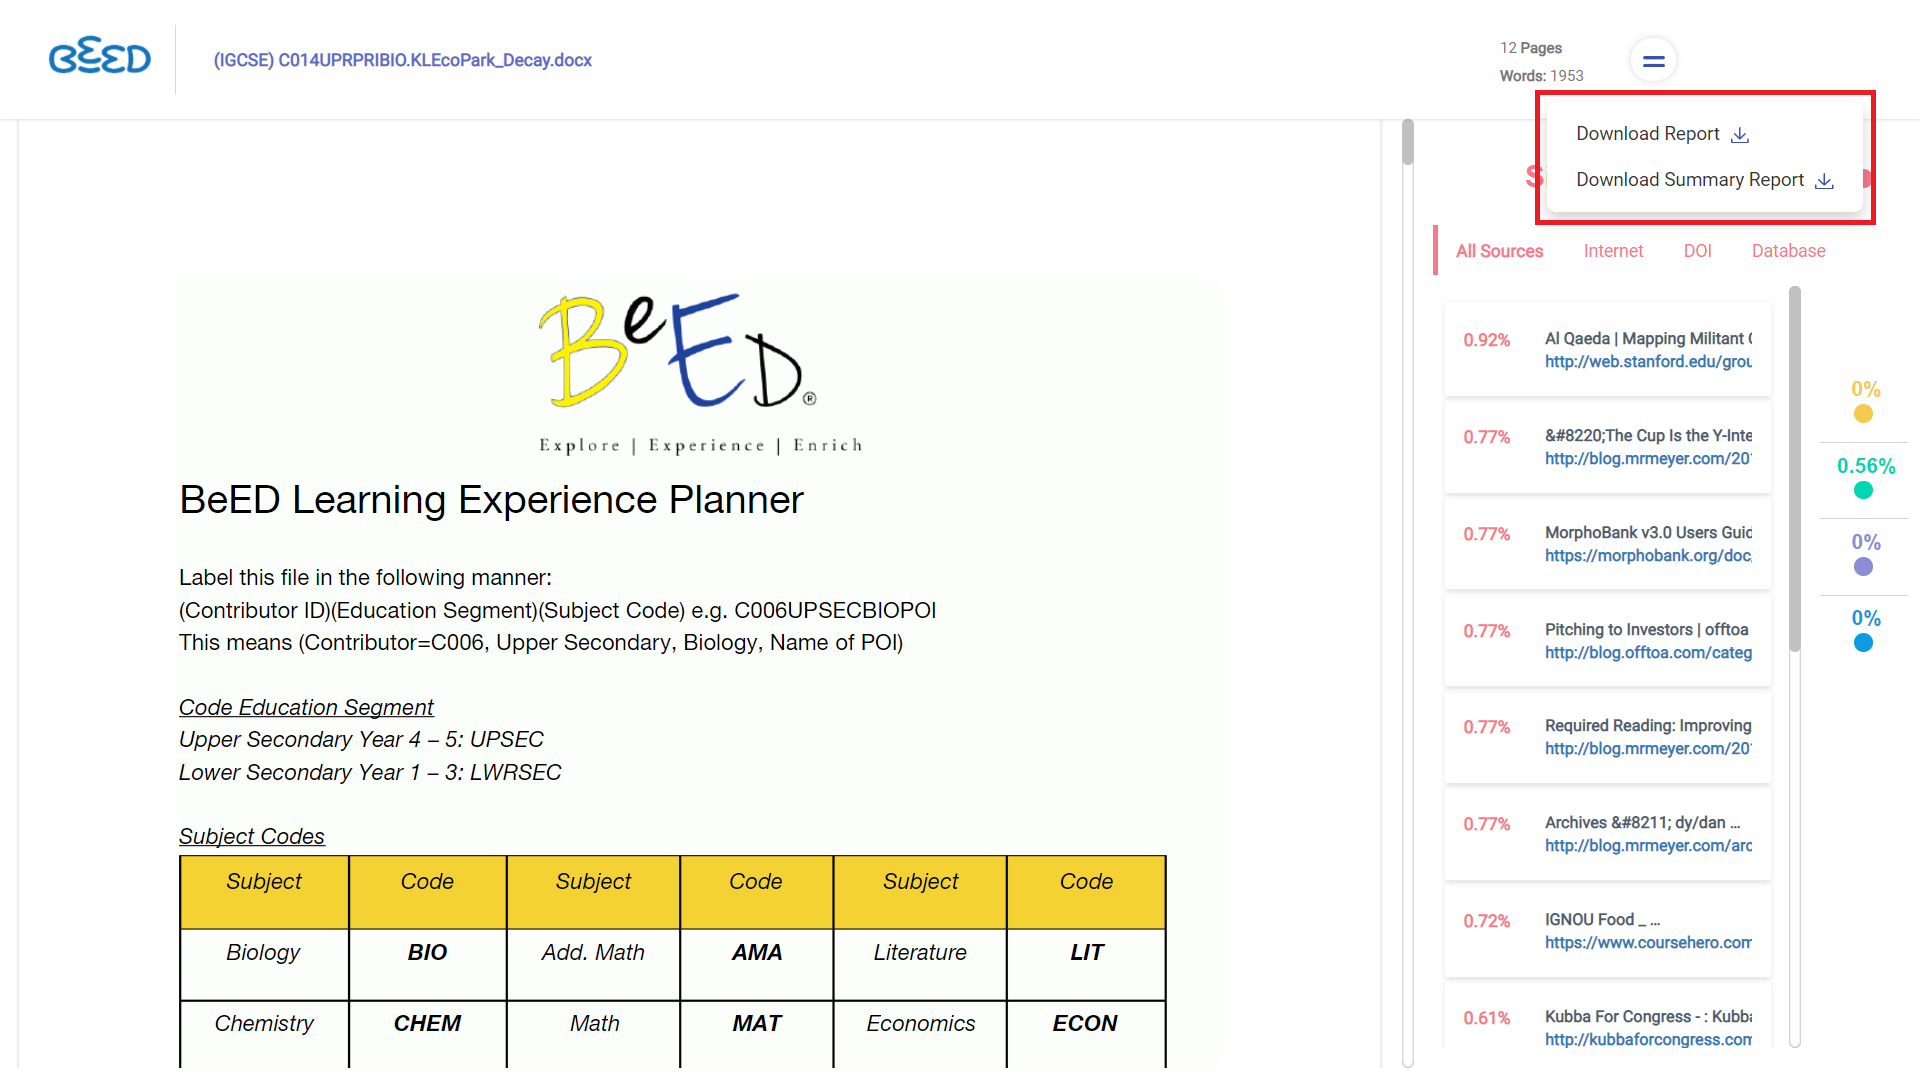
4. Click on the three dot icon and the View Plagiarism Report button to view the full plagiarism report.
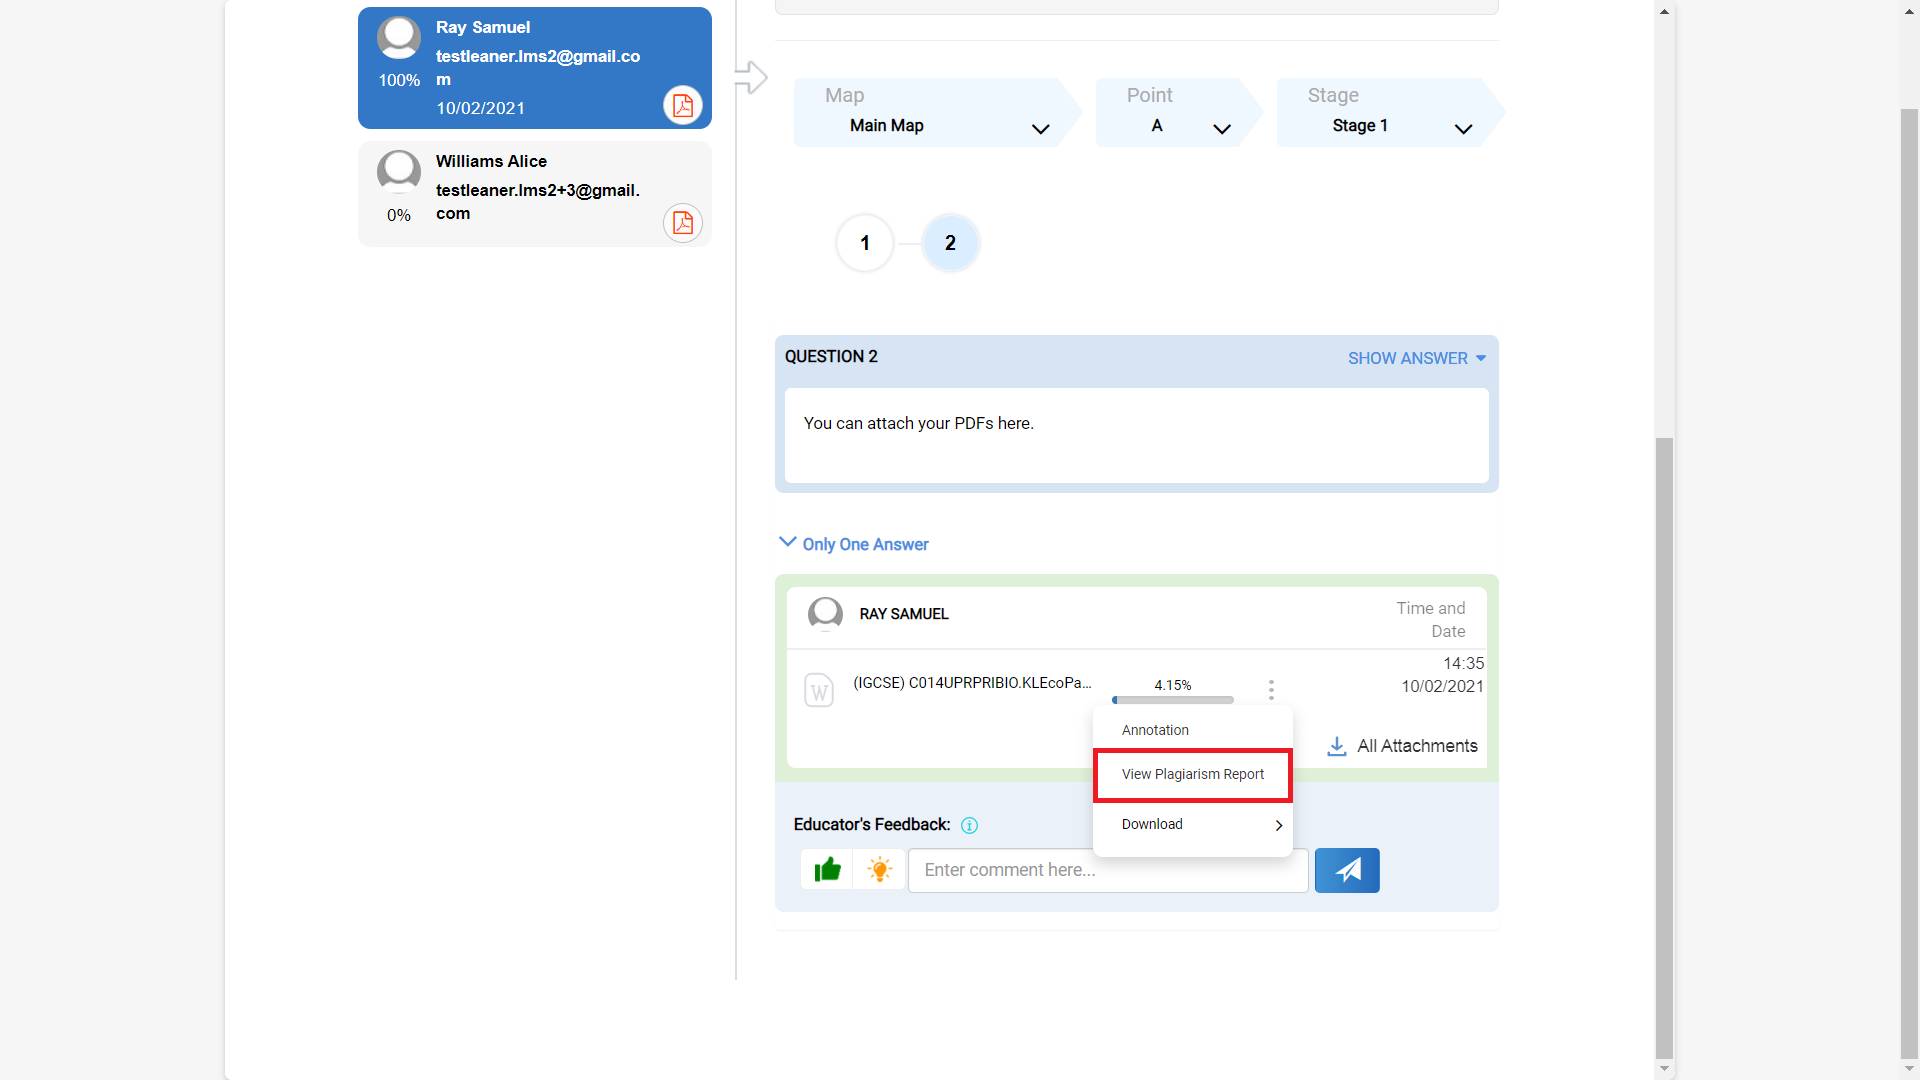
5. You can also download a full or summarised plagiarism report in PDF format.
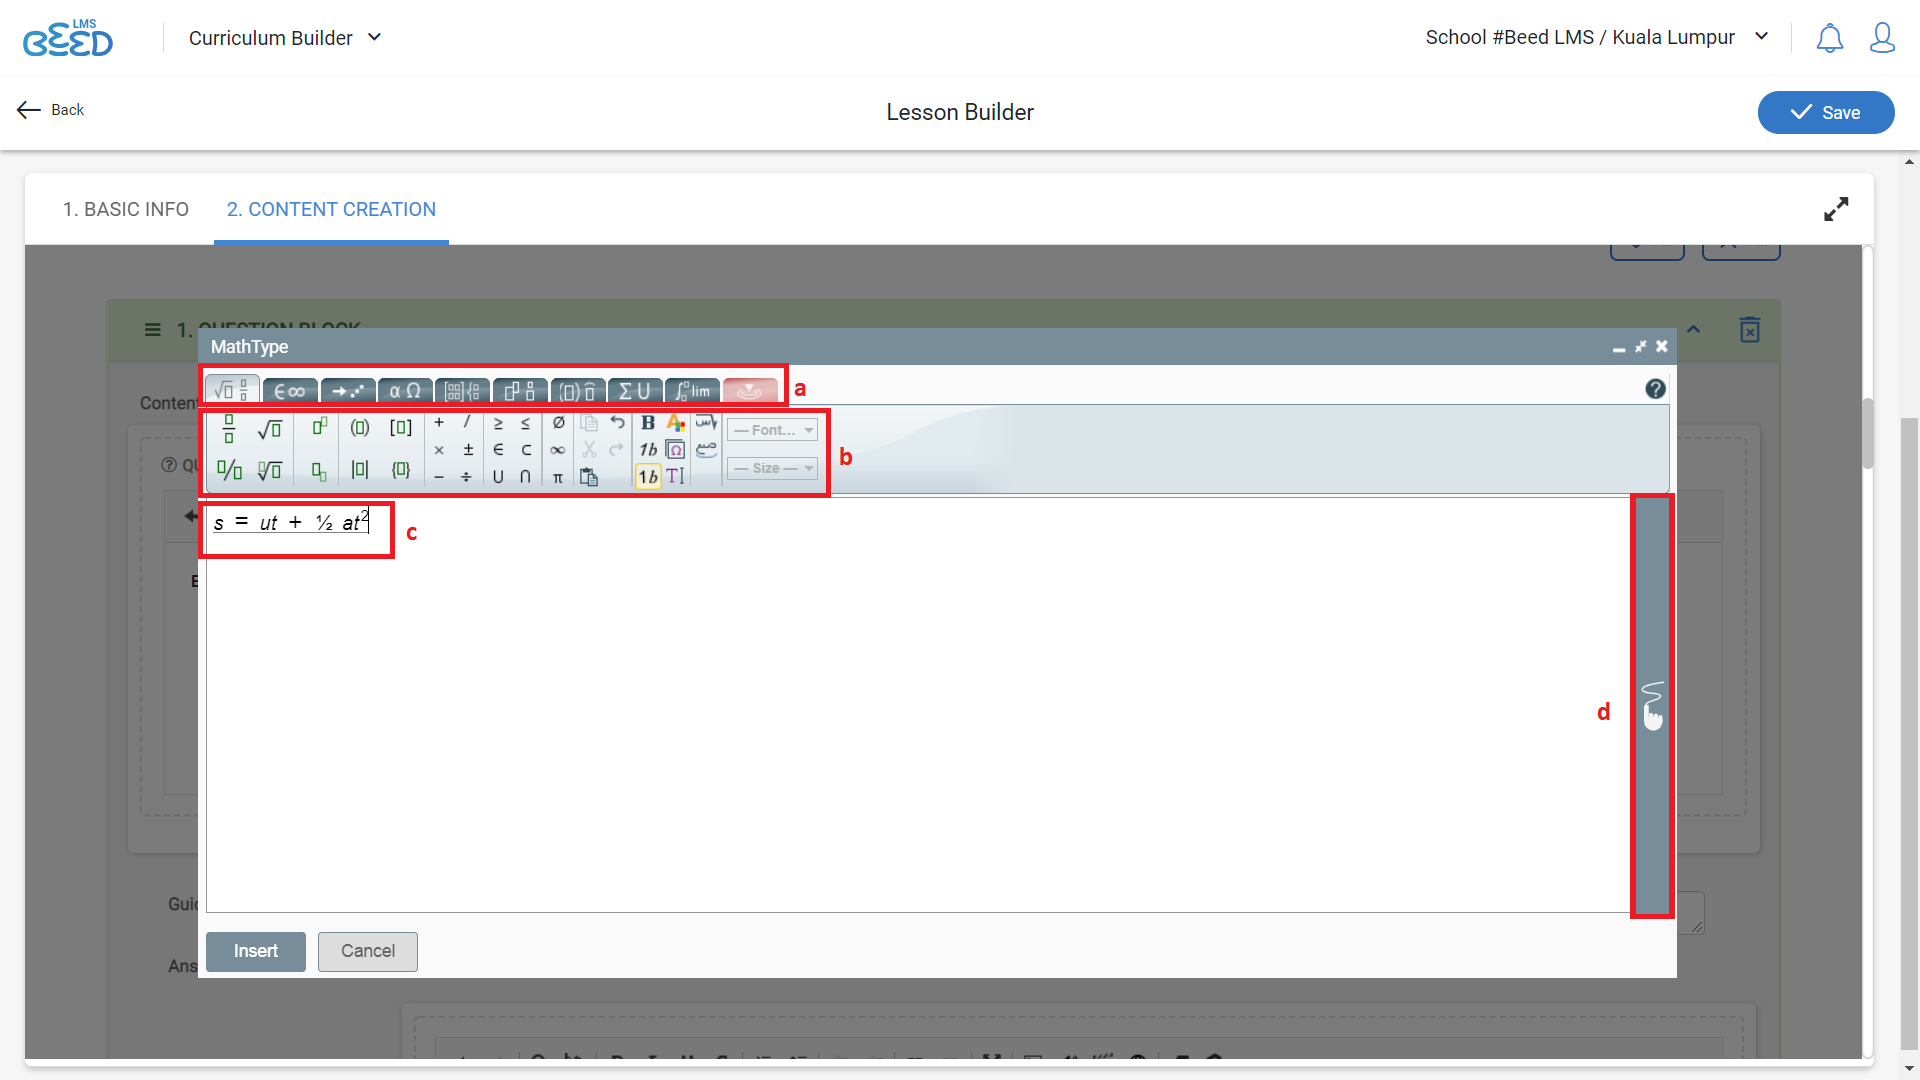
Equation Builder
How do I insert math or chemical equations into my lesson?
1. To add equations into your lessons, click on:
(a) For mathematical equations
(b) For chemical equations

2. An equation builder will popup. Use these buttons to minimise, enlarge or close the builder.

3.
(a) You can swap between categories by clicking on the tabs.
(b) Select the symbols/formats you want to include in your equation.
(c) You can also copy paste equations into the builder to add them into your lesson.
(d) Alternatively, you can write/draw your equation directly by clicking on the "handwriting" icon.
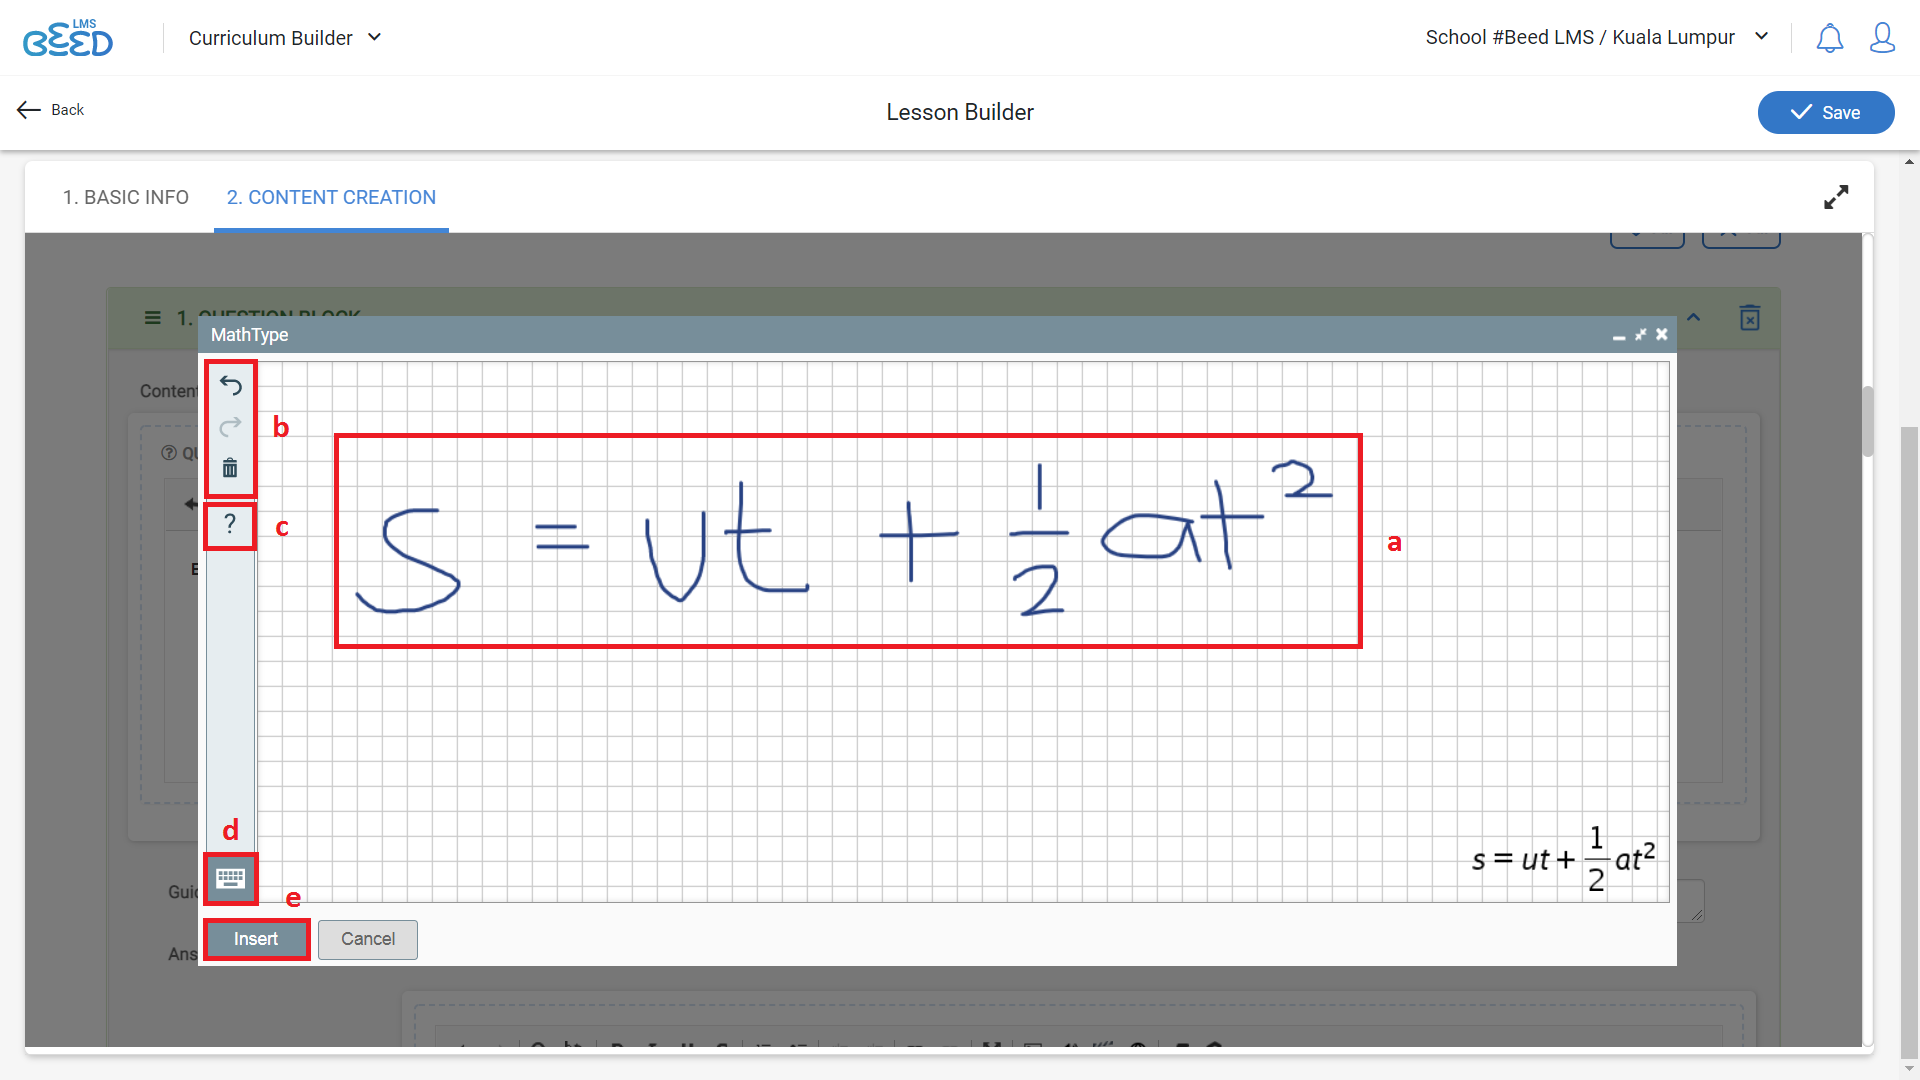
4.
(a) Write/draw you equations directly in the space provided. The builder will then automatically detect the equation.
(b) You can undo, redo or delete written equations using the toolbar.
(c) Click on the "?" for quick tips.
(d) Click on the keyboard icon below to return to typing mode.
(e) Once you are satisfied, click on Insert to add your equations into your lesson.
5. The equation will be added into your block as an image. Double click on your equation to edit it.

6. For more advanced tutorials on using the equation builder, visit our partner website.
Subscribing to Resources
Wikipedia for Educators
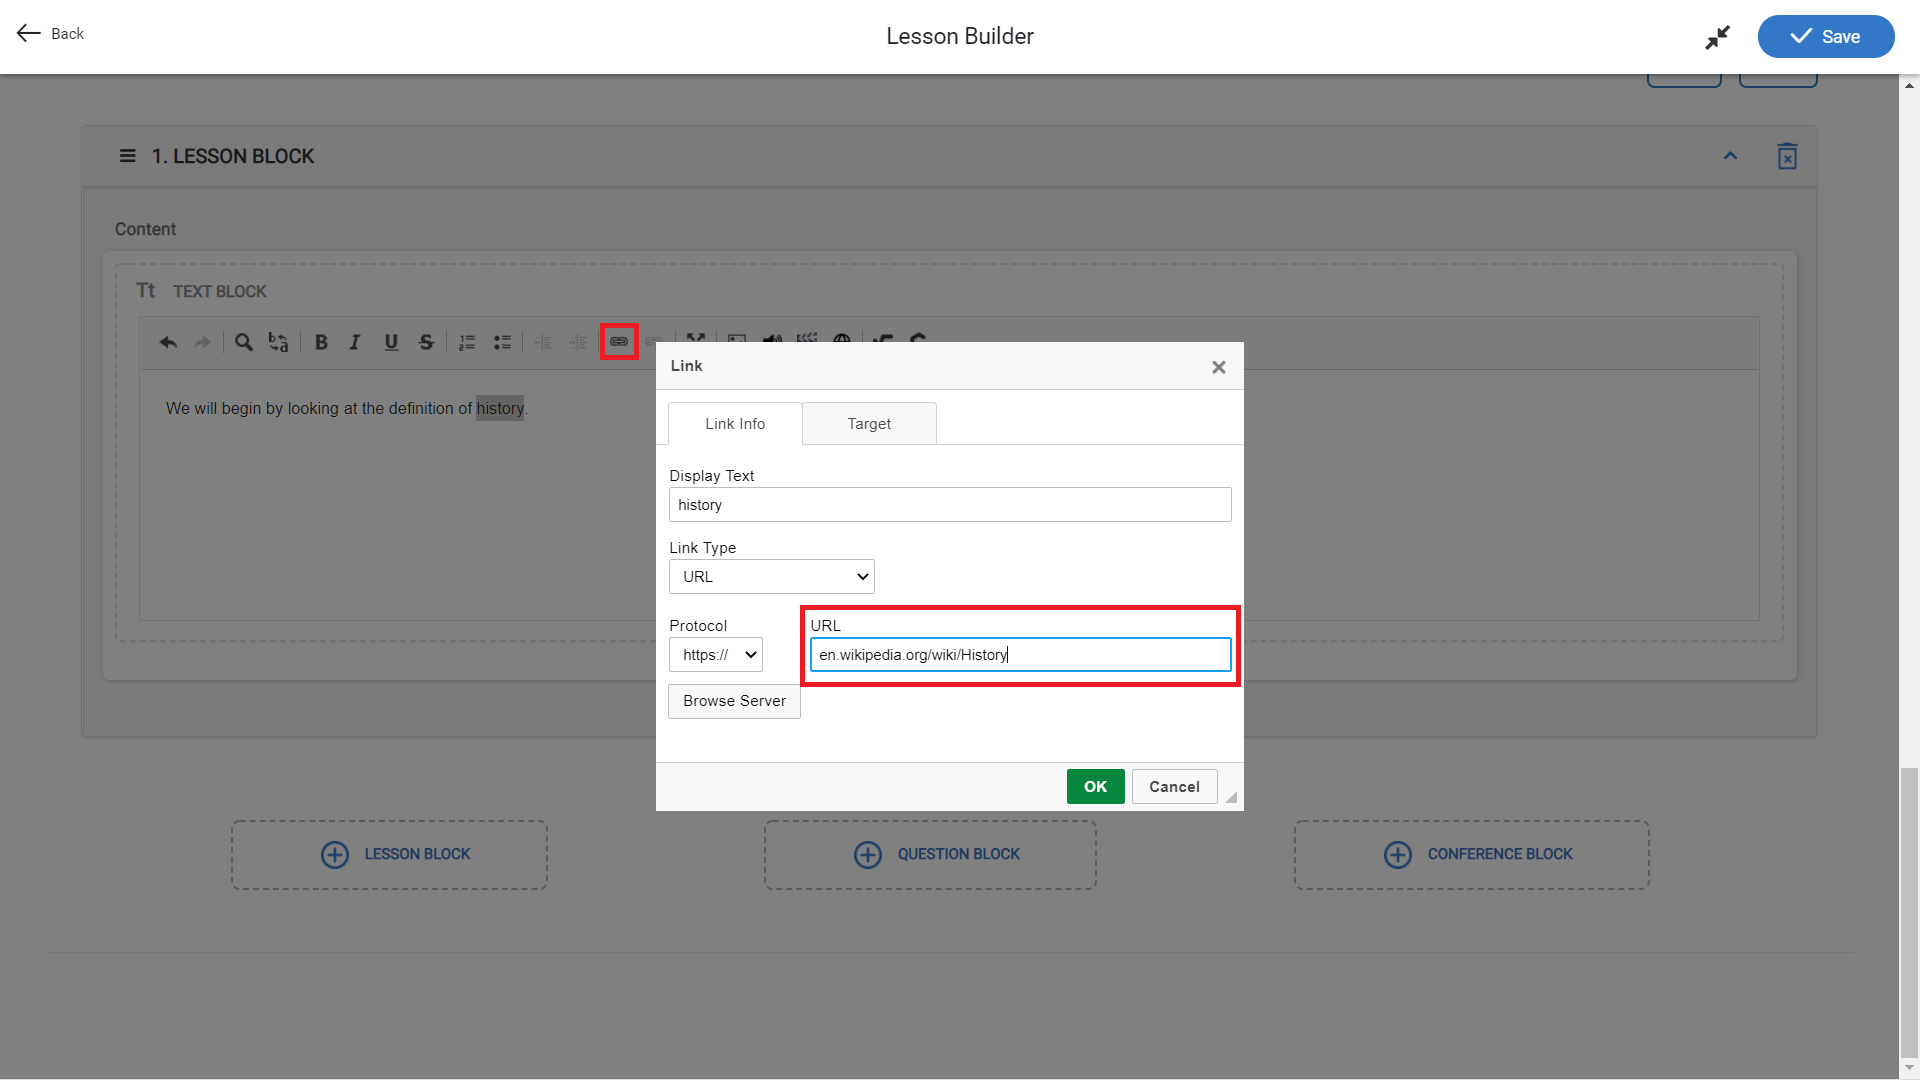
1. To begin, highlight the word or phrase that you want to search for in your block and click on the Resources icon.

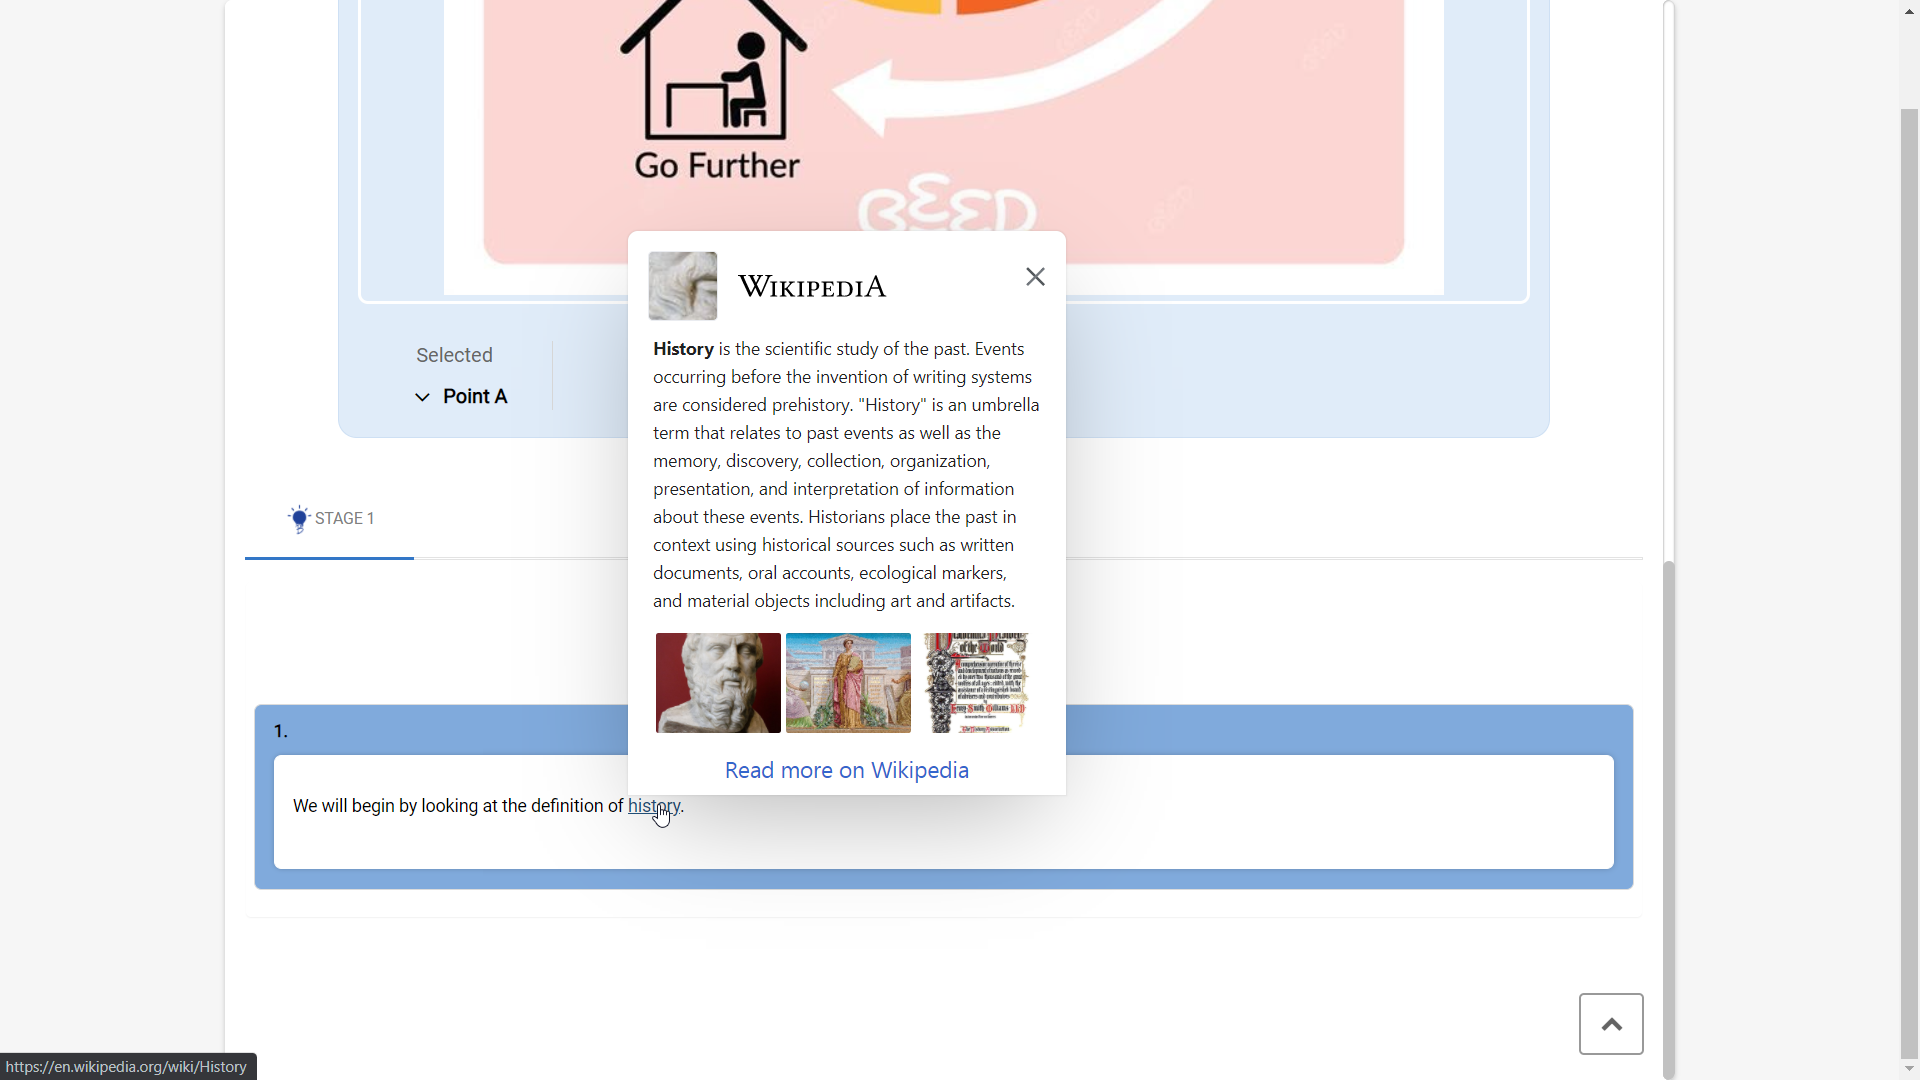
2. This will open the Wikipedia page for your highlighted word or phrase in a pop up. Use it for reference as you write your lesson, or link it to your learners.

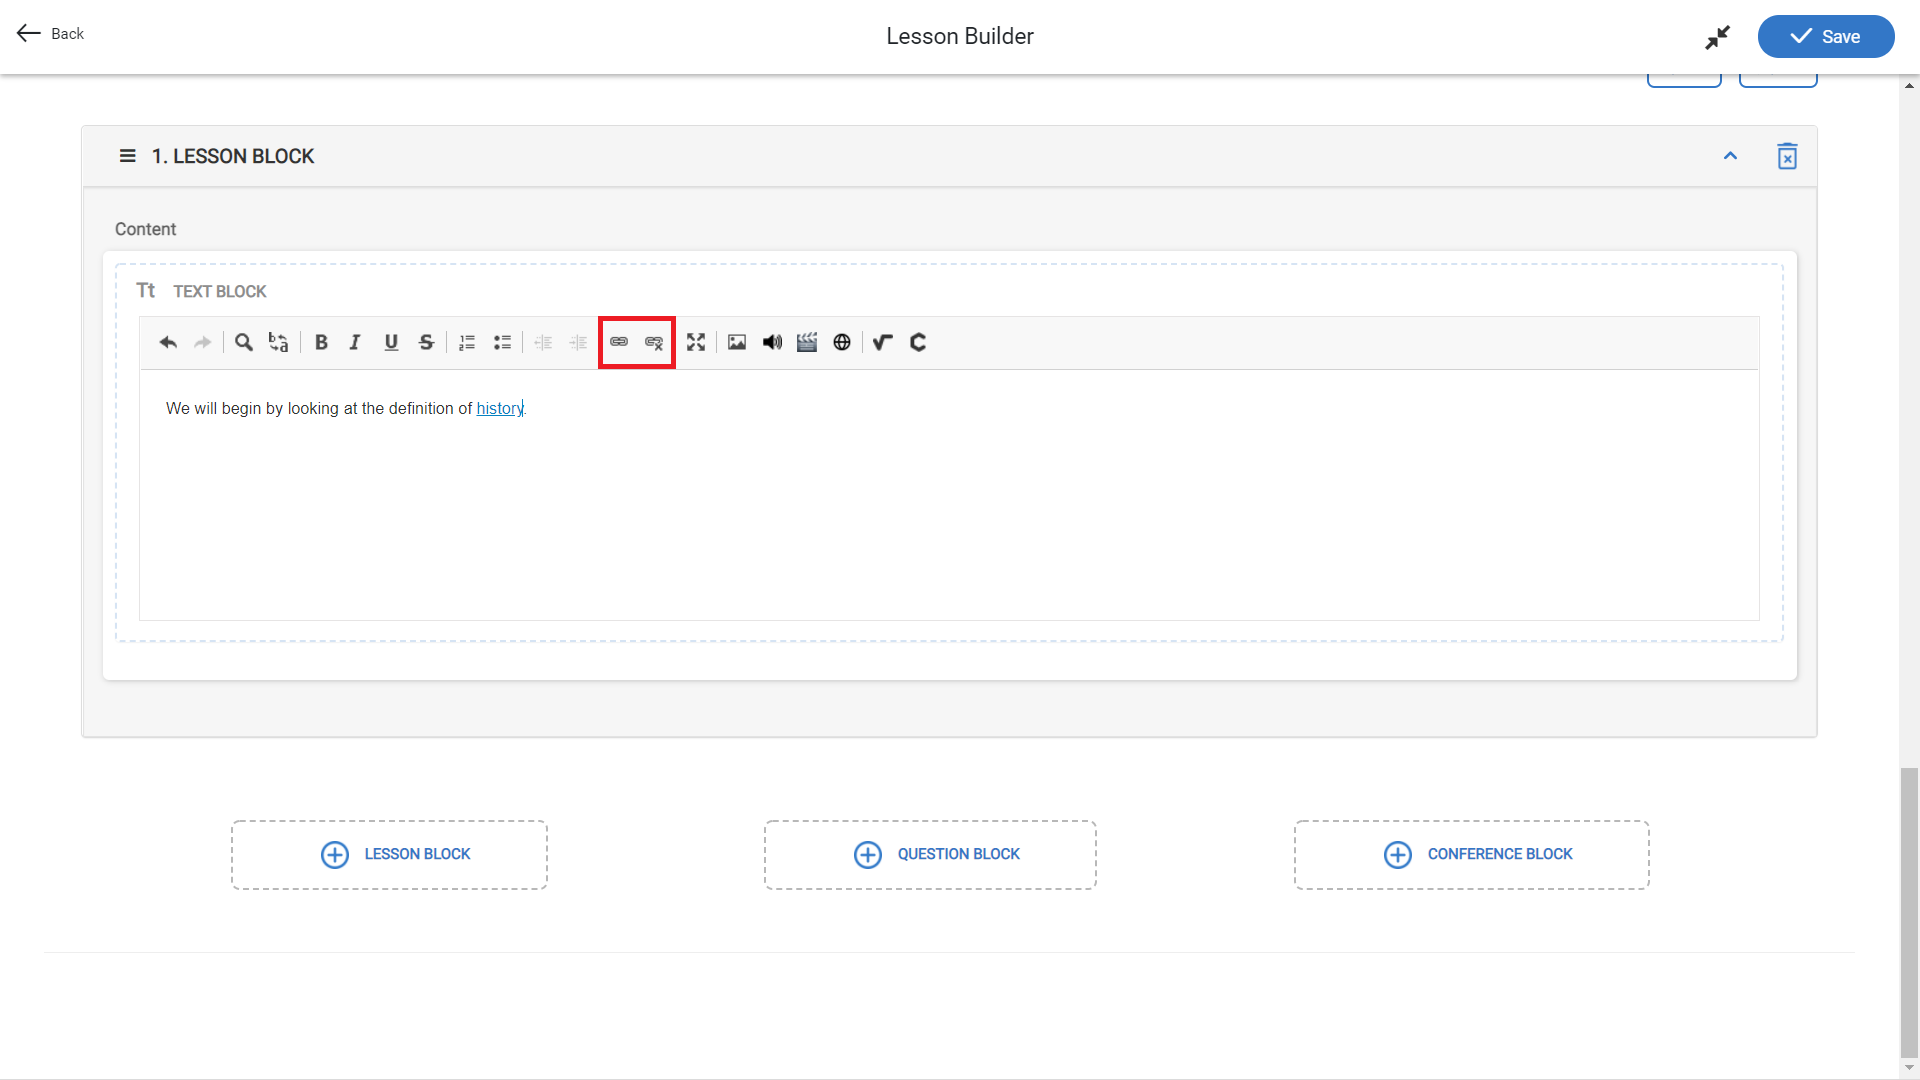
3. Click on the Link icon to add the article URL into your lesson. Paste the article URL into the URL field and click OK.
4. Once the phrase is linked to your URL, it will turn blue and underlined. You can click on the linked phrase and select the link icon to edit your link or the unlink icon to unlink the URL.
5. Your learners will now be able to preview the linked Wikipedia article directly from their lesson by hovering over the linked word or phrase.
No Comments